Batch Processing Batch Processing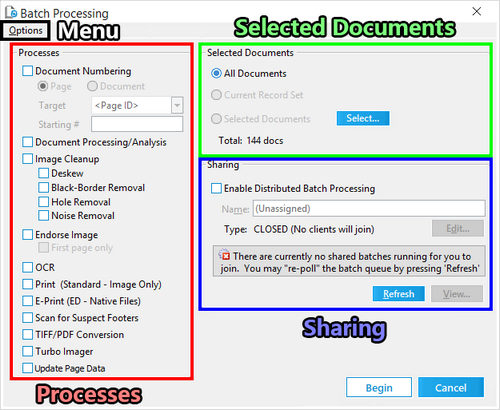
Selected Documents
Use this section of the Batch Processing Utility to determine which documents should be processed:
•All Documents - All documents from the active Case File will be processed. This will initially be the only option available when launching the Batch Processing Utility from the Main User Interface. •Current Record Set - Documents belonging to the current record set (from the Grid View or Database Query Builder) will be processed. •Selected Documents - Only user-selected documents will be processed. Use the Select... button to choose those documents and/or their Case Directory folders. oSelect... - This button opens the Select Folders window, allowing you to navigate through the Case Directory to select entire folders to process. With a folder selected, you can also click on the Set Range... button to open the Set Document Range window, which will let you select specific documents from within those folders instead. Note that selecting any document/attachment will automatically include all attached/parent documents as well. From within either of these windows, use the Select All button to select all available documents/folders, the Clear All button to remove all selections, and the OK button to confirm your selections. •Total - Displays the total number of documents currently selected for processing. You can display the total numbers of pages as well by enabling the Calculate total pages in batch/export dialogs option from the Main User Interface (Tools > Options... > Preferences). Note that this may cause a delay when opening the Batch Processing Utility. Processes
Use this section of the Batch Processing Utility to determine which Processes should be performed:
•Document Numbering - Assigns alphanumeric values to Selected Documents at either the Page or Document level. oTarget Field - Select a Metadata Field from this drop-down to use as the output. Only user-created Text type fields (unlocked) are permitted. oStarting # - Enter a starting value, which will automatically increment by 1 for each record processed. oA Knowledge Based Article on this subject can be found here: How do I number documents in LAW? (cloudnine.com) and more information on number can also be found here: Document Numbering •Document Processing/Analysis - Extracts metadata from the Selected Documents, creates EP Fields based on this data, and populates these fields with the extracted data. oUse the Document Analysis Options window (Options > Document Analysis Options...) to configure the related settings. •Image Cleanup - The following processes can help improve the legibility/visibility of page images for Selected Documents: NOTICE: Non-merged annotations are lost when running any Image Cleanup process.
oDeskew - Straightens images that appear crooked or misaligned. oBlack-Border Removal - Removes black edges from the borders of images. If these borders are uneven or angled, then they will not be removed automatically. oHole Removal - Removes visible holes from the images of hole-punched pages. Only standard-sized holes (1/4" - 5/16") are supported. oNoise Removal - Reduces the amount of dots/specks that can appear randomly on page images. This noise often reduces the accuracy of OCR. oThe letters o and e and zeros, are ignored by the hole removal process. If needed, the image borders can be configured for removing holes on images from the Configure Scan Filters dialog box (Scan > Scan Options > Configure Filters). •Endorse Image - Applies the same Header and/or Footer to all pages of Selected Documents, by adding them as extra borders onto their page images without overwriting any data. Use the Header/Footer options window (Options > Header/Footer...) to configure related settings. Watermarks can also be applied during this process when enabled in the Watermark Settings window (Options > Watermark...). oFirst page only - The Header and/or Footer will only be applied to the first page of Selected Documents instead of all pages. However, any annotations existing on these pages will be lost. Unless they have been merged in. oA Knowledge Based Article on this subject can be found here: How do I endorse documents? (cloudnine.com) •OCR - Performs Optical Character Recognition on flagged (Y) records for Selected Documents. Use the OCR Options window/tab (Options > OCR Settings...) to configure the related settings. •Print (Standard - Image Only) - Prints the Selected Documents from within LAW using their available images. Use the Batch Print Options window (Options > Print Options...) to configure the related settings. Watermarks can also be applied during this process when enabled in the Watermark Settings window (Options > Watermark...). •E-Print (ED - Native Files) - Prints the Selected Documents from within their native applications (displayed in the SourceApp field). Requires those applications to be installed on the local machine. Use the E-Print Options window (Options > E-Print Options) to configure related settings. •Scan for Suspect Footers - Scans all pages of Selected Documents for Footers (endorsements) that appear to be 1" or larger, and flags them within the selected user-created Metadata Field (Text fields only). When this process is enabled, but has yet to be run before for the active Case File, then the Invalid Suspect Field dialog will appear once Batch Processing has started. Press OK at this dialog to open the Select Field for Suspects window, where a list of Available Fields can be selected from for flagging purposes. •TIFF Conversion - Converts the Selected Documents into TIFF format from within their native applications (displayed in the SourceApp field). Requires the necessary source applications to be installed on at least one machine taking part in this process. Use the TIFF Conversion Options window (Options > TIFF Options...) to configure related settings. •Turbo Imager - Quickly converts the Selected Documents into TIFF or PDF format. Source files are not opened via their native applications with this conversion method. Progress can be monitored within the LAW Management Console, and converted images become available within the $Image Archive folder of the Case Directory once completed. Use the Turbo Imager Options window (Options > Turbo Imager Options) to configure related settings. •Update Page Data - Records containing empty PageColor, PageSize, PageWidth, or PageHeight fields will have those fields populated with the relevant data. Menu
•Options - Allows you to open the various Batch Processing Options windows. Sharing
Use this section of the Batch Processing Utility to configure options for Distributed Batch Processing, which allows multiple machines to contribute to the same batch process.
NOTE: Only the Image Cleanup, Endorse Image, OCR, Scan for Suspect Footers, TIFF Conversion, and Update Page Data processes are available with this feature.
|