Using the Scan Toolbar
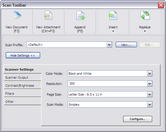
The Scan Toolbar provides quick access to all scan-related functions and settings. The Scan Toolbar also allows you to create scan profiles that can be used to quickly change between predefined settings for different document types, such as those for color photos, duplex documents, or single-sided black and white documents. All available scan settings can be saved with a scan profile.
Until the first scan profile is created, all scan settings will be saved to the "<Default>" scan profile. This profile will always exist and cannot be deleted. After one or more profiles are created, the designated scan profile will be stored at the case level, allowing you to retain case- or customer-specific scan settings. Changing cases will automatically restore the scan profile that was last used in the case.
Scan profiles are specific to a particular scanner model due to differences in the settings available for each scanner, for example, color modes, page size, and resolution. So although scan profiles can be shared between users if desired, they can only be shared by users on workstations with the same scanner model. A user or workstation with one scanner model will not be able to see shared profiles for a user or workstation with a different scanner model.
Scan Toolbar features
|
To open the Scan Toolbar
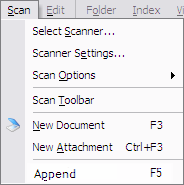
There are two ways to open the Scan Toolbar dialog box: •On the Scan menu, click Scan Toolbar.
OR •Double-click the scan profile name in the scanner status bar located at the bottom of the main LAW application window. Note that if a scan profile has not been created the profile option is marked as <Default>. This is shown in the following graphic:
If a custom scan profile is loaded, it is shown in place of <Default>. In the following graphic a profile named Scan Profile 1 is loaded.
|
1.On the Scan menu, click Scan Toolbar. Clicking Scan Toolbar opens the Scan Toolbar dialog box. 2.Click the New button. Clicking the New button opens the New Profile dialog box. 3.In the Name field, type the scan profile name. 4.In the Scope list, click one of the following: •Shared (Available to all users) •Local (Available to only you) 5.If you want to assign a keyboard shortcut to the scan profile, in the Hot Key list, click one of the available keyboard shortcuts. When a keyboard shortcut is added to a scan profile, the shortcut is no longer available for selection. 6.Click OK. Clicking OK creates the scan profile and closes the New Profile dialog box. 7.In the Scan Toolbar dialog box, click the Show Settings button. Clicking the Show Settings button expands the Scan Toolbar dialog box to display all the scan settings. 8.Define the scan profile settings. The scan profile settings are automatically saved when the Scan Toolbar is closed or another scan profile is selected in the Scan Profile list.
|
The Default and custom profiles can be edited, but the Default profile name, scope, and shortcut key settings cannot be modified. 1.On the Scan menu, click Scan Toolbar. Clicking Scan Toolbar opens the Scan Toolbar dialog box. 2.In the Scan Profile list, click the profile you want to edit. 3.If you want to edit a profile's name, scope, or shortcut key, in the In the Scan Profile list, click the Edit button. Clicking the Edit button opens the Edit Profile dialog box. 4.Make the applicable edits, and then click OK. 5.In the Scan Toolbar dialog box, modify the applicable scan settings. The scan profile settings are automatically saved when the Scan Toolbar is closed or another scan profile is selected in the Scan Profile list.
|
Note the following when deleting scan profiles: •A local profile can only be deleted by the user who created it. •A shared profile can be deleted by any user. Deleting a shared profile deletes it for all users. 1.On the Scan menu, click Scan Toolbar. Clicking Scan Toolbar opens the Scan Toolbar dialog box. 2.In the Scan Profile list, click the profile you want to delete. 3.Click the Edit button. Clicking the Edit button opens the Edit Profile dialog box. 4.Click the Delete button, and then click OK. The Delete Profile dialog box opens. 5.Click Yes. The profile is deleted.
|


