Scanning
After you have selected and configured your scanner you are ready to begin scanning. All newly scanned documents are saved in the currently selected folder. Be sure to change the folder selection as needed.
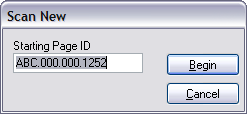
1.From the main window, open a folder. 2.On the Scan menu, click New Document. Or •Press F3. The Scan New dialog box opens. If this is the first page in the case then the Starting Page ID is blank, otherwise the next available Page ID is provided.
3.Add or edit the starting page ID and then click Begin. All newly scanned documents are added to the end of the folder.
|
To continue a scan batch using a delay-enabled scanner If scanning from the document feeder, CloudNine™ LAW scans until the feeder is empty. Some scanner models have a delay option that allows users to insert more pages after the feeder is empty and then to continue scanning in the same batch. This is helpful if scanning large documents that exceed the capacity of the feeder or multiple documents separated by barcode document break sheets. •Consult your scanner documentation for information on using its delay feature.
To continue a scan batch using a scanner without a delay feature 1.On the Tools menu, click Options. 2.Click the Preferences tab. 3.Select Prompt to continue scanning when feeder is empty. You will be prompted to insert more pages when the feeder is empty.
|
You can add attachments during or after scanning.
To add an attachment manually •On the Scan menu, select New Attachment. Or •Press CTRL+F3. The new document is added as an attachment to the last document in the current folder.
To scan documents as attachments using break sheetsYou use an attachment barcode break sheet during scanning to designate a document as an attachment. An attachment barcode break sheet is a special type of barcode break sheet that signifies that the document that follows is an attachment.
Note the following facts when using barcode break sheets: •If using barcode break sheets to scan multiple documents, each attachments must be preceded by an attachment break sheet. •The break sheet for attachments is named attach1.tif and can be found in the installation directory for CloudNine™ LAW. •A shortcut to this file (Attachment Break #1) can be found in the Break Sheets subfolder in the LAW program group. •Documents preceded by an attachment break sheet will always be attached to the previous parent document. Therefore, to scan a document with three attachments, a standard document break sheet must precede the parent, and an attachment break sheet must precede each of the three attachments. •After you scan an attachment, you can check that the attachment was itemized as an attachment by looking at the item number of the document. Attached documents appear indented in the document list to indicate that they are attached to the previous document. For example, in the following figure, item number -- 0002 is an attachment of item number 0001.
|
You can insert document that were missed at scan time. This feature is very important because, unless documents are specified by a query, the scan order determines the order of all processing functions, such as batch processing and exporting. The insert document function can be used to insert multiple documents if the "Detect Barcode Breaks" setting is enabled and the pages are separated by barcode break sheets. 1.On the Edit menu, click Insert. 2.Click one of the following: •Scanned Document •New Page(s) •Existing Page(s) and then follow the prompts to select one or more existing images to insert. The inserted document will be placed above the currently selected document in the current folder.
|
You can add one or more pages to the end of the currently selected document. 1.Select a document to which you want to add pages. 2.On the Scan menu click Append. Or •Press F5. The new page(s) are added to the end of the selected document.
|
You can replace pages within a document or replace an entire document.
To replace pages 1.Select a document. 2.On the Edit menu, click Replace, and then click Page(s). Or •Press F6. The new pages will replace the current page forward for as many new pages are scanned. To replace an entire document 1.Select a document. 2.On the Edit menu, click Replace, and then click Document. Or •Press CTRL+F6. If replacing pages, both replace pages and document work the same as the append and insert page functions, disabling the detection of barcode breaks.
|
| To replace documents with file images |
1.Select a document. 2.On the Edit menu, click Replace, and then click Image from File(s). The entire document is replaced by the image file. Only one existing image may be selected when using this feature.
|


