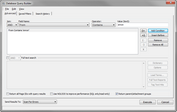
1.Start the Query Builder. Do one of the following: •From the main window, on the Tools menu click Search Records. Or
•On the ribbon, click the Search Records button ( ). ). The Database Query Builder dialog box appears.

2.Create the search query for the search results you want to scan for errors. For more information about creating search queries, see Creating Queries and Full Text Searching.
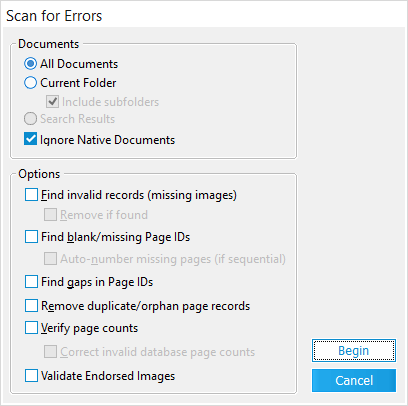
3.Select the output options as needed: •Return all Page ID's with query results - Select this option to return a page-level query for the returned documents. The grid view will display a record for every page of each document. Additional page-level fields also become available after selecting this option. •Return parent/attachment groups - Displays documents matching the specified search criteria and will also display any parents or attachments of those documents. This does not imply that both the parent/attachments also match the search criteria, however. Enabling this option may require additional time for the query to return results. •Use NOLOCK setting to improve performance (SQL only/read-only) - This option can help to improve performance of queries of SQL Server-based cases. With this option, the result set is read-only, and updates will not be available in the grid. The NOLOCK setting should only be used in cases where updates in the grid are not necessary, for example, when executing a query that will be used to run a batch process or export. 4.In the Send Results To list, click Scan For Errors. 5.Click Execute. Clicking Execute opens the Scan for Errors dialog box. The Search Results option and Ignore Native Documents check box are automatically selected in the Documents section.

6.Select options to customize the scan and then click Begin. Options to customize the scan are described in the following table:
Option
|
When you want to
|
All Documents
|
Scan all documents for errors.
|
Current Folder
|
Scan only documents in the current folder for errors.
|
Include subfolders
|
Scan documents in all folders within the current folder for errors.
|
Search Results
|
Scan documents in the current search results. This option is only available when the Scan for Errors dialog box is opened from the Database Query Builder dialog box.
|
Ignore Native Documents
|
Prevent native documents (records without images) from being repeatedly scanned and logged as errors.
|
Find invalid records
(missing images)
|
Verify that each record in the database has a corresponding image.
|
Remove if found
|
Remove invalid records.
This option is useful if you have used Windows or some other program outside of LAW to delete or move files.
These actions could cause LAW to contain records that do not point to valid images. These extra records can affect processing and summary functions, so users should remove them.
|
Find blank/missing Page IDs
|
Find documents with pages that have blank or empty Page ID entries.
Whether intentional or simply operator errors, certain export formats require non-blank Page ID entries for renaming or linking purposes. This option provides a way to find the documents with blank entries so users can take the appropriate measures to correct them.
To add page IDs to pages that have blank or empty Page ID entries after they are found:
1.Open the standalone grid display. 2.On the Query menu, click Blank Page IDs. A 'missing' Page ID is defined as being a document record with an incorrect number of page-level records. Since each document should have the same number of page-level records as the document's page count, this check ensures (for example) that a 5-page document has exactly 5 records in CloudNine™ LAW's page table. If any missing page records are found, LAW will automatically sequentially number the PageID values of the missing page level records if Auto-number missing pages is selected.
|
Find gaps in Page IDs
|
Find gaps or breaks in the numbering sequence.
Pages in a case are typically numbered sequentially. Sometimes, however, there may be breaks in the numbering sequence. This option allows users to find these breaks to ensure that all pages are accounted for and to confirm these breaks, if any, are intentional and correspond to the original documents.
|
Remove duplicate/orphan page records
|
Fix duplicate page records or records that consist of orphan pages.
Duplicate page records can result when a document contains two "page 3's" for example. Since there can only be one 'page 3', this record is safe to remove. Duplicate records can be detected while numbering a range of documents as it causes a duplicate PageID to be detected during this process.
An orphan page record is a page level record that no longer belongs to an existing document. This may have occurred after a document was deleted, but a failure occurred deleting the page records for the deleted document. These records are also safe to remove from the database.
|
Verify Page Counts
|
Validate the page count of every image in the case that has a record.
CloudNine™ LAW opens every image and compares the actual page count with the page count stored in the database.
If the page count in the database is incorrect, it is updated, provided the Correct invalid database page counts option is selected. Because every image has to be opened, this option can be very time consuming for large cases. However, this option has several benefits. First of all, it ensures that the total page count displayed in the Case Summary is accurate for billing purposes. Second, by opening every image file, it ensures that none of the images have become corrupted (if they are, it will be logged). Third, it ensures that there are no excess Page ID entries (entries for pages greater than the actual page count) that can affect the export process.
|
Validate Endorsed Images
|
Validate the endorsements applied using batch processing.
If the process finds an image that is not the expected size of the applied endorsement or white space where an endorsement is expected, the file is logged in a TXT file saved in the %temp% document. The ID, DocID, and Error Message are included in the log.
|
|


