One method of creating a permanent tag structure is to write tags directly into an INI file. A database's INI file stores various database configuration settings. Tags created in this file cannot be deleted in the Tag and Issue Management box.
When tags are created in Concordance Desktop or in the TRK file, the tags are not automatically written to the .ini file. To add tags to the .ini file, you need to manually write them into the file. Once tags are written in the .ini file and available in the Tags task pane. Once a tag is applied, the tags are automatically written to the .trk file.
The » ASCII character is used to identify the folder structure of the tag. The ASCII character for this symbol is 187. You can create a shortcut for the symbol in Microsoft Word on the Symbols tab in the Symbol dialog box. For example, you can create a shortcut of F10+K for this character.
For more information about delimiter characters, see About delimiter characters.
Once you have written tags to an .ini file, you can save time creating tags for another database's .ini file by copying and pasting the entries from one database .ini file to another.
|
If you are renaming tag or tag folder names in the .ini file, the Tags pane displays both the original and renamed tags. Renaming tags does not affect *.ini file tags. |
To Write Tags in the INI File
1.Navigate to the database's .ini file.
i.The .ini file is stored in the same directory as the database .dcb file.
2.Open the .ini file in any text editor program.
|
INI files can be opened with any text editor program, such as Notepad. We recommend using an advanced text editor program like TextPad or NotePad ++. |
i.In the .INI file, the different database configuration settings are designated by the [] symbols around the configuration category. For example, field groups are listed under [FieldGroups], and added menu items are listed under [AddedMenuItems].
ii.Tags are added after the [Tags] category, and each tag has a separate line in the .ini file.
3.If the .ini files does not have a tags list, type [Tags] in a new line to create the tags list.
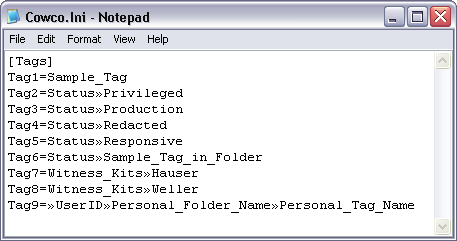
4.Add the tags below the [Tags] line using the following format:
•To add a tag outside of a folder, type: Tag#=Tag_Name
•To add a tag within a folder, type: Tag#=Folder_Name»Tag_Name
•To add a personal folder and tag, type: Tag#=»UserID»Personal_Folder_Name»Tag_Name
i.Use underscore characters to indicate spaces in a tag or folder name.
|
To enter the ASCII character, », press ALT+0187 on the number pad. If you are using a laptop, press ALT+FN+0187 (blue numbered keys - UILKJ and M). |
ii.In the image above, one tag, Sample tag, was created outside of a folder. There are five tags, Privileged, Production, Redacted, Responsive, and Sample Tag in Folder, created in the Status Folder, there are two tags, Hauser and Weller, created in the Witness Kits folder, and a personal folder and tag.
5.Save and close the modified .ini file.
6.Open the database in Concordance Desktop.
7.Open the Tags task pane to verify that the tags and folders you added are displayed.
i.If the Tags task pane was open while you wrote tags to the database's .ini file, the tags you added will not be displayed until you leave and reopen the Tags task pane. For example, open the Databases task pane and then reopen the Tags task pane.