When importing emails and attachments into Concordance, it’s best to create an Email database for these files because they contain unique coding for the author and recipients, include a parent and child structure that needs to be preserved, and attachments that need to be retained. All of these components are critical metadata that can easily be altered, spoliating original records and damaging critical information regarding who knew what and when. Once damaged, this information is nearly impossible to restore and is irretrievable after the import process.
Concordance is able to import .pst formatted files that are associated with a Microsoft Outlook profile on your machine. You need to have Outlook installed with a mail profile set up for each custodian, so you can associate each .pst file to an Outlook profile. This should be done before using the Import e-mail wizard in Concordance.
Concordance provides an Email database creation wizard, which includes typical metadata fields from Outlook and takes care of the field mapping for you. The wizard also allows you to create and modify fields as needed. See Creating an Email and Attachments Database for more information.
A Knowledge Based Article on this subject can be found here: How do I create a Dummy Profile? (cloudnine.com)
You may also want to consider how you are using Concordance in terms of production so that the content can be reviewed and redacted. If your organization is using:
•Concordance Native Viewer - the View e-mails in Concordance Native Viewer option must be selected in the Import e-mail - Attachments dialog box to ensure the Concordance Imagebase (CIB) file is created (for new records only).
•Concordance Image - e-mails need to be processed into images with a corresponding .dat and image load file.
Import E-mail and Attachments
Email is imported into Concordance using the Import email wizard. The Import e-mail wizard automatically establishes parent-child relationships with the e-mail messages and their attachments. This provides efficient and comprehensive searching and saves time in document loading.
|
When importing emails into a concatenated database, e-mails are updated when the fields of an imported e-mail match an existing email. When the fields do not match, the imported email is appended to the main database, which is the first database in the concatenated set. |
1.In Concordance, open the Email database you want to import additional documents.
2.On the Documents menu, select Import, and click E-mail and Attachments. The Choose Profile dialog displays.
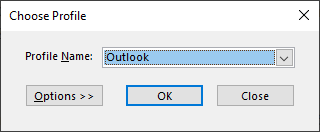
3.From the Profile Name list, select the name of the e-mail profile you want to use (Outlook is the local machine's default e-mail). Click OK. The Import e-mail - Folder dialog displays.
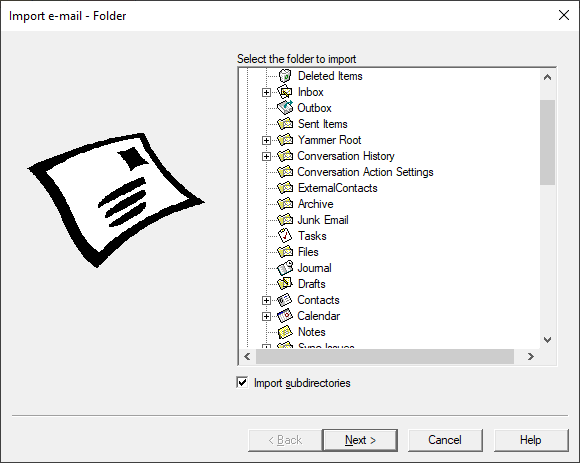
4.Select the folder or subfolder containing email messages that you want to import.
5.To include subdirectories underneath the selected folder, make sure that the Import subdirectories check box is selected.
6.Click Next. The Import e-mail - Attachments dialog displays.
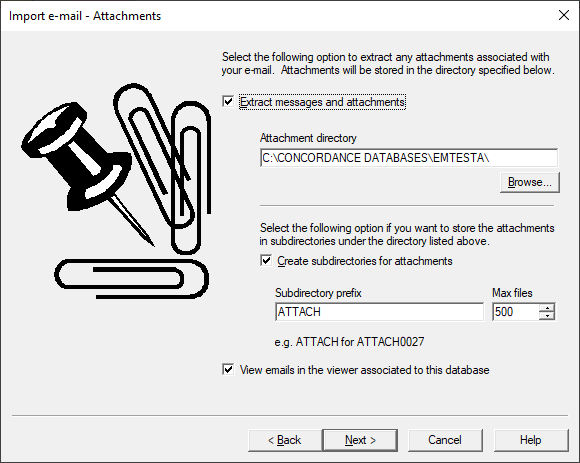
7.To extract attachments, make sure that Extract messages and attachments is selected, then Browse to the directory where you want to store the extracted email files and attachments. The Attachment directory defaults to the email database's directory.
8.It is best practice to store attachments in subdirectories by selecting Create subdirectories for attachments, especially when you are managing large numbers of attachments. When selected, specify a Subdirectory prefix and the Max files allowed in each subdirectory. Subdirectories are named using the prefix you specify followed by a number.
9.Select View emails in the viewer associated to this database if you will be using the viewer for review. Selecting this option creates the Concordance Imagebase (CIB) file that is needed to link email files with the corresponding record in Concordance. The database must have a unique image key field.
10.Click Next. The Import e-mail - Date range dialog displays.
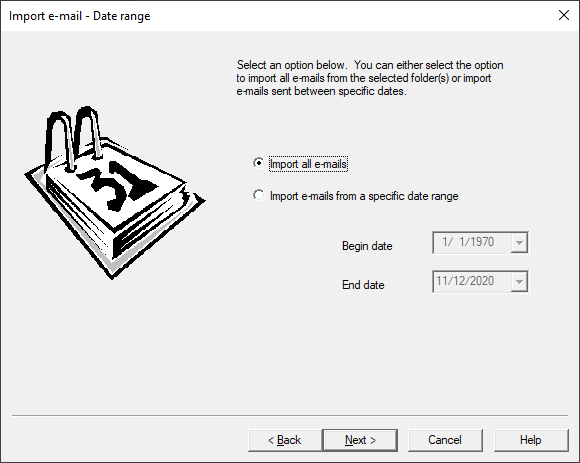
11.Select Import all e-mails to import everything in the previously selected folder, or select Import e-mails from a specific date range to limit the import to emails dated between Begin date and End date.
12.Click Next. The Import e-mail - Fields dialog displays.
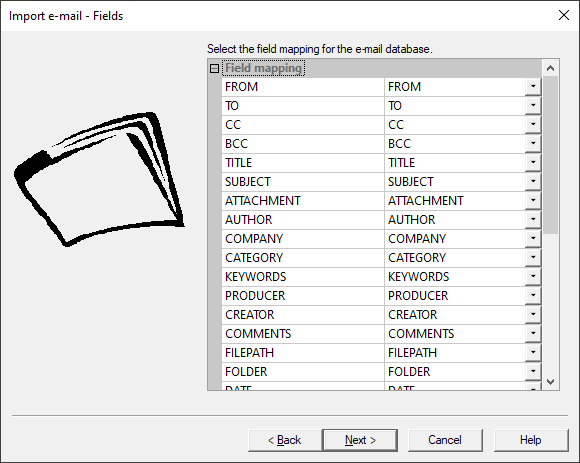
13.The left column displays email message fields, and the right column displays the database fields. Verify that the fields are mapped correctly, and make any adjustments needed by selecting the correct database field using the drop down arrow on the right.
10.Click Next. The Import e-mail - Options dialog displays.
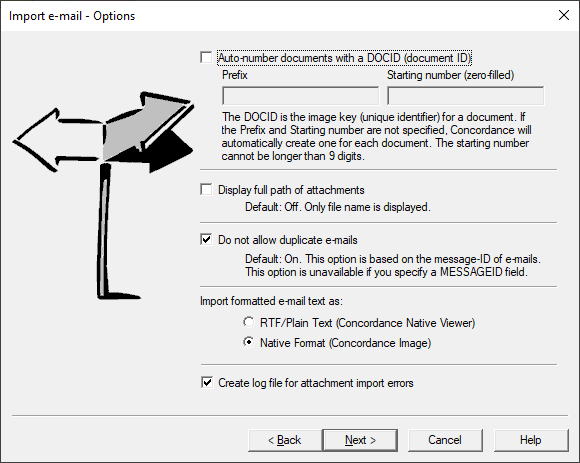
11.Select the Auto-number documents with a DOCID (documentID) to auto number the imported email messages, and then specify the Prefix and Starting number (zero-filled) to use. This option must be selected if you are using Concordance Native Viewer.
12.Select Display full path of attachments to display the full path to attachments.
13.Select Do not allow duplicate e-mails if you do not want to import duplicate emails. Most emails have a unique message identifier called the message-id, which is stored in the MESSAGEID field. Before importing a message, the import wizard checks to see if any previously imported emails have the same message-id. If the wizard finds another record with this message-id, it does not import the message.
14.Select the option you want under Import HTML formatted e-mail text as.
15.Select Create log file for attachment import errors if you want the import to create an import error log.
12.Click Next. The Import e-mail - Finish dialog displays.
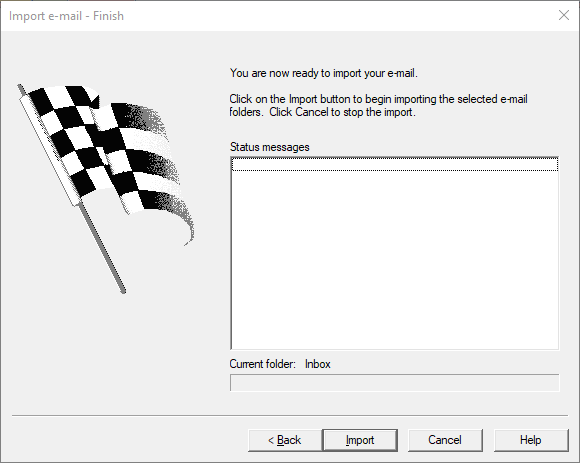
13.Click Import. The import runs and the Status messages field updates to provide information about the import.
14.Click Done to exit the wizard.
15.In the Browse view, verify your email messages have been imported.
16.If you have already indexed the database, reindex the database. Otherwise, run a full index.