|
Prior to creating an Email and Attachments Database, you must have Outlook installed, and the Outlook Data File (.pst) you want to load opened in Outlook. |
1.From the File menu in Concordance, click New.
2.At the prompt, select Yes to use Concordance Viewer, or No for another viewer.
3.In the New Database Creation Wizard, click the E-mail and Attachments button. The Choose Profile dialog displays.
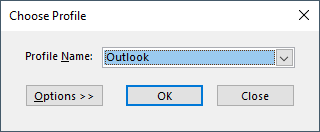
4.Select the Profile Name where the .pst file has been opened. For default local Outlook installations, choose Outlook.
5.Click OK to continue. The New Database Creation Wizard - E-mail dialog displays.
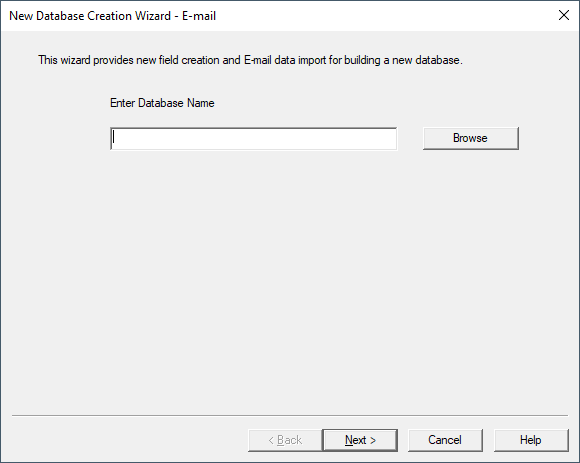
6.Click the Browse button to the right of Enter Database Name, navigate to where you want to save the new database, type a File name for the database, and click Save.
7.Click Next to continue. The Import e-mail - Folder screen displays.
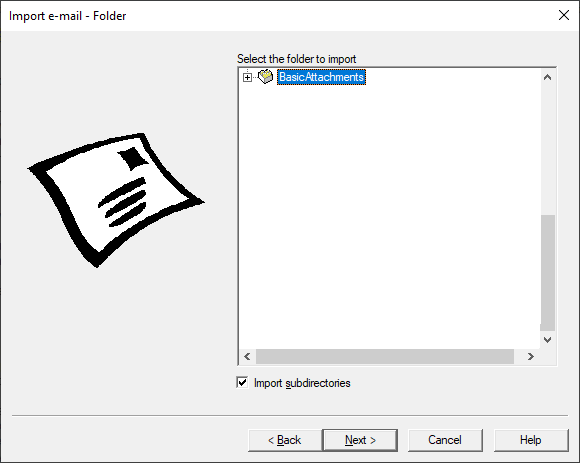
8.Browse the list displayed under Select the folder to import. Select the Outlook Data File (.pst) top-level folder that you want to load. Alternatively you can select a subfolder if you want a smaller set of data. Select the Import subdirectories check box if you want everything underneath your selection to be loaded.
9.Click Next to continue. The Import e-mail - Attachments screen displays.
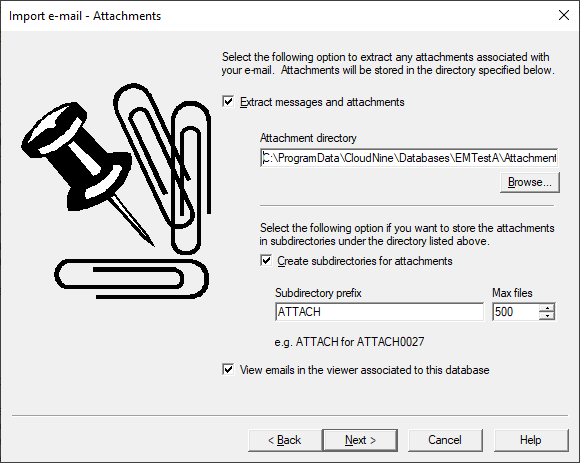
10.To extract the email attachments, select the Extract messages and attachments check box. Click Browse underneath the Attachment directory to navigate to a folder location where the attachments should be stored.
11.If your Outlook Data File contains a large number of attachments, you can also decide to save the attachments in multiple sub-directories. To do this, select the Create subdirectories for attachments check box. In Subdirectory prefix, specify the root name for the sub-directory. Select the number of attachments to put in each sub-directory under Max files. For the example shown above, the root attachment folder is C:\ProgramData\CloudNine\Databases\EMTestA\Attachments. Attachments will be saved in sub-folders, starting with a folder named ATTACH0000 - where the first 500 attachments will be placed. The next 500 attachments will be found in sub-folder ATTACH0001, and so on.
12.Select View emails in the viewer associated to this database to be able to view e-mails in the previously selected viewer during review.
13.Click Next to continue. The Import e-mail - Date range screen displays.
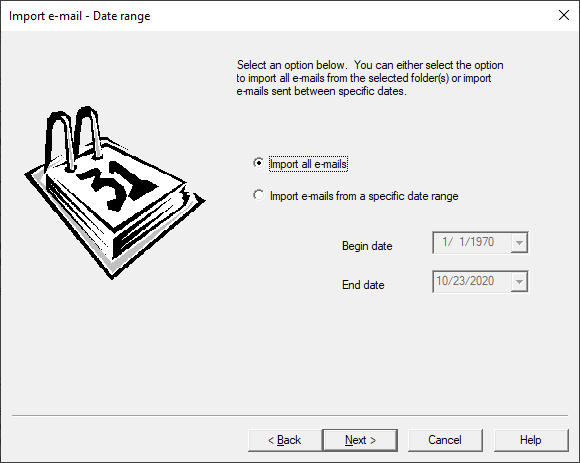
14.To import all e-mail messages from the Outlook Data file, select Import all e-mails. To narrow the e-mail message selection to a smaller time-frame, select Import e-mails from a specific date range and then pick an appropriate value for Begin date and End date.
15.Click Next to continue. The Import e-mail - Fields screen displays.
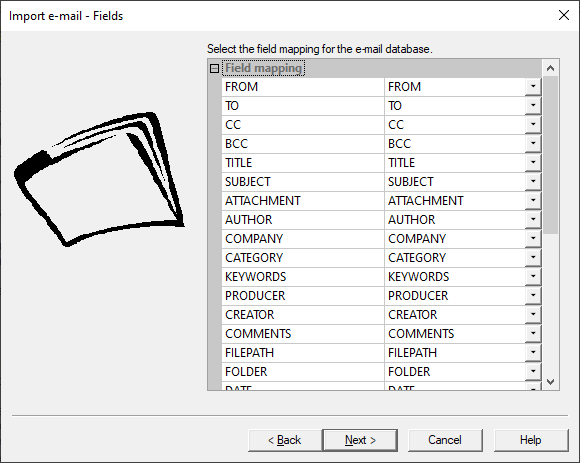
16.The Fields screen allows you to map specific e-mail fields to Concordance database fields. The left column displays the e-mail message fields, and the corresponding field on the right defines the associated Concordance database field. By default, e-mail databases are created using the E-mail and Attachments template, and fields are automatically mapped to the correct e-mail message fields. If your e-mail database did not use a template, you need to map your e-mail fields manually on this screen to load the data.
17.After verifying your field mappings, click Next. The Import e-mail - Options screen displays.
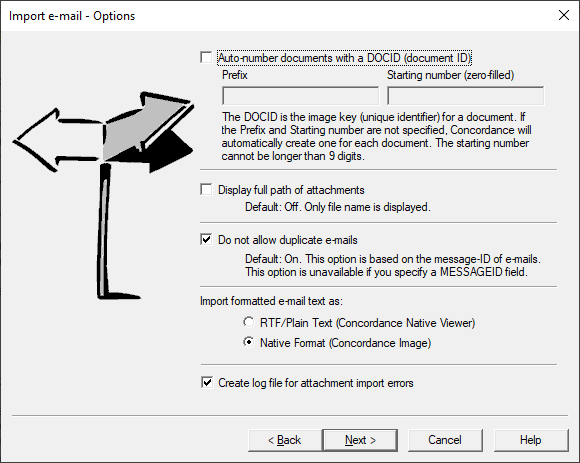
18.If you want to automatically number the imported e-mail messages, select Auto-number documents with a DOCID, and then enter the Prefix and Starting number you want to use. Auto-numbering provides a number for each e-mail message and any attachments, while also tracking family groups in a DOCID and PARENT_DOCID field.
|
If you are using the Concordance Native Viewer with this database, the Auto Number documents with DOCID option must be selected to successfully view the documents. |
19.Select Display full path of attachments to display the full path rather than just the attachment file name.
20.Select Do not allow duplicate e-mails if you want Concordance to ignore duplicate e-mails. Messages with the same MESSAGEID as an existing message will not be imported.
21.Select an option for Input formatted e-mail text as. Choose RTF/Plain Text if you are using Concordance Native Viewer, otherwise choose Native Format.
22.Select Create log file for attachment import errors if you want the wizard to generate an import error log.
23.After selecting your options, click Next. The Import e-mail - Finish screen displays.
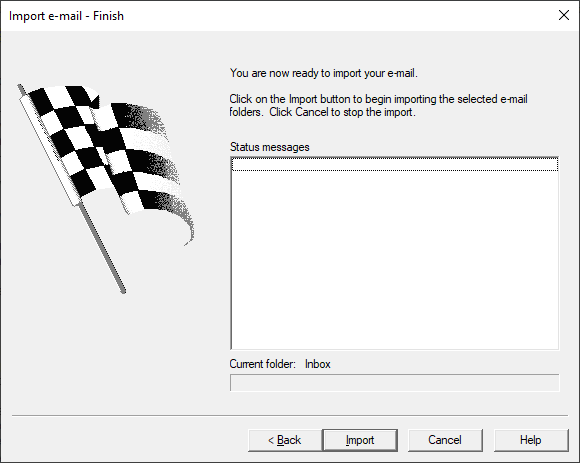
24.Click Import. The Status messages updates with progress while the import is running. A final message will display the total number of emails that were imported. Click Done to close the import wizard.
25.The newly created database will be displayed in Concordance. In the Browse view, you can navigate through a few of the e-mail messages to verify they were imported properly. It is recommended to run a full index at this time.