Return to Topic![]()
![]() Brightness and Contrast
Brightness and Contrast
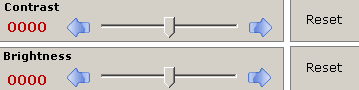 The Brightness and Contrast settings are set via the Main Interface in LAWtsi. Each setting has a reset button that will restore to the default value.
Brightness and Contrast settings - This is where users set the contrast and brightness.
![]() The Auto-Brightness option will allow the scanner to automatically detect what brightness to use for the document when enabled. This option is not available on all scanners.
The Auto-Brightness option will allow the scanner to automatically detect what brightness to use for the document when enabled. This option is not available on all scanners.
Auto-Brightness button - This toggle button will enable auto-brightness if supported by the selected scanner.
![]() Color Selection
Color Selection
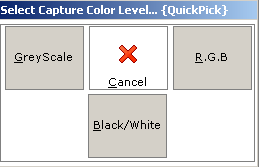
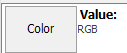 The selected scanner may support different color modes. The options are Black and White, GreyScale or R.G.B. (Full Color) if supported by the selected scanner. To change this setting click the Color button on the Main Interface of LAWtsi.
Color Picker - This dialog is used to select the color mode of the scanner.
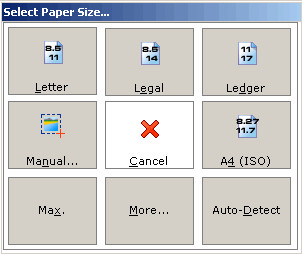
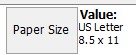
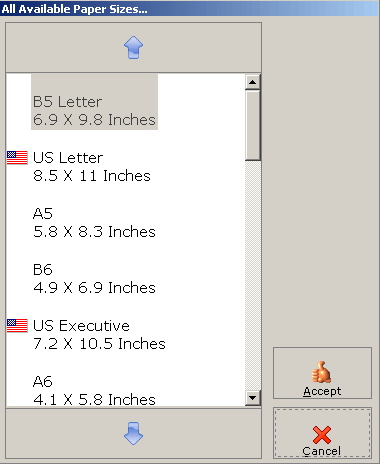
Depending on the selected scanner, one or multiple paper sizes may be available to scan. To select the paper size before scanning click the Paper Size button. Select Paper Size dialog - This dialog is used to select the paper size to be scanned. The common paper selections are available from the Select Paper Size dialog. The selections below are listed starting in the upper left hand corner and are listed clock-wise: •Letter - Letter paper size is 8 1/2" by 11". •Legal - Legal paper size is 8 1/2" by 14". •Ledger - Ledger (Double Letter) paper size is 11" by 17". •A4 (ISO) - A4 (ISO) paper size is 8.27" by 11.7". •Auto-Detect - The Auto-Detect paper size will try to automatically detect the paper size that is fed through. This setting is not available on all scanners. •More - The More button will bring up the Available Paper Sizes dialog (Figure 2) which allows users to select any paper size that is available for the selected scanner. •Max - The Max paper size button will set the paper size to the maximum available paper size for the selected scanner. •Manual - The Manual paper size button displays the Manual Paper Sizing (Figure 3) dialog which allows users to manually configure the capture area. Available Paper Sizes dialog - This dialog displays all available paper sizes for the selected scanner.
|
|
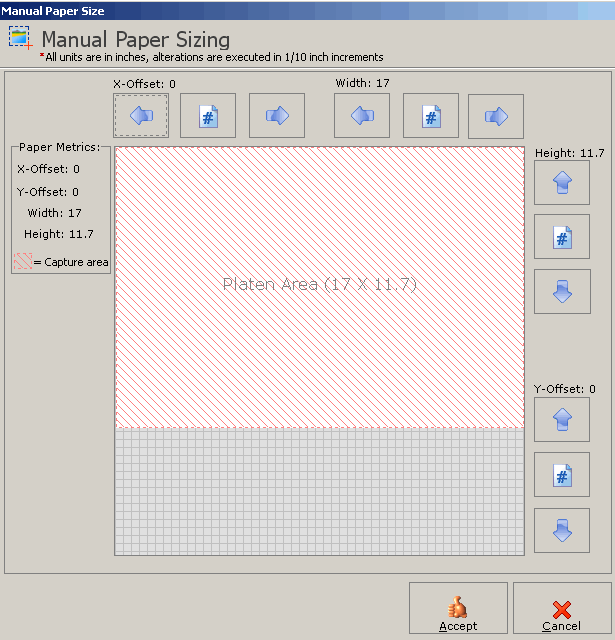
Manually configuring paper size is done using the Manual Paper Sizing dialog. This is used for scanning non-standard sizes. Manual Paper Sizing dialog - This dialog is used to set the scanner to scan at a non-standard paper size. This dialog has 4 different configuration options. •X-Offset - The X-Offset value is the Left offset on the page. •Width - The Width value is set to equal the width of the scan. •Height - The Height value is set to equal the height of the scan. •Y-Offset - The Y-Offset value is the Top offset value of the page.
|
|
![]() Paper Source
Paper Source
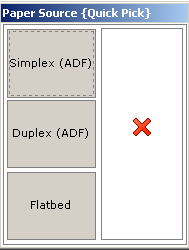
 The Paper Source is selected by clicking the Paper Src. button on the Main Interface of LAWtsi. When clicked, this button displays the Paper Source dialog (Figure 1), which allows users to select whether to use the Automatic Document Feeder (ADF) in either simplex or duplex mode. This is also where the scanner can be set to use the Flatbed when scanning.
Paper Source dialog - This dialog is used to select the paper source.
|
The Data Entry panel allows users to input data for a document in the index fields pre-defined in LAW. To input data into these fields the keyboard or the Interactive Keyboard. can be used. Input data via the Data Entry panel, which is available by clicking the Data button on the Scanner Settings. Data Entry panel - Used to enter information for documents. To enter Data for a field click the Text Input button to the right of the field. The Interactive Keyboard. for data input will be displayed. If the Data input Field is of a Date type, it will have a Date Select button next to it. Clicking this button will display the Date Picker to select a valid date to enter. |
|
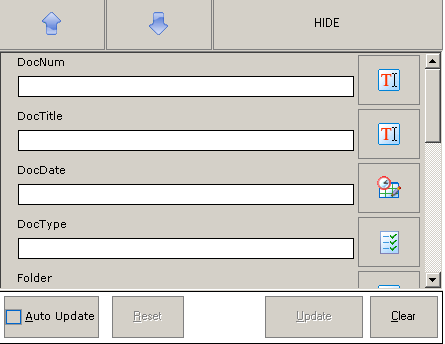
![]() Date Select button
Date Select button 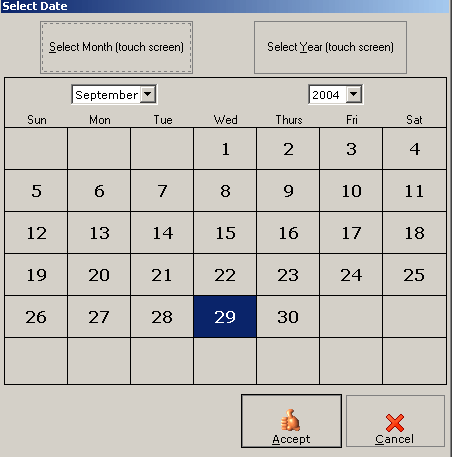
![]()
Date Picker dialog - Used to select valid dates for data entry.
If the Data input Field is of a List type, it will have a List Select button next to it. Clicking this button will display the List Picker dialog which allows users to select values from the available list values. Multiple values can be selected if the enabled on the Data Entry settings.
![]() List Select button
List Select button
![]()
List Picker dialog - Displays the available values for the field selected.
The following buttons are on the List
![]() Data Entry Options
Data Entry Options
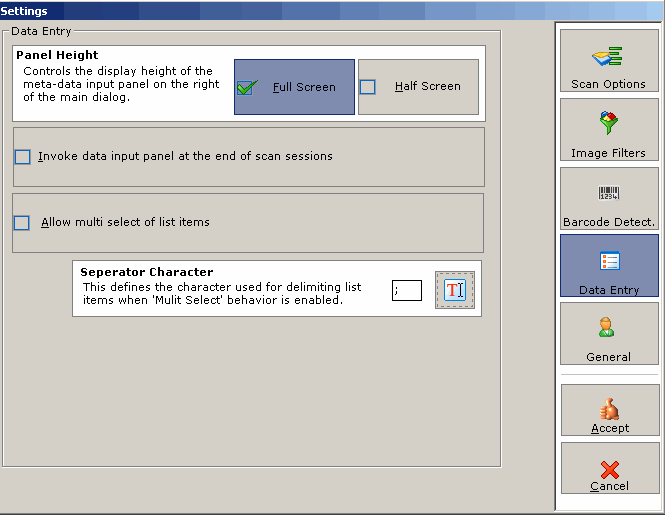 The Data Entry Options are displayed by clicking the Settings button on the Main Interface of LAWtsi and then clicking on the Data Entry button on the Settings Dialog.
Data Entry settings - This dialog shows the settings that can be configured for Data Entry (coding).
The following options are available for Data Entry:
•Full Screen - The full screen option will display the Data Input Panel over the right half side of the interface. This will cover up the Document and Page panels and will not allow navigation using these panels. The Image Navigation buttons will still be available to navigate document while the Data Input Panel is displayed in full view.
•Half Screen - The half screen option will display the Data Input Panel over half of the right side of the interface. This will not cover up the Document and Page panels and allows navigation using these panels.
•Invoke Data Input Panel at the end of scan sessions - The Invoke Data Panel at the end of Scan Sessions option can be set to display the Data Input panel after each document has been scanned.
•Allow multi select of list items. The Allow multi select of list items setting will allow users to select multiple values for list type fields.
•Separator Character. The Separator Character is selected using the Interactive Keyboard, this character will be used to delimit multiple selections in a list type field.
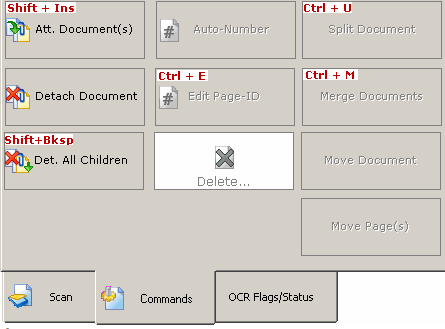
Documents can be put into logical groupings called attachments. Parent/Child documents are managed by the attachment buttons on the Commands Tab of the Acquisition Functions. These buttons can be used to add/remove attachments. Attachment buttons on the Commands tab - These buttons are used to manage attachments. The attachment buttons perform the following actions: •Att. Document(s) - The Attach Document button will attach all of the selected documents to the previous document when clicked. •Detach Document - The Detach Document button will detach the selected child document from the parent document when clicked. •Det. All Children - The Detach All Children button will detach all documents attached to the current document. Pictured below in Table 1 are the glyphs for the parent attachments, child attachments, and regular documents. Attachment Glyphs - This table shows the glyphs signifying the different attachment levels. |
|

![]() Document/Page Deletion
Document/Page Deletion
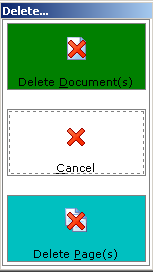
 Document/Page deletion is handled via the Delete button on Commands tab located in the Action panel.
![]() Delete button
Delete button
This button is clicked to invoke the Deletion Dialog.
Deletion Dialog - This dialog is used to delete selected documents or pages.
Multiple pages/documents can be deleted by using the Selection Modes and then clicking the corresponding button on the Deletion dialog.
![]() Merging/Splitting Documents
Merging/Splitting Documents
 LAWtsi has the ability to merge/split documents to correct mistakes made during scan-time. To merge documents together use one of the Selection Modes to select multiple documents and then click the Merge Documents button located on the Action Panel. Documents will be merged in the same order that they appear in the document list.
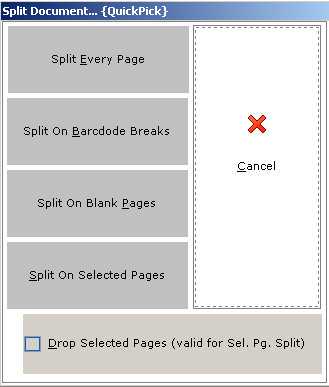
To split a document select the document to be split and click the Split Documents button. This brings up the Split Document dialog.
Split Document dialog - This dialog is used to determine how documents are split.
Splitting a document can be performed one of four different ways.
•Split Every Page - The Split Every Page button will split every page in the document into one page.
•Split on Barcode Breaks - The Split on Barcode Breaks will split a document based on barcode breaks within the file. These break sheets can be configured via the Barcode Detection Options on the Settings dialog.
•Split on Blank Pages - The Split on Blank Pages button will scan through the pages in the selected document and look for pages that are considered blank.
•Split on Selected Pages - The Split on Selected Pages button will split the document on each of the selected pages. Each page that is selected will become a new document. The Drop Selected Pages option will drop the each of the selected page when splitting on Selected Pages.
Note: Splitting on Barcode Breaks and Blank Pages will drop either the barcode page or the blank page.
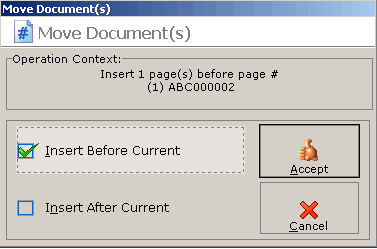 LAWtsi allows users to move either documents or pages within a document. To move documents, first select the document(s) to be moved, then click the Move Document button on the Action panel on the Main Interface. This will display the Move dialog which allows the user to insert the document(s) either Before or After the selected document. When this dialog is visible, case navigation can still occur.
Move dialog - This dialog is used to insert documents into a new position within a case.
To move pages within a document, first select the page(s) to be moved and then click the Move Page button. This will invoke the Move Dialog which allows users to insert the pages Before or After the selected pages.
Note: When moving pages document navigation is still possible, but pages within a document cannot be move to another document. They must be moved within the original document.
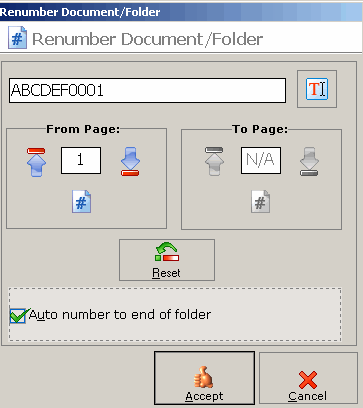 LAWtsi allows users to number documents within a folder. The Auto-Number feature can be accessed by clicking the Auto-Number button on the Commands tab of the Action Panel. This displays the Renumber Document/Folder Dialog. The start page defaults to the current page making it easy to renumber if you discover a page is incorrectly numbered. Enter the desired starting and ending Page ID. If the ending page exceeds the page count of the current image, LAWtsi will only number to the end of the current document. If the Auto-number to end of folder option is selected, the ending page is disabled and LAWtsi numbers all the way to the end of the current folder. This makes it very easy to fix numbering mistakes in a single document causing all subsequent documents in the folder to be incorrectly numbered.
Renumber Document/Folder Dialog - This dialog is used to renumber document(s) or a folder.
![]() Editing Page-IDs
Editing Page-IDs
 To edit a single Page-ID click the Edit Page-ID button on the Commands tab of the Action Panel. This will display the Edit Page-ID dialog. A new Page-ID can be entered for each page in a document. To continue the numbering beyond the single page, check the Auto Number to end of Document option. This will increment the numbering for each page.
Edit Page-ID Dialog - This dialog is used to change the Page-ID of a page or to renumber a document.
All OCR Flagging actions can be performed from the OCR Flagging/Status tab on the Action Panel of LAWtsi. The OCR Tab is displayed below. OCR Flags/Status tab - This is an interactive image of the OCR Flags/Status tab on the Action Panel. OCR Tab - This tab contains all of the OCR Flagging features. The following functions can be performed via the OCR Flags/Status Tab: •Flag Pg. for OCR - The Flag Page for OCR button will flag the selected page(s) for OCR when clicked. •Reset Flags ON - The Reset Flags On button sets all of the OCR flag on the selected document(s) to ON when clicked. This will update all the pages within the document to ON as well. •Reset Flags OFF - The Reset Flags Off button sets all of the OCR flag on the selected document(s) to OFF when clicked. This will change the page flags within the document to OFF.
|
|
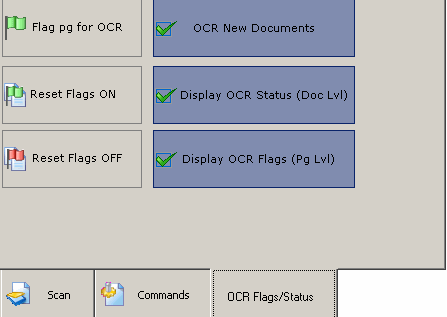
The following settings are available for OCR Flagging.
•OCR New Documents - The OCR new documents button will set the OCR flag for all documents/pages scanned to ON when checked.
•Display OCR Status (Doc Lvl) - The Display OCR Status (Doc Lvl) setting will display a glyph for each document depicting whether the document is flagged for OCR or not. The glyphs are shown in Table 1.
•Display OCR Flags (Page Lvl) - The Display OCR Flags (Page Lvl) setting will display a glyph for each page within a document depicting whether the page is flagged for OCR or not. The glyphs are shown in Table 1.