Return to Topic![]()
The central pane that allows you to see the selected page with in the Case Directory
![]() Viewer Fit-To
Viewer Fit-To

 The Image Viewer can quickly be set to pre-defined zoom ranges by clicking on the Fit-To button on the Main Interface of LAWtsi. This setting will not persist through all documents and pages unless the Viewer Lock button is turned on.
Fit-To button - This button allows users to quickly set the zoom of the Image Viewer.
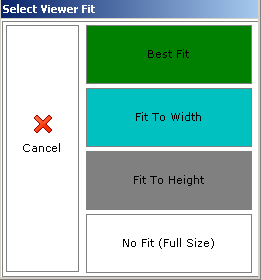
When the Fit-To button is clicked, it will display the Viewer Fit dialog. This allows users to set the viewer to either Best Fit, Fit to Width, Fit to Height, or No Fit (Full Size).
Viewer Fit dialog - This dialog is used to set the fit of the Image Viewer.
The pre-defined selections for the zoom in the Image Viewer are:
•Best Fit - The Best Fit selection will zoom to fit both the full width and height of the document in the Image Viewer.
•Fit to Width - The Fit to Width selection will zoom to the full width of the document in the Image Viewer regardless of the height of the document.
•Fit to Height - The Fit to Height selection will zoom to the full height of the document in the Image Viewer regardless of the width of the document.
•No Fit (Full Size) - The No Fit (Full Size) selection will zoom to the actual size based on resolution.
![]() Viewer Zoom
Viewer Zoom
The Viewer Zoom buttons will zoom either in or out on the image. To persist this setting the Viewer Lock may be enabled. The buttons are located on the Main Interface of LAWtsi.
![]()
 Zoom In button - This button zooms in on the image.
Zoom Out button - This button zooms out on the image.
![]() Rotating Images
Rotating Images
LAWtsi allows users to rotate images to correct the orientation. This can be done by clicking the Rotate Left button, which will rotate the selected page(s) 90 degrees to the left. To make this change permanent the Save Pages button must be clicked. To lock the current rotation throughout all documents click the Viewer Lock button.
![]() Rotate Left button - This button rotates the image.
Rotate Left button - This button rotates the image.
The Viewer Lock button on the Main Interface is used to Lock the Image Viewer's Zoom and/or Rotation. Once this button is clicked, it will remain in a depressed state (enabled) until it is clicked again (disabled).
 Viewer Lock button.
When rotating images, to get the rotation to become permanent the Save Pages button must be clicked to commit the changes to the image file. This will only save the selected pages. Multiple pages can be selected using the Selection Modes.
![]() Save Pages button - This button saves the selected pages.
Save Pages button - This button saves the selected pages.
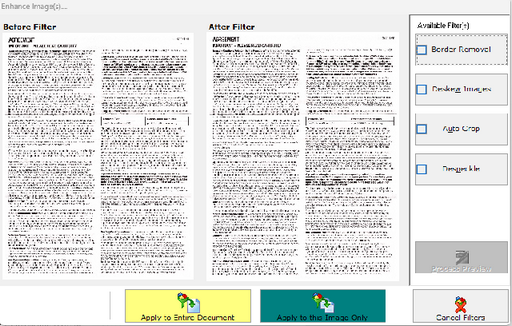
In a separate pop up pane, you can see a before and after image when applying Border removal, Deskew images, Auto Crop and Despeckle.
•To Preview what effects the filters will have on the image(s), click the Process Preview button. This will show what the image will look like in the After Filter view.
•To apply the filters to the selected page, click the Apply to this Image Only button.
•To apply the filters to all the pages in the selected document, click the Apply to Entire Document button.


