Buttons for Subtopics![]() Return to Section Header
Return to Section Header![]()
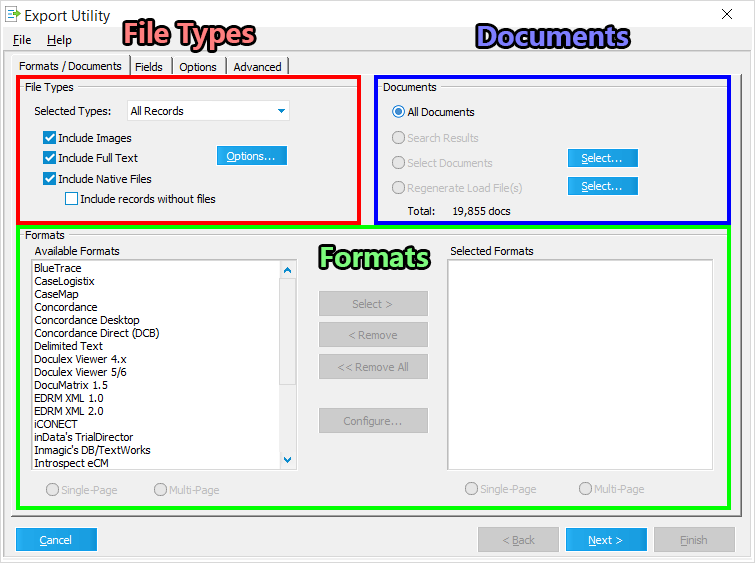
Use the Formats / Documents tab to determine which documents from the active Case Database should be exported, along with their associated file types, and the Formats (applications) desired for load file creation.
 Running the Export Utility - Part 2 of 5
2.Skip this step if you're not manually selecting documents and/or folders to export. Manual selections can be made by doing the following:
A.In the Documents section, next to the Selected Documents option, click on the Select... button to open the Select Folders window.
B.Use the Select Folders window to navigate through the Case Directory and select entire folders for export.
C.To choose specific documents from folders, select a folder from the list, and click the Set Range... button to open the Set Document Range window for that folder.
D.Use the Set Document Range window to select specific documents contained within any folder.
E.When you are happy with the selections made within either window, click OK to confirm those selections.
3.Determine which File Types should be included in the export by choosing one of the Selected Types from the drop-down menu, and check the box next to each additional option as desired.
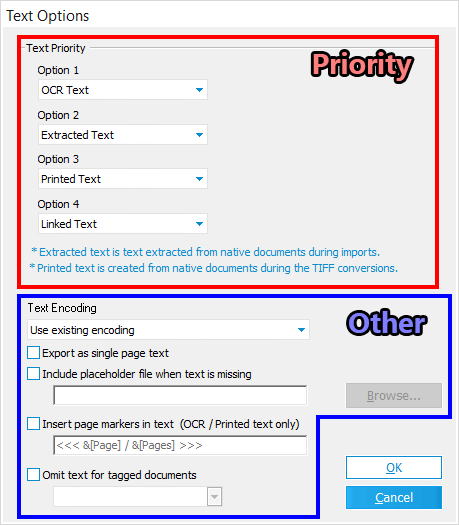
i.If you want to Include Full Text in the export, make sure to click the Options... button to configure your Text Options window as desired.
4.Select your desired load file export Formats from within the Available Formats list, and click the Select > button (while they are highlighted) to move them to the Selected Formats list.
i.Each Format has its own load file type(s) that will be created during the export process, and some Formats cannot be chosen alongside others.
i.Some of these Formats have additional configuration windows available. Click the Configure... button with those Formats selected (in the Selected Formats list) to configure their related settings windows.
5.When you're ready to proceed, click Next in the bottom-right corner of the Export Utility to continue to the Fields tab.
![]() These instructions are continued in the Export Utility: Fields topic.
These instructions are continued in the Export Utility: Fields topic.
|
|
After selecting an Available Format, you must choose either Single-Page or Multi-Page before the format is added to the Selected Formats column. This choice will determine how the images are outputted: Single-Page creates one file for each page in the document, while Multi-Page combines all pages into one file. |
|---|
|
When Include 24-Hour Chat Threads is enabled, Concordance is the only Available Format that may be selected. You will receive a 24 Chat View – Invalid Operation message if any other format is selected. |
|---|