Manipulating Fields
The following facts apply to index fields in CloudNine™ LAW:
•LAW provides many built-in fields. However, you define as many new fields as you need to support specialized queries.
•When a new case is created, and Enable Electronic Discovery for this case is selected, all fields necessary for processing electronic discovery or Turbo Import (depending on the type selected) are created automatically.
•Field information for each record is displayed on the Index display on the main form to the right of the main image window.
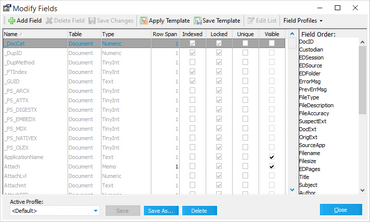
•Use the Modify Fields dialog box to add, delete, and update existing fields.
To add, delete, and update existing fields
1.On the Index menu click Modify Fields. The Modify Fields dialog box appears. •Fields shown in gray are system fields and cannot be deleted or edited. •Fields shown in black are user-defined fields. •Fields of Type Memo will show the Row Span value in black. 2.Select a field and then apply the following options as needed: •Add Field: Opens the Add Field dialog box. •Delete Field: Deletes a user-defined index field. •Save Changes: Saves changes after editing field properties. •Apply Template: Applies an existing case template. See Case Templates. •Save Template: Saves a case template based on the current LAW case. See Case Templates. •Edit List: Starts the List Editor to allow editing of list field values. •Field Profiles: Click the arrow to view a list of active profiles, open the Manage Field Profiles dialog, and save a new profile. For more information, see Index Profiles. •Name: Displays names of system and user-defined fields. •Table: Indicates if a field is contained in the document-level or page-level table of the database. •Type: Lists the type of field (see Field Types below). •Row Span: Indicates how many rows of data will be visible in the Index display (Memo fields only). •Indexed: Indicates if a field is indexed. •Locked: Indicates if a field is locked. All system fields will be locked, meaning they cannot be edited. •Unique: Indicates if a field is set to unique, meaning values in this field must be unique for each record. •Visible: Indicates if the field is visible on the Index display. •Field Order: Displays the order of fields in the Index display. •Active Profile: Displays the name of the profile currently applied in the Index display.** •Save: Saves any changes made to the active field profile.** •Save As: Deletes a user-defined Index profile. to be used for storing field order and visibility.** •Delete: Deletes the profile currently selected in the Active Profile field. The Default profile cannot be deleted.** **For more information on index profiles, see Index Profiles.
|
To create a new field
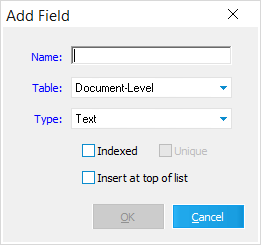
1.From the main window, on the Index menu, click Modify Fields. The Modify Fields dialog box opens. 2.Click Add Field. The Add Field dialog box appears.
3.Type a unique name for the field.
4.In the Table list, select the level. •Document-level applies the same value to all pages in a document. •Page-level applies a unique value to each page in a document. 5.Select options for the database properties for the field:
6.Click OK.
|
To apply an index to a field
In database terms, an index refers to a numerical list that the database engine applies to field data. The database engine uses this list instead of the actual data as the basis for sorting and searching. The end result of applying an index to a field is a potential boost in query performance. It is important to note that the database engine does not automatically create an index for any field. Instead, you must assign them yourself and exercise good judgment when doing so because if an index is applied to the wrong kind of field, performance can be impacted negatively. It is recommended that you follow these guidelines when deciding which fields to apply an index to: •Apply indexes only to fields that hold unique values. •Apply indexes only to fields that you expect will be the subject of queries or that you expect will be used as a basis for sorting. There is a performance cost that the database engine incurs with applying an index. So you should apply indexes sparingly and only to those fields you expect you will use the most.
1.In the main application window, on the Index menu, click Modify Fields. 2.Find the field that you want to index in the list and select the checkbox in the Indexed column. 3.Select the checkbox in the Unique column if you want the values in the field to function as a unique identifier. 4.Click Close.
|
Considerations for changing field properties
Note the following important considerations before you change a field property: •Certain field type conversions may cause a loss of data. For example, changing a text field to date field can cause all invalid date values to be cleared. Similarly, changing a memo field to text will cause truncate fields that have greater than 255 characters. •A unique index cannot be added to an existing field if that field does not contain all unique values.
|
To delete a field
1.In the main application window, on the Index menu, click Modify Fields. 2.Select the field you want from the field list and then click Delete. The field and all data associated with it are deleted permanently from the database.
|
To manipulate field sequence and visibility
The Field Order section of the Modify Fields dialog box is used to specify the order in which fields will be displayed in the Index display on the main form.
|


