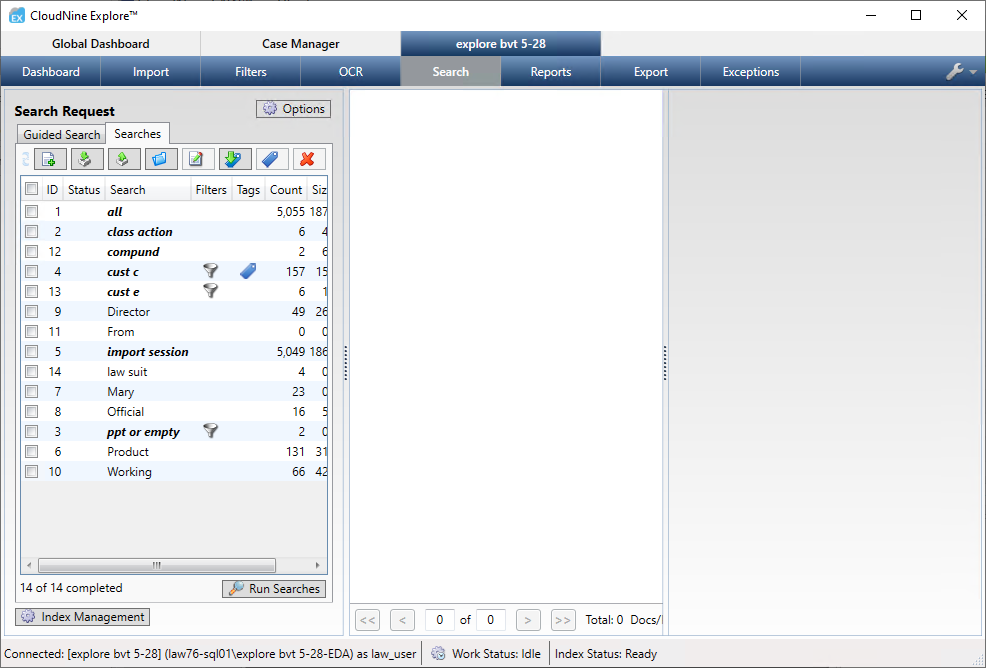
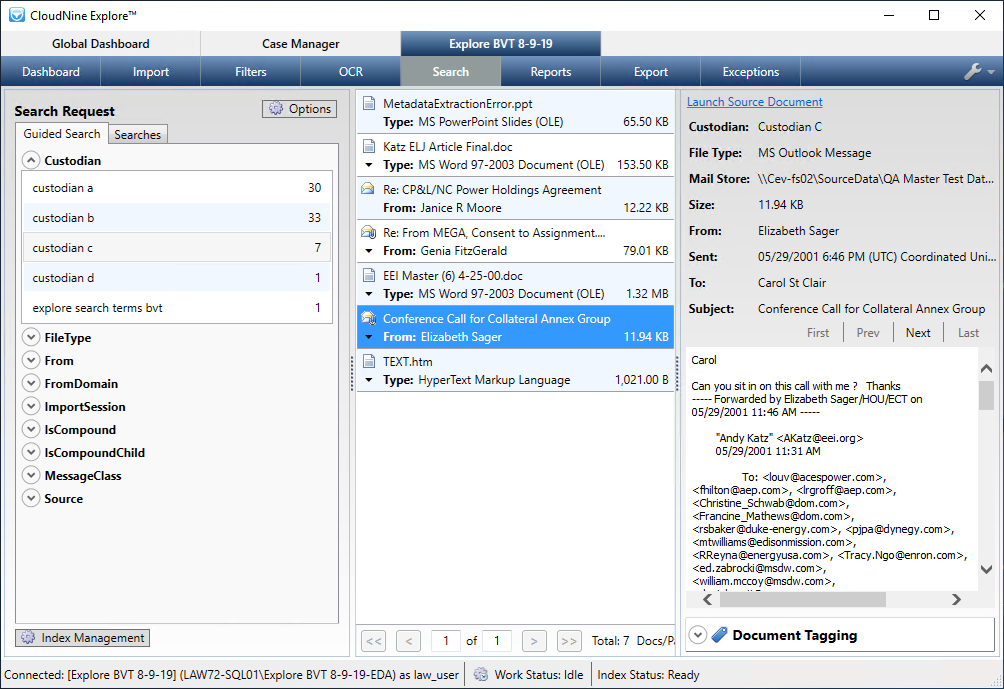
Within a top-level case tab in CloudNine™ Explore, new and saved searches are executed on the Search sub-tab. The Search tab displays in three panes from left to right: Search Request, Document List, and Document Details.
You can run new and saved searches against a case's filtered records from the Search Request pane on the left of the Search tab. New searches are run by entering a search query in the New Search dialog box and then clicking the Save & Search button. Saved searches are run by clicking the check box for a saved search or searches and then clicking the Run Searches button. You can run multiple saved searches simultaneously in CloudNine™ Explore.
The toolbar at the top of the Search Request pane allows you to perform various actions on selected searches, or create a new search.
Search Toolbar |
|
|---|---|
Icon |
Function |
|
Refresh saved searches |
|
New Search |
|
Bulk Import Search Terms |
|
Bulk Export Search Terms |
|
Search Sets |
|
Edit Checked Search |
|
Tag Imported IDs |
|
Tag Searches |
|
Delete Searches |
The Search value in the Searches list displays the search query name. Names are optional when creating a search query. If a search query is not given a name, the search query text is displayed for the Search value in the Searches list and other areas of CloudNine™ Explore. To help distinguish between named searches, the Search value is displayed in bold italics when a name is provided for a search query, and unnamed searches are displayed in plain text.
In the search list you can view the search query associated with a Search value by placing your pointer over the Search value.
The Status column on the Searches tab displays a status icon for each corresponding saved search.
Search Status |
||
|---|---|---|
Icon |
Name |
Description |
|
New |
Search query is new and has not run yet. |
|
Pending |
Search query is currently running. |
No icon |
Complete |
When no icon is displayed for a search in the Status column, the search query is completed and the search results are current. |
|
Out of Date |
Search query results are out of date. The Out of Date icon will be displayed if documents that have been added or removed from the case or filter settings that have been modified affect the saved search query. |
|
Error |
CloudNine™ Explore encountered an error while running the search query. |
You can create and run searches in CloudNine™ Explore. You can manually add search terms or you can add search terms directly from the dictionary, fields, and field values. You can also help fine-tune your searches by applying search filters, including date ranges, in the New Search or Edit Search dialog box.
When writing advanced search queries, you will want to learn how to use search operators that help provide precise search results. For more information, see Search Operators.
Search queries can also be imported into CloudNine™ Explore from a line-delimited text file. When search queries are imported into CloudNine™ Explore, they are automatically added to the saved search queries list on the Searches tab in the Search Request pane. If you want to use the saved searches from a case in another case, you can export the case's saved search queries to a line-delimited .txt file, and then import the search queries into another case.
|
CloudNine™ Explore cannot search for Unicode characters. Any imported searches that include Unicode characters will receive an error message upon import. |
On the Search tab, tags can be applied to all or individual records in a search query. For more information about tagging documents by search query see Applying Tags.
Configuring Search Options
Before running a search, you should define the search options you want. Settings defined in the Search Options apply to all full-text searches.
1.From the Search tab for a case, in the Search Request pane, click the Options button in the upper right. The Search Options dialog displays.
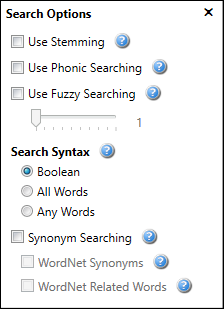
2.Select or deselect the options displayed, depending on your search needs for the case.
•Use Stemming - Finds grammatical variations of the term. For example, "fish" also returns "fishing."
•Use Phonic Searching - Finds terms that sound like the search term. For example, "Smith" also returns "Smyth."
•Use Fuzzy Searching - Finds words with similar spelling as the search term. For example, the search term "case" might return records that contains cash, cage, cake, etc. You set the fuzzy value to a number between 1-10, with 1 being the least fuzzy and 10 the most.
•Search Syntax - Selects terms according to logical operators and character patterns that you specify that occur within the search string.
•Boolean - Supports standard AND/OR connectors between search terms.
•All Words - Alternative to using Boolean that implies all ANDs and ORs respectively between words. All of the words in the search query must be present in the record for a record to be retrieved in your search results.
•Any Words - Alternative to using Boolean that implies all ANDs and ORs respectively between words. Any of the words in the search query can be located in a record.
•Synonym Searching - Enables synonym searching.
oWordNet Synonyms - Use synonyms from the WordNet thesaurus.
oWordNet Related Words - Use related words from the WordNet thesaurus.
3.Close the Search Options dialog. The search option settings are saved and applied to all searches.
Creating and Executing a New Search
1.From the Search tab for a case, in the Search Request pane, click the New Search button on the toolbar. The New Search dialog opens.
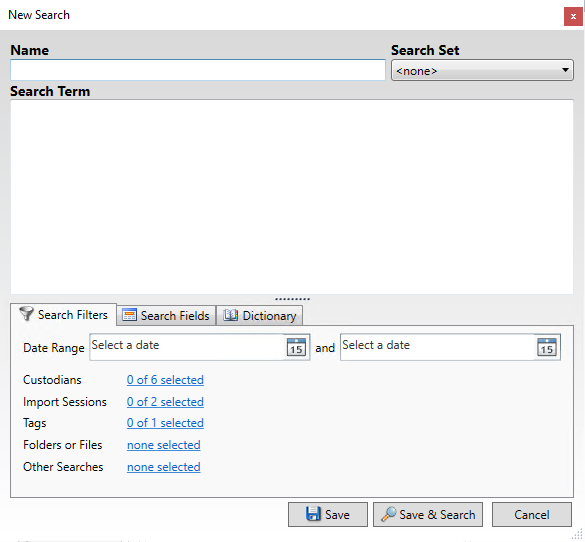
2.You may enter a Name you want to use for the search query as desired. The Name can contain up to 100 characters, and does not have to be unique.
3.If you want to add the search query to a Search Set, choose the applicable Search Set in the drop-down. Search sets are containers for grouping search queries. The Search Set list defaults to <none>. For more information about search sets, see Organizing Searches.
4.In the Search Term box, type the search query. Include keyword(s), operators, and add any applicable search filters and/or words directly from the dictionary or field list.
5.Click the Save & Search button. The search query is saved and run. Alternatively you can click Save to save your search query and run it later.
|
Instead of Save & Search, you can click Save to save your search query and run it later. If the query is saved but not run, the New Search Status icon displays for the query in the Searches list. |
6.The search results display in the Document List (center) of the Search tab. The number of records returned in the search results displays at the bottom of the Document List. You can click an item in the Document List to display it in the Document Details pane on the right. If available, click Document text truncated due to length to view the extracted text in a text editor. You can also:
•Click Launch Source Document to open the record in a native application or viewer.
•Scroll through the record to find highlighted search hits.
•Click the First, Prev, Next, or Last button to move between highlighted occurrences of the content in the file.
7.Additionally, search results are clustered by field and field value and display on the Guided Search tab in the left pane. For more information about guided search, see Search Results using Guided Search.
Editing a Search
1.From the Search tab for a case, in the Search Request pane, select the check-box to the left of the search you want to edit.
2.Click the Edit Checked Searches button on the toolbar. The Edit Search dialog opens.
3.Edit the search query and then click the Save or Save & Search button. Clicking the Save or Save & Search button saves your changes and the search query is updated in the saved search queries list on the Searches tab.
Applying Search Filters to a Search
In CloudNine™ Explore, you can add search filters to search queries to help fine-tune your query and search results. The search filters are configured on the Search Filters tab on the bottom of the New Search and Edit Search dialogs and include:
•Date Range - Searches a specific date range within the filtered case records.
•Custodians - Searches the case's selected custodians within the filtered case records.
•Import Sessions - Searches the case's selected import sessions within the filtered case records.
•Tags - Searches the case's selected tags and/or the untagged documents within the filtered case records.
•Folders or Files - Searches the selected folder or file within the filtered case records.
•Exports - Allows you to exclude any exported documents from any export profile.
•Other Searches - Searches the case's other selected search queries within the filtered case records.
Searches that have filters applied will have a Filter icon (funnel) displayed in the Filters column on the Searches tab of the Search Request pane. You can hover your mouse pointer over the Filter icon to view the date range and other search filters applied to the search query. The Filter icon is not displayed in the Filters column for date ranges entered manually in the Search Term box or from the Search Fields tab.
Adding a Date Range Search Filter
A date range can be added to a search query using a Date Range start and end date fields in the New Search or Edit Search dialog. Date range search filters only look for date range matches within the case's filtered documents. Documents excluded by the case filters are excluded from search queries, including date ranges in search queries. Just like date range filters on the Filters tab, Date Range search filters search the sent date for e-mail messages, and the start and end dates for calendar items.
Other date ranges can also be added to a search query by manually entering the applicable date range in the Search Term box, or by selecting the applicable fields and dates on the Search Fields tab.
1.In the New Search or Edit Search dialog, select the Search Filters tab at the bottom.
2.In the start date field, type the start date or click the calendar button to pick the month, day, and year in the displayed calendar.
3.In the end date field, type the end date or click the calendar button to pick the month, day, and year in the displayed calendar.
4.Click Save to save your changes and close the New Search or Edit Search dialog.
Adding a Custodian Search Filter
1.In the New Search or Edit Search dialog, select the Search Filters tab at the bottom.
2.The Custodians link displays the number of custodians selected out of the total number of custodians in the case. Click the Custodians link.
3.The Search Filters - Custodians dialog displays. All custodians associated with the current case are listed. By default, the custodians are listed in ascending order. To change the sort order, click the Custodian column header.
4.Select each custodian you want to include in the search results.
5.Click OK to save your selections and close the Search Filters - Custodians dialog.
6.The Custodians link is updated based on the custodians you selected.
Adding an Import Session Search Filter
1.In the New Search or Edit Search dialog, select the Search Filters tab at the bottom.
2.The Import Sessions link displays the number of import sessions selected out of the total number of import sessions in the case. Click the Import Sessions link.
3.The Search Filters - Import Sessions dialog displays. All import sessions for the current case are listed. By default, the import sessions are listed in ascending order. To change the sort order, click the Import Session column header.
4.Select each import sessions you want to include in the search results.
5.Click OK to save your selections and close the Search Filters - Import Sessions dialog.
6.The Import Sessions link is updated based on the import sessions you selected.
Adding a Tag Search Filter
1.In the New Search or Edit Search dialog, select the Search Filters tab at the bottom.
2.The Tags link displays the number of tags selected out of the total number of tags in the case. Click the Tags link.
3.The Search Filters - Tags dialog displays an [Untagged Documents] check-box along with the case's tags. The [Untagged Documents] check box determines whether the search query includes documents within the filtered case records that do not have any tags currently applied to them in the search results.
|
To quickly identify the which filtered documents in the case do not have any tags applied to them, you can create and run a search query with just the [Untagged Documents] check box selected. |
4.Select the tags you want to include in the search results.
5.Click OK to save your selections and close the Search Filters - Tags dialog.
6.The Tags link is updated based on the tags you selected.
|
Files that are tagged with the search request pane are dynamic. I.e. if you tag 5 documents, the change the search that result in another 5 documents, the second 5 are tagged and not the first 5. |
Adding a Tag Search Filter
1.Click the Tag documents icon at the top of the document list pane. The Bulk Tagging dialog displays. The total number of documents in the current document list is shown at the bottom of the Bulk Tagging dialog.

2.Select the Apply option for the tag(s) you want to apply to the document list.
3.Click SAVE. The Bulk Tagging dialog closes. The tag(s) are applied to each document in the document list.
|
Bulk Tagging is static. I.e. when you tag 5 documents and change the search, the same 5 documents are tagged. |
Adding a Folder or File Search Filter
1.In the New Search or Edit Search dialog, select the Search Filters tab at the bottom.
2.The Folders or Files link displays none selected until a file or folder is selected. Once a file or folder is selected, the Folders or Files link displays the file or folder name and its path. Click the Folders or Files link.
3.The Search Filters - Folder or File dialog displays. All of the case's folders and mail store and archive files are listed.
4.Select the folder or file you want to include in the search results. You can only choose one folder or one file in the Search Filters - Folder or File dialog. Files and folders displayed in italics do not contain any source files and cannot be selected. Italic files and folders are displayed to represent the directory structure as it exists on the disk.
5.Click OK to save your selections and close the Search Filters - Folder or File dialog.
6.The Folders or Files link updates based on your selection.
Adding Another Search as a Search Filter
The Other Searches filter allows you to use search queries within another search query. If changes are made to a search query that is included in other search queries, the query changes are automatically updated in the search queries that include the changed query.
If a search query included in another search query has an error, the queries containing the search query will also have the error status until the error is corrected in the original search query.
1.In the New Search or Edit Search dialog, select the Search Filters tab at the bottom.
2.The Other Searches link displays none selected until one or more searches are selected. Click the Other Searches link.
3.The Search Filters - Other Searches dialog displays. All of the case's saved search queries are listed.
4.Select the search queries you want to include in the search results.
5.Click OK to save your selections and close the Search Filters - Other Searches dialog.
6.The Other Searches link updates based on your selection.
Adding Search Fields to a Search
1.In the New Search or Edit Search dialog, select the Search Fields tab at the bottom.
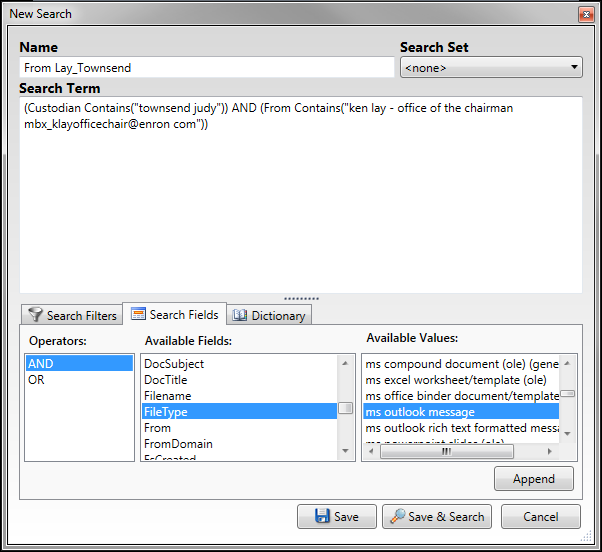
2.The Available Fields box contains all of the metadata fields available for selection. In the Available Fields box, click the field you want to add to the search query. If field values are available for the selected field, they are displayed in the Available Values box.
3.When you are adding a field to a search, you can add both the field and values or just the field itself to the search query. Click the field value(s) you want to add to the query in the Available Values box. If you do not want to include a field value in the search query, do not click any value in the Available Values box. When the field is added to the query, the query will display (<field name> Contains("")).
|
If you are adding a field value that contains special characters that dtSearch treats as spaces, CloudNine™ Explore will strip these special characters out of the field value when the value is added to the search query and replace them with spaces. If a field value contains special characters that will be stripped from the value, a caution icon is displayed next to the Append button. Place your pointer over the caution icon to view the warning message. |
|
To maximize performance, CloudNine™ Explore limits the viewable list of Available Values to 5000. If there are more than 5000 possible values, and the value you want is not shown in the Available Values list, you can still type the value in the Search Term box and CloudNine™ Explore will still search for it. |
|
Because of the likelihood of very high numbers of potential values, the email address fields To, CC and BCC do not show available values. You can still type the value in the Search Term box and CloudNine™ Explore will still search for it. |
4.If this is the first field being added to the search query, the value selected in the Operators list is ignored. If you are selecting a second or subsequent field, click AND or OR from the Operators list to define how the fields will be searched. The Operators list defaults to AND. For more information about the AND and OR search operators, see Search Operators.
5.Click the Append button to add the field and/or field value(s) to the search query in the Search Term box. Field terms added to a search query can be edited in the Search Term box in the New Search or Edit Search dialog box.
Adding Dictionary Words to a Search
The dictionary contains words from the records imported into the case that were identified during indexing.
1.In the New Search dialog box, click the Dictionary tab.
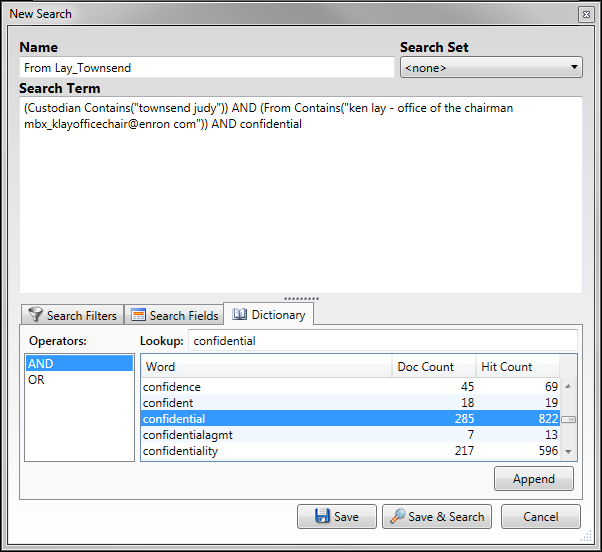
2.In the Lookup field, type part or all of the word you want locate in the dictionary. When you begin typing the word, the corresponding dictionary words are listed. The Word column displays the dictionary words, the Doc Count column displays the number of filtered documents in the case that contain the dictionary word, and the Hit Count column displays the number of occurrences of the dictionary word in the filtered case documents.
3.Click the dictionary word you want to add to the search query.
4.If this is the first dictionary word being added, the value selected in the Operators list is ignored. If you are selecting a second or subsequent dictionary words, click AND or OR from the Operators list to define how the dictionary words will be searched. The Operators list defaults to AND. For more information about the AND and OR search operators, see Search Operators.
5.Click the Append button to add the word to the search query in the Search Term box. Dictionary terms added to a search query can be edited in the Search Term box in the New Search or Edit Search dialog box.
|
If the Any Words or All Words option is selected in the Search Options dialog box, the sequence of words in the query must be wrapped in quotes to prevent the search from inserting Boolean operators (like AND or OR) between the words in the sequence. |
Searching for All Filtered Records
In CloudNine™ Explore, you can create an empty search query. An empty search query is a search query with no text entered in the Search Term box in the New Search or Edit Search dialog box. When you run an empty search query, the search results contain all records currently filtered in the case. If search filters are applied to an empty search query, the search results will contain all records currently filtered on the Filters tab and the search filters assigned to the search query.
Like other search queries, an empty search query can be named, assigned to search sets, and can have search filters defined for the empty query. If an empty search query is unnamed, a blank value is displayed for the Search in the Searches tab in the Search Request pane. If an empty search query is named, the Search field is displayed in bold italics.
Using Guided Search
When a search query runs in CloudNine™ Explore, all of the records in the search results are displayed in the Document List, and the search results are clustered by field and field values on the Guided Search tab in the Search Request pane. There are nine fields that can be displayed on the Guided Search tab: Custodian, FileType, From, FromDomain, ImportSession, IsCompound, IsCompoundChild, MessageClass, and Source. Out of these nine fields, only those sharing common records in the search results will be displayed on the Guided Search tab. The clustered search results are only available on the Guided Search tab after running a search query.
The Guided Search tab displays the field, field values, and number of search hits for each field value in the search results.
1.Run a new or saved search query. You can also view the search results on the Guided Search tab for any up-to-date search query on the Searches tab by clicking the up-to-date search on the Searches tab.
2.Click the Guided Search tab.
3.Click the down arrow next to the field name. The field values and search hit count displays.
|
If you are viewing search results for the ImportSession field, the ImportSession field only displays import session IDs for import sessions created in CloudNine™ Explore. For more information about import sessions, see Import. |
4.You can click a field value to view the records in the search results containing that value in the document list pane.
Editing Multiple Searches
If you want to make the same changes to multiple search queries, you can edit the search queries simultaneously from the Edit Searches dialog. In the Edit Searches dialog, you can modify the search set assignment and search filter settings for the selected search queries. You cannot edit the search name or query for multiple searches at the same time.
1.From the Search tab for a case, in the Search Request pane, select the check-box to the left of all searches you want to edit.
2.Click the Edit Checked Searches button on the toolbar. The Edit Searches dialog opens and displays a count of searches you selected for editing. If one or more search filters are selected for any of the selected search queries, the clear link is displayed next to the search filter. To remove the search filter selections from all of the selected search queries, click the clear link. Otherwise each Search Filter displays information about the selected searches:
•None Selected - Nothing is selected for any of the search queries for a specific search filter.
•[Specific Value] - The same search filter value is selected for all of the search queries, and that value is displayed in the search filter link. For example, if the Date Range start date for each of the search queries is 5/1/2003, then that date is displayed as the Date Range start date link.
•Some filters selected - Different search filter values are selected for the search queries (except for the Date Range filter).
•Multiple - Different dates are selected for the search queries.
•All selected - All search filter values are selected for all of the selected search queries.
3.Modify any Search Filters you want. If desired, modify the search set assignment for the searches. The editing sections above provide details on how Search Filters and Search Sets work. When a Search Filter has been modified, a green check mark will display in the Search Filters list..
4.Click the Save or Save & Search button. Your changes are saved and the search(es) are updated in the Searches tab in the Search Request pane. The Filters column is updated appropriately to display the Filter icon for searches that now have filters.
Running Multiple Searches
You can have CloudNine™ Explore run multiple saved search queries at one time. When you run multiple search queries at one time, each search query is run individually against the filtered case files. They are not combined into one query. Once the queries have finished running, you can click the saved query to view the search results in the Document list.
|
When saved searches queries are running, users can continue working in CloudNine™ Explore, but sources cannot be deleted from a case and OCR cannot be performed on documents during the search process. |
1.From the Search tab for a case, in the Search Request pane, select the check-box to the left of all searches you want to run. If you want to run all saved queries, select the check box in the header row.
2.Click the Run Searches button at the bottom of the Search Request pane. The Run Searches button is only enabled when one of more of the saved searches are selected.
3.All of the selected search queries run. When the process is completed successfully, no icon is displayed in the Status column for the selected search queries. The Count column is updated with the number of search hits found for the selected queries, the Size column is updated, the number of searches completed is displayed at the bottom of the Searches tab, and the search results are displayed in the Document list.
The Size column displays the sum of the file sizes of the documents in megabytes. The Size value is calculated using family size. A hit directly on an attachment or the parent document will include the entire family. When a parent document contains attachments, the attachments are not included in the file size calculation independently because the parent document file size already reflects the file size of its attachments. This prevents doubling the actual file size of attachments.
Deleting Saved Searches
1.From the Search tab for a case, in the Search Request pane, select the check-box to the left of all searches you want to delete.
2.Click the Delete Searches button on the toolbar.
3.The Delete Saved Searches confirmation dialog displays. Click Yes to confirm you want to delete the selected searches, or No to cancel the delete operation.
4.Any deleted searches are removed from the case. The Search Request pane updates to reflect the changes made.