If you want to print multiple records or transcripts, you can generate a standard report. Your current search query determines which records or transcripts are available to print on a standard report. For example, if your current search query contains 47 records, you can include some or all of the 47 records in the query on the standard report.
Standard reports have a number of customizable features such as headers, footers, date and time stamps, page numbering. When you print a standard report in Concordance Desktop, by default the printed font format for records is determined by your personal Concordance Desktop display settings. For example, if your display font setting is: Sea Green, 14 point, Monotype Corsiva, your document will be printed with the larger italic green font (for color printers) or gray font (for black and white printers). If you do not want to use the default format, you can define your preferred print settings on the Print documents dialog box before printing. You can also save your preferred print settings for future printing, or use previously saved print settings for printing.
To ensure records print the way you want, we recommend previewing your print job before sending it to the printer. To preview your print job, click the Print preview button on the Print tab in the Print documents dialog box.
|
When you print in Concordance Desktop, you are printing from database records. When you print in Concordance Desktop Image, you are printing from .tif files in the imagebase. For more information about printing in Concordance Desktop Image, see Printing in Concordance Desktop Image. |
To Print Standard Reports in Concordance Desktop
1.On the Standard toolbar, click the Print button.
2.Click the Fields tab.
i.The Fields tab is used to define the fields and their order to include on the report for the selected database. The fields are listed alphabetically in the Available fields field.
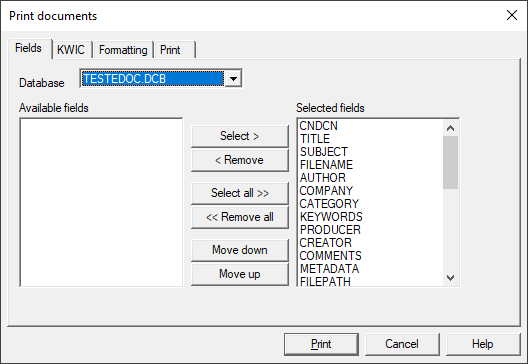
3.In the Database list, select the database containing the records you want to print.
i.The Database field defaults to the current Concordance Desktop database.
4.In the Available fields list, choose the fields you want to include on your report.
i.For example, to print the record's body text, click the OCR1 field.
ii.You can choose multiple fields by pressing the SHIFT or CTRL key while clicking multiple fields.
5.Click the Select button to add the fields to the Selected fields list.
i.The standard report includes data from each of the fields in the Selected fields list, and displays the field data in the order the fields are displayed in the Selected fields list.
ii.To add all of the fields to the Selected fields list, click the Select all button. To change the order of the fields in the Selected fields list, click a field and click the Move down or Move up button.
iii.To remove a field from the Selected fields list, click the field you want to remove and click the Remove button. To remove all the fields from the Selected fields list, click the Remove all button.
5.To print the keywords (search hits) for the current query, click the KWIC tab and select the Print key words in context (KWIC) check box.
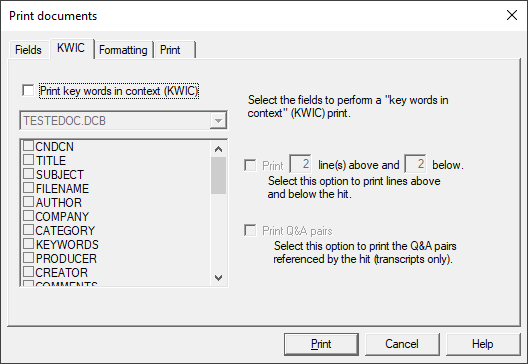
6.The database and fields you selected on the Fields tab are displayed below the Print key words in context (KWIC) check box.
7.In the fields list, select the check box next to the fields you want to print keys words in context.
8.To include record text above and below the key words, select the Print line(s) above and below check box and type the number of lines to include above and below in the line number fields.
9.To print the question and answer pair associated with the key words in transcripts, select the Print Q&A pairs check box.
i.This check box only applies to transcripts. Leave the Print Q&A pairs check box blank if you are not printing from a transcript.
10.To add header and footer text, determine widows and orphans on page breaks, and define other printing controls, click the Formatting tab.
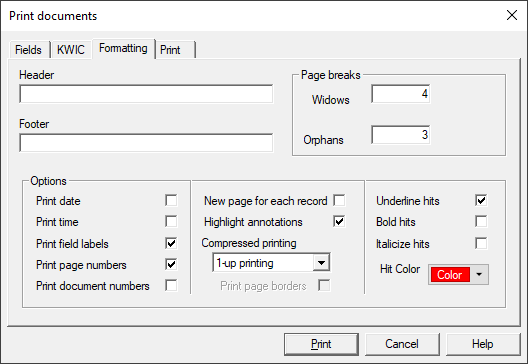
11.In the Header field, type the report header.
i.The header displays at the top of each printed page and is left justified on the page.
12.In the Footer field, type the report footer.
i.The footer displays at the bottom of each printed page and is left justified on the page.
13.In the Widows and Orphans field, type the number of widows and orphans to allow on each page.
i.Widows are the lines of text left at the bottom of a page when a record is split in two. Orphans are the lines of text at the top of the next page.
ii.The number entered in the Widows field controls the minimum number of lines Concordance Desktop allows to remain at the bottom of a page. If the number of lines to print at the bottom of the page is less than the number in Widows field, then the document is moved to the top of the next page.
iii.The number entered in the Orphans field controls the minimum number of lines Concordance Desktop prints at the top of a page when splitting a document between pages. If the lines left to print are less than the number in the Orphans field, then lines will be borrowed from the previous page until the orphan minimum is met. This may cause the preceding page to go below the widows threshold, causing the entire document to print at the top of the new page.
14.In the Options section, select the print options you want to apply to your report.
Field Name |
Field Definition |
|---|---|
Print date |
Prints the current date on each page below the footer. |
Print time |
Prints the current time on each page below the footer. |
Print field labels |
Prints the field name before each field. |
Print page numbers |
Prints the page number at the bottom of each page on the right side of the page. |
Print document numbers |
Numbers each document in the report and prints the document number before each document in the report. For example, Document 1 of 100. |
New page for each record |
Prints each document on a separate page. |
Highlight annotations |
Highlights the notes and annotations in the report. |
Compressed printing |
Prints the selected number of pages on one single page. You can print up to nine pages per sheet of paper. Printing multiple pages on one single page is sometimes referred to as N-up printing. The N represents the number of pages you are printing on one single page. |
Print page borders |
Prints a border around each page when you are printing multiple pages on one single page. This field is only available if you are printing 2 or more pages on one single page. |
Underline hits |
Underlines search hits in full-text paragraph fields. |
Bold hits |
Bolds search hits in full-text paragraph fields. |
Italicize hits |
Italicizes search hits in full-text paragraph fields. |
Hit Color |
Adds the selected color to search hits in full-text paragraph fields. To change the hit color, click the Hit Color button and select the hit color. |
i.Search hits are only highlighted in the full-text paragraph fields, not in fixed-length text, date or numeric fields.
ii.If a record is edited after the search, the record's search hit will not be highlighted in the report. To include the edited record's search hit, index or reindex the database and re-run the search.
|
When printing documents with ideographic text, like Chinese, a character underlined for hit highlighting can easily be confused with other characters. Select bold, italicize, or color to highlight search hits in these languages. |
15.To define the document print range, change the font, margin, orientation and printer settings, and preview and save your print settings, click the Print tab.
i.The Total field is a read-only field, and displays the total number of documents in the current query. The First and Last fields determine the document print range for the report. The First field defaults to the first document in the current query, and the Last field defaults to the last document in current query.
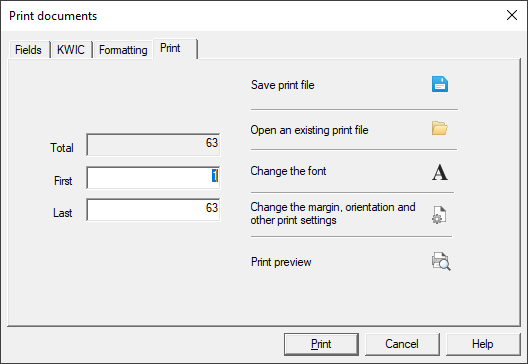
16.In the First field, type the number of the first document you want to include on the report.
17.In the Last field, type the number of the last document you want to include on the report.
i.Concordance Desktop prints all documents between and including the first and last documents defined in the First and Last fields.
18.Click one or more of the following buttons:
Button Name |
Definition |
|---|---|
Save to Print file |
Click to open the Print Format dialog box and save your settings to a print format file (.fmt). For more information see To save your print settings. |
Open an existing print file |
Click to open the Print Format dialog box and select an existing print format file (.fmt) to use for printing the report. For more information, see To print a standard report from an existing print file. |
Change the font |
Click to open the font menu. Click the font type you want to modify to open the Font dialog box and modify the font. You can modify the font for the fields, data, transcripts, and header and footer in the report. |
Change the margin, orientation, and other print settings |
Click to open the Page Setup dialog box and define the paper size and source, and the page orientation and margin settings. By default, reports print to your computer's default printer. You can click the Printer button in the Page Setup dialog box to select a different printer for the report. |
Print preview |
Click to preview the report. To print directly from the preview screen, click the Print button. To return to the Print documents dialog box, click the Close button. |
19.Click the Print button to generate and print the report.
To Save Your Print Settings
1.On the Standard toolbar, click the Print button.
2.In the Print documents dialog box, define your print settings on the tabs.
3.On the Print tab, click the Save print file button to open the Print Format dialog box.
4.Browse to where you want to save the file, type the file name in the File name field, and click the Save button.
All of the print settings are saved including selected fields, fonts, page orientation, paper size, headers and footers. The file is saved in plain text format and can be edited with any text editor or word processor that uses plain text. The print format file’s file extension is .fmt.
To Print a Standard Report From an Existing Print File
1.On the Standard toolbar, click the Print button.
2.On the Print tab, click the Open an existing print file button to open the Print Format dialog box.
3.Browse to and select the print format file you want to use.
4.Click the Open button to load the print settings into the Print documents dialog box.
5.Click the Print preview button to preview the report, and make any necessary changes to the print settings.
6.Click the Print button to generate and print the report.