Images are produced using the Production Wizard in Concordance Image. You can produce images following the steps in the Production Wizard, or you can run the production using a previously saved production settings .psf file. See Production Settings for more information.
Running the Concordance Image Production Wizard
1.Create a directory folder to store the production files.
2.Determine your production page count. See Determining your Page Count.
3.In Concordance Image, from the Tools menu, select Produce. The Production dialog displays.
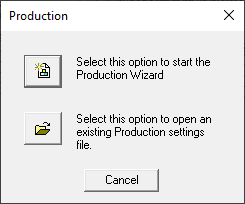
4.If you do not have previous production settings saved, click Select this option to start the Production Wizard. The Range dialog displays.
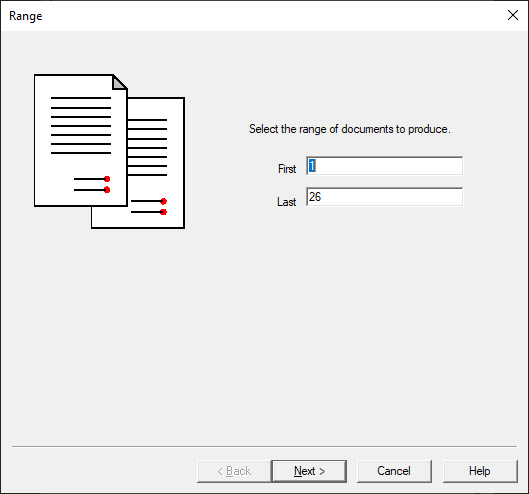
5.Enter the record number for the First and Last document in the range you want to produce.
6.Click Next. The Images dialog displays.
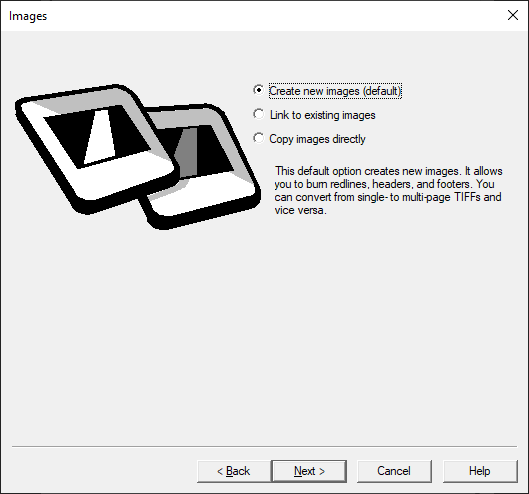
7.Select one of the following options:
•Create new images (default) - creates new images based on the original images. It allows you to burn headers and footers as well as redlines onto the images. You can also convert from single to multi-page TIFFs and vice-versa.
•Link to existing images - creates a production set that links to the existing set of images. Most of the time you will also create an imagebase or log file that links to the subset of images you are producing. This option does not allow you to burn headers, footers, or redlines onto the images.
•Copy images directly - copies the image directly from the source directory to the destination directory, but you cannot burn headers, footers, or redlines onto the images. Typically, this option is not used for productions, but is used for large print jobs.
8.Click Next. If you selected Create new images (default) or Copy images directly, the Directory dialog displays and you can continue to step 8. Otherwise if you selected Link to existing images, the Imagebase dialog displays and you can skip to step 11.
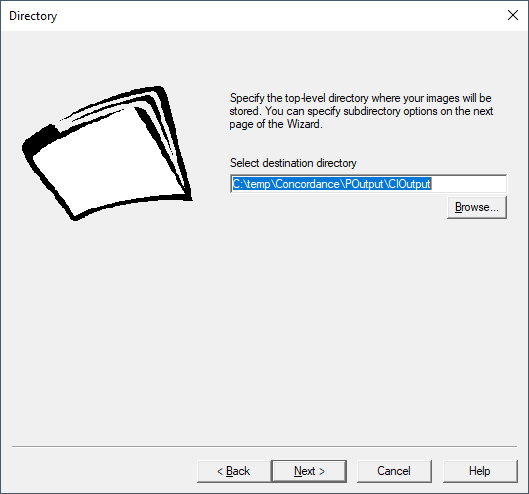
9.The Directory specifies the top-level folder where production images should be saved. Click Browse to navigate to and open the folder to use for saved images.
10.Click Next. The Subdirectory dialog displays.
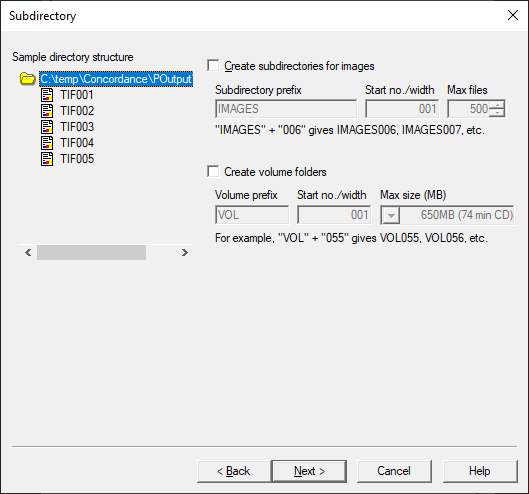
11.If you create both image and volume subdirectories, volume directories are created below the top-level directory and image subdirectories are created below each volume directory. You can copy the contents of the volume directories directly to removable storage media for distribution.
•Select Create subdirectories for images if you want to create image subdirectories. Then specify:
oSubdirectory prefix is the string that will be used as a prefix for image subdirectory folder names.
oStart no./width defines the starting number to use in the image subdirectory folder names. Zero fill your starting number to define the desired number width.
oMax files determines the maximum number of image files allowed in each image subdirectory folder.
•Select Create volume folders if you want volume folders. Then specify:
oVolume prefix is the string that will be used as a prefix for volume folder names.
oStart no./width defines the starting number to use in the volume folder names. Zero fill the starting number to define the desired number width.
oMax size determines the maximum file size allowed in each volume folder. When a volume fills to the maximum size, a new volume folder is created and the image subdirectories start renumbering from the beginning. Documents will not be split across volumes.
12.Click Next. The Imagebase dialog displays.
13.Select Create new/append imagebase if you want to create an imagebase that contains references to the images you are producing. If you are referencing these images from a Concordance database you need to select this option. Click Browse to navigate to a directory and specify a File name for the new imagebase or select an existing imagebase .dir file. Click Save. For new files, clicking Save displays a message confirming this is a new file. Select Yes.
14.Select Create Concordance Image log file (cross reference file) if you want the wizard to generate a log file. The log contains the image alias, path and file name for each of the images in the imagebase. The log file is a delimited ASCII file, and it can be used later to create an imagebase. Click Browse to navigate to a location and specify a File name for a new log or select an existing log to append to. Click Save. For new files, clicking Save displays a message confirming this is a new file. Select Yes.
15.Click Advanced if you want to create custom image paths for each image in the imagebase. The Advanced dialog displays.
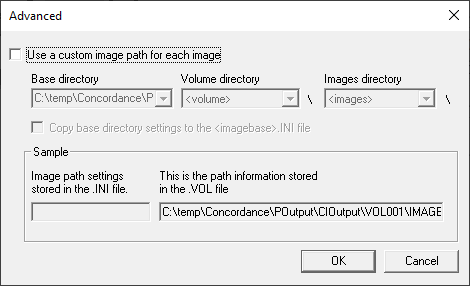
•Select Use a custom image path for each image allows you to customize the image paths in the imagebase.
•In Base directory, select the top-level directory where your images will be stored. If you do not know the final destination for the images, select <none> in the Base directory field. Later, when you know the image path, you can add the image path to the imagebase using the Imagebase Management dialog.
•In Volume directory, select <volume> to organize images in volume directories or <none> if you do not want image volumes included.
•In Images directory, select <images> to organize images in image subdirectories or <none> if you do not want image subdirectories included.
•Selecting Copy base directory settings to the <imagebase>.INI file will save the path for future use.
•Click OK to close the Advanced dialog.
16.On the Imagebase dialog click Next. The Numbering dialog displays.
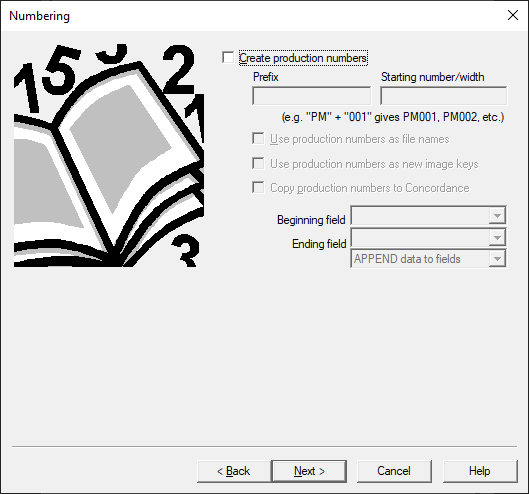
17.The Numbering dialog allows you to define production number details for the images in a production set. Select Create production numbers and then:
•Prefix specifies the production number prefix. This can be any combination of letters, numbers, or punctuation.
•Starting number/width defines the first production number to use. Zero fill the starting number to determine the number width. You must be careful to use an appropriate width that will accommodate the total number of pages that will be produced (determined in step 2).
•Select Use production numbers as file names to have Concordance Image replace image file names with production numbers. For example, if you had an image file named IMG0001.tif and your production number is P1CF0001, the new image file will be named P1CF0001.tif.
•Select Use production numbers as new image keys to store the production number image keys in the imagebase for accessing the image from Concordance.
•Selecting Copy production numbers to Concordance will store the beginning and ending production number for each document in the Concordance record. You must also specify:
oIn Beginning field, select the field you want to use to store the beginning production number.
oIn Ending field, select the field you want to use to store the ending production number.
oSelect either APPEND data to fields to append the production numbers to any existing data in the fields or OVERWRITE data in fields to replace existing data with the production numbers.
18.Click Next. The Header & Footer dialog displays.
19.The Header & Footer dialog allows you to permanently place or information on any or all of the four corners of the production images. Images will be scaled to accommodate space for the headers and footers you specify on the production image.
|
Concordance only supports headers and footers in TIFF image files for a production. |
20.In each of the Left header, Right header, Left footer, and Right footer drop downs you can:
•Manually type any text string that you want to appear in that position.
•Select a macro (denoted by angle brackets) that defines the text to be produced. The Macros include:
o<Date & Time> – The date and time the image was produced
o<Date> – The date the image was produced
o<Document number> - The document number of the current image (i.e. Document 4 of 10)
o<Image key> - The image key as it appears in Concordance
o<Page number> – The current page number (i.e. Page 1 of 4)
o<Production number> – The current production number
o<Time> – The time the image was produced
•Select a Concordance field. Text from the associated field will be included up to the first line or first 60 characters.
21.For each header or footer you can also select Auto increment. If this is selected, Concordance Image will automatically increment the header or footer by 1. For example, if you manually type PM-0001 for the Left header text and select Auto increment, Concordance Image will print PM-0001 for the left header on the first image, PM-0002 on the second image, and so on.
22.If desired, click Font for each header or footer to display the Font dialog and modify the font to use in that area.
23.Click Next. The Options dialog displays.
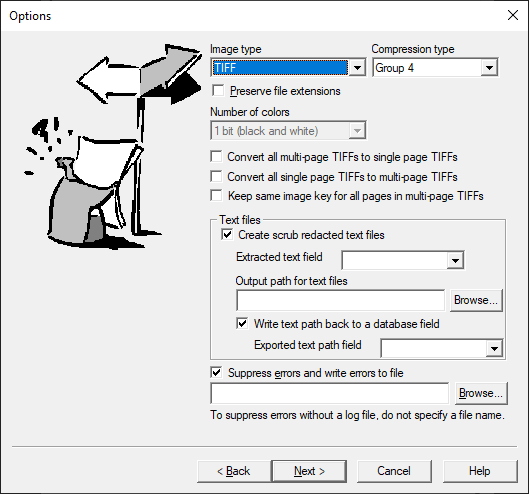
24.Select the Image type and Compression type you want for your produced image files. See Image File Types for Production for more information.
25.Select Preserve file extensions to keep the image file extensions.
26.For Image type and Compression type selections that support color, select the Number of colors.
27.Select either Convert all multi-page TIFFs to single page TIFFs or Convert all single page TIFFs to multi-page TIFFs. Then select Keep same image key for all pages in multi-page TIFFs if desired.
|
In order to properly convert multi-page TIFF files to single-page TIFF files, your image files should have a numeric suffix. For example, PM0001.tif and not PM0001a.tif. |
28.If you selected TIFF or CALS as your Image type, you can select Create scrub redacted text files if you want to produce scrubbed text files for images that have been redacted. You also need to specify:
•Extracted text field is the Concordance field containing text for image files that do not have redactions and do not need to be OCRed.
•Click Browse to navigate to a location and select a folder to specify for the Output path for text files. This is where the text files will be produced. If an image file contains redactions, the output text file will be scrubbed. For non-redacted files the output text file will contain the data from the Extracted text field.
•If you want the path to the text file saved in a Concordance field, select Write text path back to a database field and then select the field in the Exported text path field drop down.
29.Select Suppress errors and write errors to file if you want any error messages during the production to be suppressed and written to an error log file. Click Browse to navigate to a location and specify a File name for the log.
30.Click Next. The Redlines dialog displays.
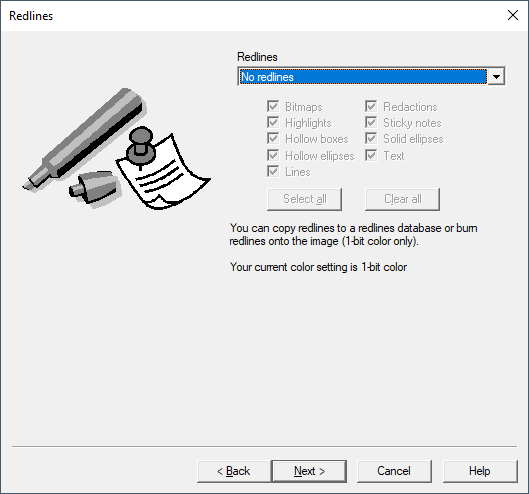
31.In the Redlines drop down, select an option:
• No redlines - this will ignore all redlines on the images being produced.
•Copy redlines to redlines database - this option copies the redlines from the produced images to a redlines database that tracks redlines for each image in the imagebase. Whenever you add or move redlines on an image, the redlines database is updated. If you select this option, redlines for produced images can be moved, deleted, and altered.
•Burn redlines onto image - this image will permanently place or burn redlines onto the produced images. The redlines cannot be moved, deleted, or altered in any way.
32.If you selected Copy redlines to redlines database or Burn redlines onto image, then you should select any specific redline types that you want to be copied or burned. Click Select all to select all redline types at one time.
33.Click Next. The Produce dialog displays. The Start document and End document numbers for the production are displayed at the top.
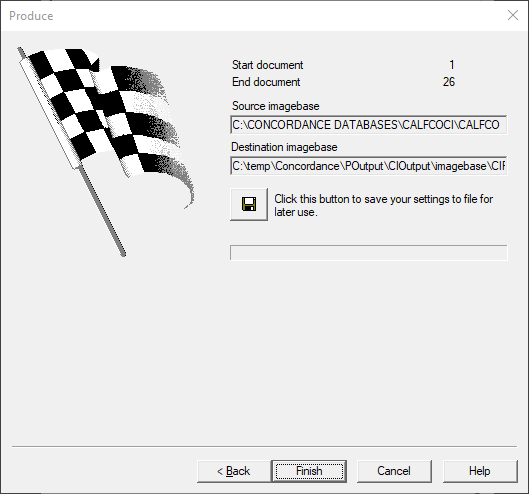
34.You can select Click this button to save your settings to file for later use. Navigate to a location, specify a File name for the production settings, and click Save.
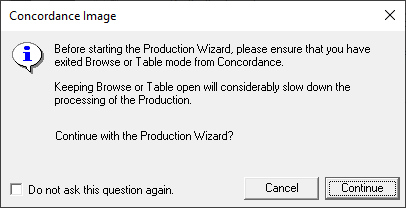
35.Click Finish to produce the images. A continue message is displayed.
36.Click Continue. The Produce dialog displays a progress bar at the bottom while the production is running. If errors occur you will see a message allowing you to view the log file.
37.Click Done to exit the Production Wizard.
After completing the image production, it is best practice to export the production numbers and other necessary field data from Concordance to a delimited text file. This information may be needed later for opposing counsel or an internal production review. See Exporting Delimited Text Files for more information.
Determining your Page Count
Prior to running the Production Wizard in Concordance Image, you should determine the number of pages you will be producing. This page count will help you define the appropriate production numbers using the Wizard.
1. In Concordance Image, on the File menu, select Print. The Print dialog displays.
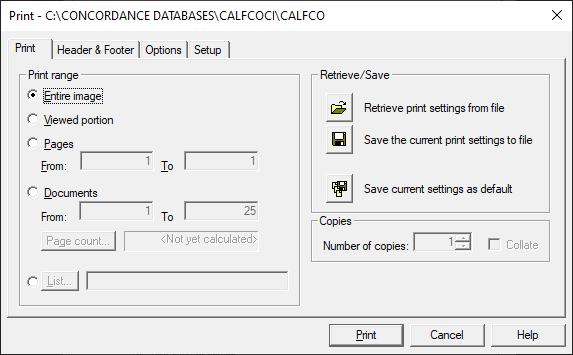
2.On the Print tab, select Documents in the Print range section.
3.Click Page count. The dialog updates to display the current page count. Make a note of this page count.
4.Click Done to close the Print dialog.