<< Click to Display Table of Contents >> Navigation: Using CloudNine LAW > Grid Displays > Grid View Overview |
The primary function of either Grid View is to display search results generated by the Database Query Builder. Once these results have been generated, all records associated with the defined search are presented here. A host of different document processing operations for those records become available from within this utility. These operations are explained more in-depth in other topics:
For now we'll provide a quick overview of the Grid Views, including some of the useful functionality found within, along with how to Sort and Filter Search Results:
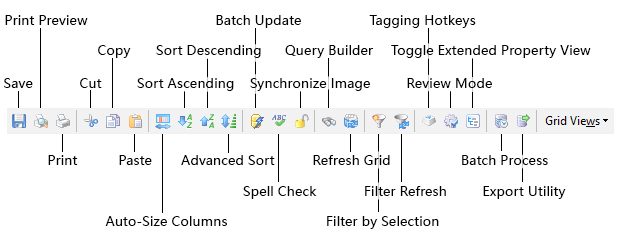
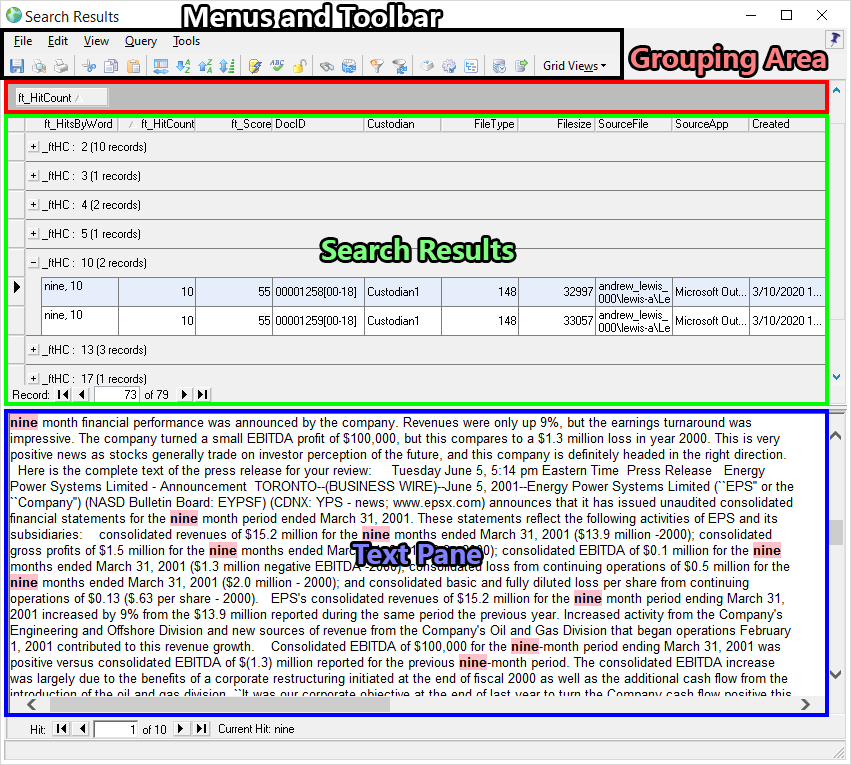
Standalone Grid ViewNOTICE: The Embedded Grid View is similar in structure, but lacks the Menu and Text Pane regions shown, and has fewer Toolbar buttons. Menus and Toolbar•File - Here you can save search results, setup page properties for printing, and preview or print search results. •Edit - Contains several quality controls features, such as the ability to cut/copy and paste record data, delete records, find and replace specific record data, or perform batch updates on select Metadata Fields for all displayed records. •View - Provides access to several options for customizing the overall appearance of the grid. •Query - Provides access to the Database Query Builder, various controls for Filtering the current search results (explained below), and several shortcut Database Query Builder search commands. •Tools - Provides access to the various tools and utilities used to perform document processing operations on search results, such as the Batch Processing Utility and the Export Utility.
Search ResultsThis pane displays records from the Case Directory that match search queries performed through the Database Query Builder in a spreadsheet-style format. Rows are used to represent individual records or groups of records, while columns are used to represent Visible Metadata Fields. Use the Field List window to determine which Metadata Field columns are viewable along the top of this pane. You can synchronize the records displayed within the Search Results pane with the Case Directory portion of the Main User Interface by clicking on the Synchronize Image button in the Toolbar. With synchronization active, selecting records from within this pane will cause them to also be selected within the Case Directory. This helps to quickly locate these records so that other actions may be taken from the Main User Interface, such as manipulating document images or opening native source files. Grouping AreaRecords displayed in the Search Results pane can be grouped according to the data stored within their viewable Metadata Fields. Click+drag the Metadata Field columns displayed along the top of the Search Results pane into the Grouping Area in order to group the displayed records by that column/field. Continue dragging more columns into the Grouping Area to add more group levels, or drag columns back out of this area in order to remove them. You can further organize the group level hierarchy by clicking+dragging columns left or right within this area. Columns on the left are considered higher in group level than columns on their right. While grouping is active (as shown), groups of records can be expanded with the [+] buttons on the left in the Search Results pane, or collapsed with the [-] buttons once expanded. You can also expand, collapse, or clear all groups simultaneously by right-clicking on any group within the Search Results pane and selecting the appropriate option from the pop-out menu. Other actions while grouping •Right-click any group and then select either Expand All Groups or Collapse All Groups. •To remove a single grouping, click and drag the column header from the grouping area to the area containing the column headers. •To remove all groups at once, right-click on any grouping in the grid and then select Clear All Groups. Text PaneThis pane is only available in the Standalone Grid View for full-text searches performed with the Database Query Builder (as shown). Once performed, any extracted or OCR-created text is displayed here for records selected within the Search Results pane, and text hits are highlighted for ease of detection. If no full-text search was performed, then the Search Results pane will instead be extended down over top of this pane. You can change where this pane is located (or turn it off altogether) from the Menu by selecting View > Text Pane > Left / Bottom / Right / Off. |
Records displayed within the Search Results pane can be Sorted or Filtered based on your specific needs:
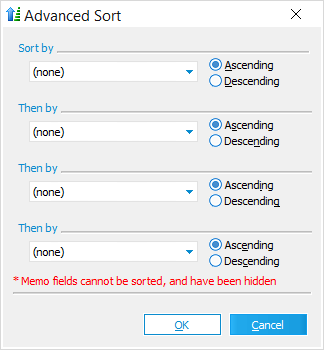
SortingSorting these records can be achieved in two distinct ways: 1)Left-click on any column along the top of the Search Results pane, and then click on either the Sort Ascending or Sort Descending button in the Toolbar to sort all records by that column/field. i.Alternatively, from the Menu you can select Tools > Sort Records > Ascending / Descending instead (Standalone Grid View only). 2)Click on the Advanced Sort button in the Toolbar to access the Advanced Sort tool (shown), which allows you to choose up to 4 Metadata Field columns to sort all records by, along with whether or not those columns/fields should be sorted by Ascending or Descending record data (Standalone Grid View only). |
Filtering these records can be achieved in two distinct ways:
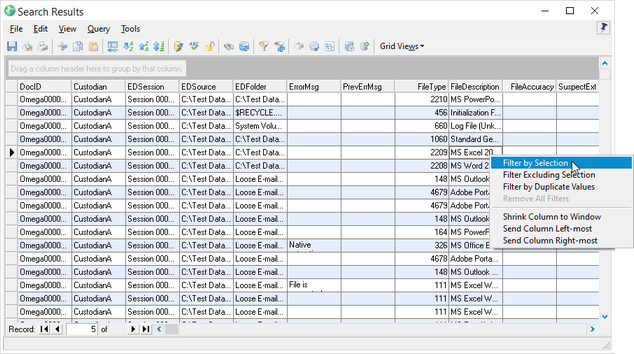
1)Right-click on any cell and select either Filter by Selection or Filter Excluding Selection from the pop-out menu:
a)Filter By Selection causes all records containing the same data within that column/field to be displayed, and all other records to be excluded from the current search results.
b)Filter Excluding Selection causes all records containing the same data within that column/field to be removed, displaying only the remaining records from the current search results.
i.Alternatively, from the Menu you can select Query > Filter by Selection / Filter Excluding Selection instead (Standalone Grid View only).
For example, to view only records with the .xls file extension, you would right-click one of the cells containing xls, and then click Filter by Selection.
Clicking Filter by Selection filters the search results so that only records containing files with the .xls file extension are displayed.
Add more filters on the search results as needed. |
To process the filtered documents, launch the Batch Process or Export Utility from the grid; only the current record set will be selected for processing. |
2) Right-click on any cell and select Filter by Duplicate Values from the pop-out menu to show only records containing identical data within that column/field.
ii.Alternatively, from the Menu you can select Query > Filter by Duplicate Values instead (Standalone Grid View only).
Multiple filters can be applied by using the first method described above. To reset/remove these filters, right-click on any cell and select Remove Filters from the pop-out menu. This will remove all filters that are currently applied. Alternatively, from the Menu you can select Query > Remove Filters instead (Standalone Grid View only).
In addition to filtering records using the Filter by Duplicate Values menu selection in the grid view, you can also locate duplicate values within specific case fields using the Find Duplicate Values menu selection on the Tools menu in the main LAW window.
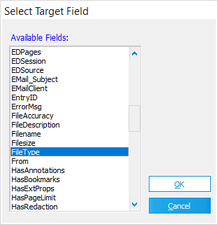
1.In the main window, on the Tools menu, click Find Duplicate Values. Clicking Find Duplicate Values opens the Select Target Field dialog box. 2.In the Available Fields list, click the field where you want to find duplicate values. 3.Click OK. Your search results are opened in the grid view. All records containing duplicate values in the selected field are listed in the search results. Null values are not considered when identifying duplicate values in a field. If there are no duplicate values in the selected field, the No records were found for the specified query. message is displayed. 4.To sort the duplicate values in the selected field in ascending or descending order, click the field's column header to sort the records.
|