Return to Section Header
Several of the customization options presented here (marked with an *asterisk) can be saved for future use with other Case Files as a Grid View Profile. The remaining customization options are only available within the Standalone Grid View, but will still affect the Embedded Grid View as well.
*Showing/Hiding Metadata Field Columns
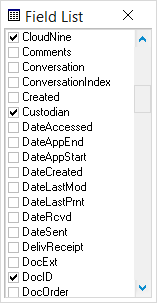
Alternatively, from the Menu you can select View > Field List.
From this window, simply check the box on the left of each Metadata Field you wish to show, or un-check the box for Metadata Fields you wish to hide. Only Metadata Fields with the Visible property are available from this list. You can change which fields are Visible by managing them within the Modify Fields utility. |
*Changing the Column Order
Metadata Field columns in the Search Results pane can be re-organized by clicking+dragging them left or right to a new location along the top of this pane. You can also right-click on any cell within them and select either Send Column Left-most or Send Column Right-most from the pop-out menu to automatically re-locate them to the far left or far right respectively.
*Changing Column Widths
Metadata Field column width can be changed by clicking+dragging left or right on the boundaries between them at the top of the Search Results pane. Selecting a column and clicking the Auto-Size Columns button in the Toolbar will automatically adjust its column width to fit the max character length of data stored for all records currently displayed. If columns become too wide, you can right-click on any cell within them and select Shrink Column to Window from the pop-out menu to automatically reduce the width of that column so that it fits the current width of the Search Results pane.
*Changing Row Height
Row height can be altered by clicking+dragging up or down on the boundaries between them at the left-hand side of the Search Results pane.
Changing the Color Scheme
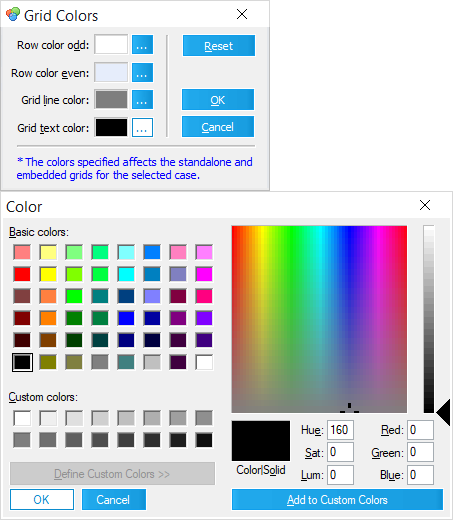
From within this tool, you can view and change the following colors: •Row color odd - The background color used for the first row, and every other (odd) row. •Row color even - The background color used for the second row, and every other (even) row. •Grid line color - The color used for the lines separating individual cells (by rows/columns) within the grid. •Grid text color - The color used for all text (record data) displayed within individual grid cells.
Pressing the [...] buttons to the right of each color option opens the Color window, giving you access to the palette of Basic colors to select from, along with several user-definable Custom colors. Click on the Define Custom Colors button to expand the Color window out to the right (as shown), giving you access to the full RGB color selector for defining the Custom colors palette. To define Custom Colors, select a color option from the Custom colors palette, pick a new color with the RGB color selector, and then click on the Add to Custom Colors button at the bottom-right.
Once you have selected a new color, either from the Basic colors or Custom colors palettes, click on OK at the bottom-left of the Color window to apply that color. All color selections made within the Grid Colors and Color windows apply to the currently active Case File only.
|
Displaying Document and Page Totals
In the Standalone Grid View, you can toggle (turn on/off) the total number of documents/pages currently listed (as records) at the bottom-right of the utility. Displaying these totals may introduce a slight delay when searches are performed.
From the Menu, select View > Doc/Page Totals.

