Return to Section Header
Users can create distributive batch processes through the LAW Management Console without launching CloudNine™ LAW.
Databases need to be created in SQL to create a batch processing job through the LAW Management Console. If running a batch process that requires flag reset prior to processing, then it is recommended to set up the distributed batch through the database where you can reset the flags prior to OCRing etc.
![]() When Should I Create a Distributed Batch Process Through the LMC vs through the Database
When Should I Create a Distributed Batch Process Through the LMC vs through the Database
Use the LMC - If you need to start a large process and are not a regular user of CloudNine™ LAW, then the LMC is quick and easy to get to a large number of documents for batch processing started. Creating jobs does not use any licenses - when the job starts, each client will pull required licenses to join the process.
Use Distributed Batch Processing through the database, if you need to query/filter for specific documents, or reset OCR flags first.
|
![]() Creating a Distributed Batch Process Through the LMC
Creating a Distributed Batch Process Through the LMC
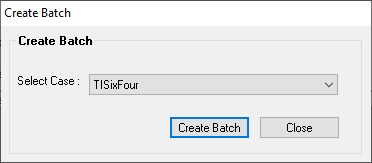
1. 2.Launch the LAW Management Console 3.In the LAW Management Console, select Tools from the tool bar. 4. Select Create batch job. Create Batch opens in a new window. 5. Select the database from the list of SQL Databases in the Select Case dropdown.
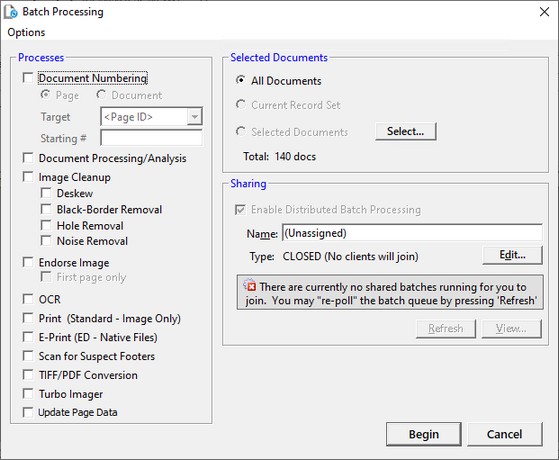
6.Click Create Batch. Batch Processing opens in a new window. 7. In the Batch Processing dialog box select the documents to be processed on the right. You can select All Documents, Current Record Set (all documents), or click Select to choose specific folders. 8.Select the batch Processes that you wish to run.
9. Type a name for the batch over the default of (Unassigned). The batch name is visible to other workstations when they are prompted to join a distributed job. The batch name is also visible in the LAW Management Console (LMC). 10.Under Enable Distributed Batch Processing select Edit. The Create/Modify Job Invitation dialog will open. 11.Select the Invitation Type. The invitation type determines how the job is handled by other stations when utilizing the LMC. •Closed. (Default) None of the LMC instances will be able to auto-join LAW to the shared batch. LAW workstations can still be joined to the job manually. •Open. All LMC instances automatically join LAW to the shared batch. •Restricted. Only selected LMC instances will automatically join the process. If you choose Restricted, select computers that can participate in the batch process from among available computers in the Clients area of the dialog box. 12. In the Limit no. of stations for the job field, enter the maximum number of work stations that can process data for the batch process job at any given time. The Limit no. of stations for the job field defaults to 0. When the Limit no. of stations for the job field is set to 0, all available work stations will process data for the job. 13. Configure Scheduling as needed. This option prevents the job from starting until after the date and time that you specify. 14. It is important to select the Clients that will be used for the distributed processes. If no clients are selected then you must manually join the batch process. 15.Once you are done updating the Job Invitation click Accept. The Create/Modify Job Invitation window will close leaving the Batch Processing window open with your settings. 16.Select Begin. The Batch Processing window closes and the job will be added to Batch Process Jobs list in the LMC and also under Jobs>Batches> (Job name) on the left side.
|
 Close LAW on the workstation that you are using.