Return to Section Header
The Inter-Case Deduplication Utility externally scans electronic documents and flags duplicate (identical) records across multiple Case Files. It's recommended not to use this utility on cases in which deduplication was already performed - either while importing documents via Turbo Import or ED Loader, or through the internal Deduplication Utility.
Unlike most of the other built-in utilities, this utility is opened from outside of LAW.
|
Inter-Case Deduplication is not designed for a combination of Turbo Import cases and Electronic Discovery cases. Turbo Import cases are hashed differently than Electronic Discovery. Turbo Import cases can be deduplicated against other Turbo Import cases. ED Loader cases can be deduplicated against other Ed Loader cases. |
 (Re)Running the Inter-Case Deduplication Utility
1.Launch the Inter-Case Deduplication Utility by clicking on Start (Windows Key) > CloudNine LAW > Inter-Case Deduplication Utility from the Windows Taskbar.
i.You can also use the Windows File Explorer to navigate to your "LAW50" install folder (default C:\Program Files (x86)\LAW50) and double-click on "InterCaseDedup.exe" instead.
2.Choose an External Deduplication Database file for the current session by doing one of the following:
1)Open an existing database file by either clicking on the [...] button in the Database pane, selecting File from the Menu and clicking on Open, or pressing Ctrl + O on your keyboard.
2)Create a new database file by following the instructions shown below.
3.Configure settings as desired for the current deduplication session within the Options pane.
4.Add or Remove any number of desired "project.ini" Case Files to the Member Cases pane with the appropriate buttons on the right.
5.Ensure the listed Member Cases are organized properly by highlighting them from the list and moving them with the Up or Dn buttons on the right.
i.Cases higher up on the list will have their documents prioritized as the original master record (non-duplicate) when duplicates are identified in other cases lower on the list.
6.With all desired Member Cases now listed in their proper order, start the deduplication session by clicking on Begin at the bottom-right.
7.The Inter-Case Deduplication Utility closes, and the Inter-Case Deduplication Progress window opens, indicating the progress for the current session.
8.Once finished, the Inter-Case Deduplication Progress window closes, and the Summary window opens, displaying the results of the current session.
i.You can save this Summary by selecting File from the Menu at the top-left, and clicking on Save As (Ctrl + S). A File Explorer opens, allowing you to save the results as a TXT file.
9.When you're done reviewing the results, you can click on Exit at the bottom-right to close the Summary window and end the current session. You will be returned to the Inter-Case Deduplication Utility.
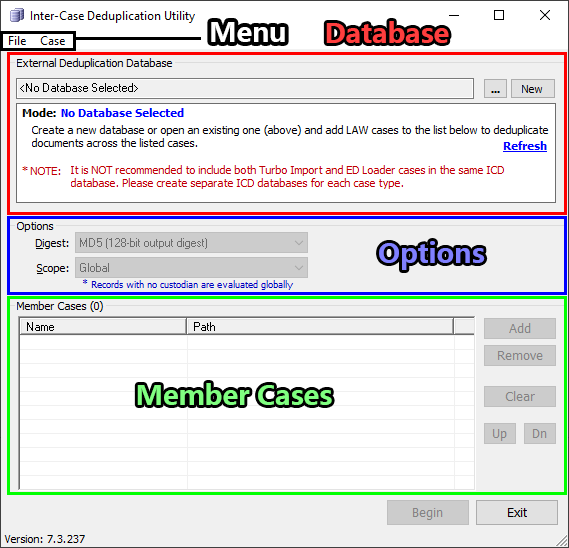
Menu•File - Here you can create a New (Ctrl + N) database, Open (Ctrl + O) an existing one, or Exit the utility. •Case - Offers the same controls shown in the Member Cases pane: Add (Ctrl + A), Remove (Ctrl + R), Clear, Move Up (Ctrl + U), Move Down (Ctrl + D) Database•External Deduplication Database - This field indicates which database is being used by the Inter-Case Deduplication Utility for the current session. o[...] - Opens a File Explorer, allowing you to locate either an MDB (Access) or ICD (SQL) file to use as the External Deduplication Database. oNew - Opens the Select Database Type window, allowing you to create a new External Deduplication Database file in either SQL or Access (explained below). •Mode - Displays various status messages depending on the current External Deduplication Database file being used: oNo Database Selected - A database file has yet to be selected. oNew - The selected database file has yet to perform any deduplication. oResume/Append - The selected database file has already performed deduplication. Only documents that were imported/added to Member Cases after the most recent deduplication session are scanned and compared for duplicates. oRebuild/Flush - The selected database file was previously in Resume/Append mode, but a change was made to one or more Member Cases that now requires the database to be rebuilt. A details link becomes available in this mode, and clicking this link opens a dialog window indicating what changes occurred. This mode is otherwise functionally similar to New mode, and running a full deduplication will return the database to normal. Options•Digest - Provides two choices for the type of hashing being used to detect duplicates: MD5 (128-bit output digest), or SHA1 (160-bit output digest). •Scope - Provides two choices for the level (hierarchy) at which documents are compared for duplicates: oGlobal - All documents across all selected Member Cases are compared. oCustodian Level - Documents sharing identical Custodians across selected Member Cases are compared. Documents without a Custodian are compared globally instead. Member CasesThis pane displays a list of all Case Files that have been selected for deduplication within the chosen External Deduplication Database file. Cases listed here have their case Name and file Path shown for reference purposes. Cases higher up on the list will have their documents prioritized as the original master record (non-duplicate) when duplicates are identified in other cases lower on the list. Highlight cases from the list by left-clicking on them. •Add - Opens a File Explorer, allowing you to navigate to a "project.ini" file located within the top-level folder of the desired case you wish to add to the list. •Remove - Deletes the highlighted case from the list. •Clear - Deletes all cases from the list. •Up - Moves the highlighted case one line up on the list. •Dn - Moves the highlighted case one line down on the list.
|
|
Note the following facts when considering using the Inter-Case Deduplication Utility: •After a case is deduplicated using the Inter-Case Deduplication utility, the case should not be deduplicated using the internal Deduplication Utility, and incoming documents should not be deduplicated using ED loader. Doing so can lead to issues with purging, reviewing, and filtering duplicate records caused by a mixture of internal and external duplicates existing in the case. See ED Loader Deduplication, Turbo Import Settings Filters and/or Deduplication Utility topics for more information about these risks and associated warnings. •In addition to creating a database for each case, LAW also creates a database external to the case database. The external deduplication database can be created as a Microsoft SQL database (*.MDB file). The purpose of this database is to maintain deduplication information. When you use the Inter-Case Deduplication Utility, the database registers each case added. Cases are ready for inter-case deduplication after they have been populated with records via the ED Loader or Turbo Import. Records added to these cases during subsequent imports can also be deduplicated.
|
|
Errors that halt processing or cancelling the deduplication process will both result in the database entering Rebuild/Flush mode. |