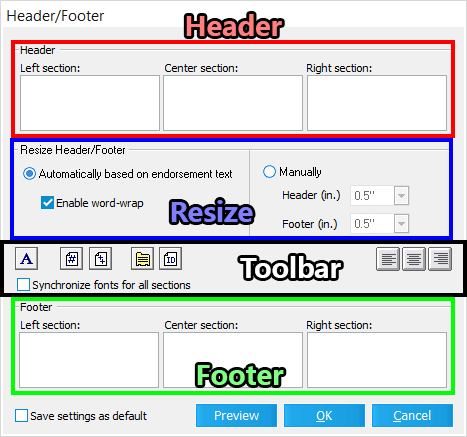
Batch Processing Options

<< Click to Display Table of Contents >>

Navigation:  Using CloudNine LAW > Processing Documents > Batch Processing >

Batch Processing Options

The following windows each provide the necessary configuration options for the various processes that are available within the Batch Processing Utility:

RightArrowCovered in other topics:

DocumentAnalysisOptionsWindowIcon Document Analysis Options

This window is used to configure settings for the Document Processing/Analysis process of the Batch Processing Utility. The EP Fields generated from this process are uniquely named based on the metadata extracted from associated documents.

Capture custom metadata for Adobe PDF files - This metadata is used to generate and populate EP Fields for all related documents.

Capture custom metadata for MS Office files - This metadata is used to generate and populate EP Fields for all related documents. Does not apply to Publisher or Access files.

Capture EXIF metadata for image files (TIFF/JPEG) - This metadata is used to generate and populate EP Fields for all related documents.

Detect bookmarks in Adobe PDF files - Assigns a Y to the HasBookmarks field when detected.

oSplit document on bookmarks - Once splitting has occurred, bookmark names from the original file are assigned to each new document's BookmarkName field, and the original PDF file is deleted.

Detect comments for MS Word/Excel/PowerPoint and PDF Files - Assigns a Y to the HasComments field when detected.

Detect hidden rows and/or columns for MS Excel files - Assigns a Y to the HasHiddenRow and/or HasHiddenColumn fields when detected.

Detect hidden sheets for MS Excel files - Assigns a Y to the HasHiddenSheet field when detected.

Detect hidden slides for MS PowerPoint files - Assigns a Y to the HiddenSlides field when detected.

Detect speaker notes for MS PowerPoint files - Assigns a Y to the SpeakerNotes field when detected.

Detect tracked changes for MS Word and Excel files - Assigns a Y to the HasTrackChanges field when detected.

Back to:

HeaderFooterWindowIcon Header/Footer

This window is used to configure both the Header and Footer settings for the Endorse Image process of the Batch Processing Utility. You can click the Preview button at any time to open the Image Preview window to see a snapshot of how your current settings should appear.

Toolbar

The buttons provided here allow you to change the font format, add relevant page and/or Metadata Field information, and set the text alignment. Keep in mind that only Times New Roman, Courier, Symbol, and Helvetica fonts are supported for PDF files, and that certain light font colors (silver, white, gray, yellow, etc) may not be properly extracted when performing OCR. The following buttons open additional option windows:

Select font for current item - This will open the Font window, allowing you to configure the font format for the current section.

Adds an index field value - This will open the Select Field window, allowing you to select Available Fields to insert into the current section.
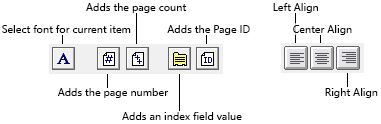
HeaderFooterToolbar

Synchronize fonts for all sections - Any changes made to the font format (Select font for current item) will be applied uniformly to all sections of the Header and Footer. Alignment is not affected by this setting.

Resize

This section is used to determine the overall size of the Header and/or Footer being added to documents:

Automatically based on endorsement text - The size is automatically adjusted in increments of 1/4" until it is large enough to fit all text.

oEnable word-wrap - Text is automatically moved onto new lines in order to fit properly. PDF files wrap text regardless of whether or not this setting is enabled.

Manually - The size is determined by selections made here, only taking effect if text is actually entered. 1/2" can sufficiently fit 2 lines of text at the default size (12 point font). Any text not fitting within the specified size is cropped out.

oHeader (in.) - Determines the size of the Header in inches.

oFooter (in.) - Determines the size of the Footer in inches.

Header

Type directly into these input boxes (max of 8 lines) to specify the Header text:

Left section - This is the left-most section of the Header.

Center section - This is the middle section of the Header.

Right section - This is the right-most section of the Header.

Footer

Type directly into these input boxes (max of 8 lines) to specify the Footer text:

Left section - This is the left-most section of the Footer.

Center section - This is the middle section of the Footer.

Right section - This is the right-most section of the Footer.


Considerations for Headers/Footers

When performing batch processes on larger sets of documents, it's good practice to first apply the Endorse Image process to a smaller group of documents before committing these settings to the entire batch.

You should use caution when adding endorsements to rotated images, as removing or later modifying this text can lead to actual image data being removed from those documents. To prevent this from occurring, ensure that images are always in the same orientation before adding, changing, or removing any endorsements.

Once these endorsements are applied, you can Validate Endorsed Images by using the Scan For Errors tool (File > Administration > Scan For Errors...).

Back to:

BatchPrintOptionsWindowIcon Batch Print Options

This window is used to configure printer settings for the Print (Standard - Image Only) process of the Batch Processing Utility:

Active Printer - This drop-down to determines which printer (driver) to use.

Auto-Rotate pages - Automatically rotates all page images 90º to the Left (counter-clockwise) or Right (clockwise) for printing.

Auto-Size paper - Automatically selects a paper size that most closely matches page image dimensions (including any endorsements, headers, footers, annotations, etc). Requires the Send jobs in batches of N pages option to be enabled in order to function properly.

Do not print annotations - Excludes any non-merged annotations from being printed.

Include separator pages - Prints a Separator Page at the start of each document. The following settings apply:

oOptions... - Opens the Map Placeholder Templates window, which is used to manage Separator Pages & Placeholders Templates.

oPaper Source - This drop-down determines which printer tray to use for Separator Pages. May not work with certain printer models, so it's recommended to test this before printing large document batches.

oPrint separator pages only - Only Separator Pages (for the selected documents) will be printed. Documents themselves are not printed.

oPrint folder break separator pages - Prints a Separator Page at the start of each folder.

Limit jobs in print queue to: - Sets a maximum number of documents (print jobs) that will be sent to the printer at any given time. Once this limit is reached, LAW will wait until documents have finished printing before sending more jobs to the Active Printer.

Rip to PDF before printing - Documents are converted to PDF before being sent to the printer. PDF format increases the compatibility for printers using PostScript drivers, therefore decreasing the overall print time.

Send jobs in batches of N pages: - Rather than sending individual documents to the printer as separate jobs, LAW will instead temporarily combine multiple documents into a single print job based on the page number entered here. For example, when using the default number (100 pages), 20 different 5-page documents would all be sent to the printer as one combined job. This helps correct the problem of documents being printed out of order with digital printers, and can also improve performance for high-speed printers. With this enabled, Separator Pages cannot be printed from a different tray unless the Auto-Size paper setting is also enabled.

Staple documents (Canon iR110 only) - Allows the Canon iR110 to staple documents together during the printing process. While this is the only printer supported with this feature, other printer models may also work.

Print Setup... - This button will open the printer-specific setup interface provided by its manufacturer.


A Knowledge Based Article on this subject can be found here: Viewing the Windows Print Queue (cloudnine.com)


Identifying LAW Print Jobs in the Spooler

Each print job LAW creates can be identified in the print spooler by the following format:

"LAW Batch <Value> - <Description>"

In this format, the <Value> portion is a 6-digit number (starting at 000001) that increments by 1 for each print job. For documents, the <Description> portion will either be the DocID, BegDoc#, or ID of the document being printed. For Separator Pages, the <Description> portion displays either "Break" for document separators, or "Folder Break" for folder separators. When using the Send jobs in batches of N pages setting, the <Description> portion is no longer present.

Back to:

WatermarkSettingsWindowIcon Watermark Settings

Watermarks are images files that are applied to documents in order to make using/copying them without permission more difficult. This window is used to configure Watermark settings for both the Endorse Image and Print (Standard - Image Only) processes of the Batch Processing Utility.

Watermark File - Select a Watermark (image file) to apply to documents from this drop-down menu. Previous Watermarks Files that have been used are available here. Click the [...] button on the right to open a File Explorer, allowing you to navigate to and select an image file to use as a Watermark. Most commonly used image file formats are supported.

Options - The following settings determine when/how the selected Watermark File will be applied:

oApply watermark to endorse process - The selected Watermark File will be applied alongside the Endorse Image process. This Watermark will be aligned to (but not a part of) the Header and/or Footer that is added to documents.

oApply watermark to print process - The selected Watermark File will be applied to the Print (Standard - Image Only) process.

Alignment - Select where the Watermark File should appear on printed documents from this drop-down menu. Only applies to the Print (Standard - Image Only) process.


Considerations for Watermarks

Watermarks cannot be removed once applied. You should make backups of case files before applying them.

When Watermarks are applied alongside the Endorse Image process, parts of the Watermark may be deleted/overwritten when later removing/editing those endorsements. Creating Watermarks with large margins (empty space) can help to avoid this situation by creating a buffer zone around them.

Document file types, color formats, and image resolutions all have an impact on how Watermarks are applied. For best results, its recommended to use Watermarks of the same file type as the documents they are being applied to.

Watermark colors resolve differently once applied. Lighter colors become transparent, and medium/dark colors become various shades of gray. Black will always resolve as black.

GIF image files with transparent regions are not compatible as Watermarks.

When a Watermark's dimensions are greater than the document to which it is being applied, it will be re-sized to fit to that document.

The file size of a Watermark image should be taken into consideration when processing large batches of documents, as larger file sizes increase the amount of processing time required.

Watermarks can also be used to redact text from documents. Use Microsoft Word to create a new document, position text boxes with black backgrounds onto the redaction areas, and then "print" as a TIFF file. This TIFF can then be selected as the Watermark File and applied to all documents that need redacting in the same spot. Just make sure to test the positioning on a backup of one of the documents before running the full batch process!

Back to:

TurboImagerOptionsWindowIcon Turbo Imager Options

This window is used to configure settings for the Turbo Imager process of the Batch Processing Utility.

Image output type - Determines whether documents are converted to Tiff or Pdf format.

Color Reduction - Select Reduce to black & white from this drop-down to convert all images into the black & white color mode. Otherwise, leave this at None for no color reduction. Color images use LZW compression, and black & white images use CCITT Group 4 compression.

Output Format - For Tiff conversion, images may be saved in either Serialized (single-page per file) or Multipage formats. For Pdf conversion, only Multipage format is available.

Resolution - Use this drop-down to determine the quality of converted images. Higher DPI (dots per inch) values increase both image quality and file size.

Display date and time in emails using - Allows you to establish the timezone used for all email files. The following options are available:

oTimezone used during import - The timezone from the current LAW workstation will be used.

oOriginal Timezone from email - The timezone from the email files themselves will be used.

oCustom Timezone - Select the desired timezone from the drop-down provided.


Considerations for Turbo Imager

Jobs are performed in the background via available LAW Agents (Windows Services). The number of available agents depends on the number of cores/licenses available in your environment, up to a maximum of 10 agents per job.

Once a job has completed, the converted images will become available within the $Image Archive folder of the Case Directory.

TIFF files have a maximum file size of 4 GB. This is due to the limitations of VintaSoft, which is used for conversion.

Only visible content within Excel spreadsheets will be used during image conversion. It is recommended to convert these documents using the TIFF Conversion process instead to avoid losing any data.

Suspending a Turbo Import session will also suspend any active Turbo Imager jobs for the same case.

For password protected files, Turbo Imager will first look at passwords defined during import in the Import Settings, Content tab for a Turbo Import case, or the Password Settings for an ED Loader case.  If a password cannot be found in the import settings that opens the file, Turbo Imager will then look at the TIFF Conversion Options Passwords list.