Customizing the Grid View
You can change how the grid shows or hides columns, adjust column width and row height, and change the colors used. You can also make fields visible or hide fields. You can also view any extended properties or Office properties associated with a document.
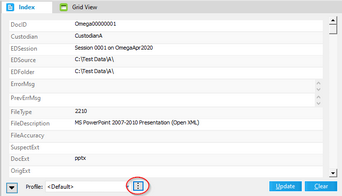
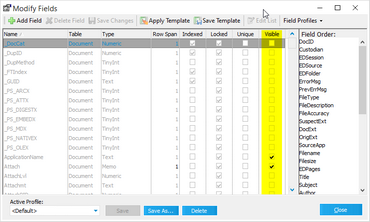
To show or hide fields in the embedded grid 1.From the main form, on the Index tab, click the ... button next to the Profile list. 2.In the Modify Fields dialog box, select or deselect Visible on fields to make them visible or hidden. 3.Click either Save to keep the fields you selected visible in the current profile, or click Save As and then create a new grid profile. 4.Close the Modify Fields dialog box. Any field with Visible selected in the previous steps can be seen the next time you display the embedded grid.
To show or hide fields in the standalone grid: 1.From within a grid view, right-click any column heading. The Field List dialog box appears. 2.Do the following: •Select any field you want to show. •Deselect any field you want to hide.
|
Custom metadata found in imported documents is placed into special fields called extended properties. You can use grid controls to view the extended properties of documents. To view extended properties, you must customize the view of the grid control. Then, you can identify any extended property by looking for those preceded by EP. For example, if you import a Word document that contains a value of Jones in its Typist field, LAW will create a new field for the case called EPTypist and populate the field for that document with the value Jones.
To view extended properties from the embedded grid 1.From the main form, on the Index tab, click the ... button next to the Profile list. 2.In the Modify Fields dialog box, scroll down to find fields that begin with EP. Fields that begin with EP contain extended property data. These fields can also be identified by looking at the Table column. Any field belonging to the Extended table is an extended field. 3.Select Visible on extended property fields as needed. 4.Click either Save to keep the fields you selected visible in the current profile, or click Save As and then create a new grid profile. 5.Close the Modify Fields dialog box. The extended fields you selected will be visible the next time you display the embedded grid.
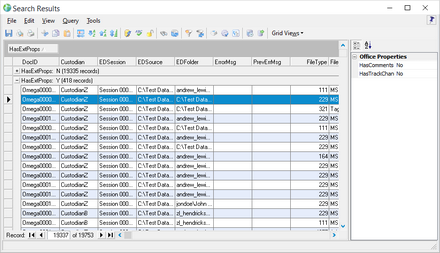
To view extended properties from a standalone grid 1.From the main form, on the Tools menu, click Display all Records. •Or click the Globe icon. A standalone grid opens. 2.Right-click one of the column headings. The Field List appears. 3.Select HasExtProps. The HasExtProps column appears in the grid. You might have to scroll left or right to find the column. 4.Drag the HasExtProps column to the grouping area. 5.Expand the HasExtProps record set. 6.Select any record with HasExtProps set to Y. 7.On the View menu, click Extended Properties. A panel opens to the right of the main grid window. Any extended properties that exist for the selected document are visible.
|
1.From within a grid view, right-click any column heading. 2.Do one of the following: •Manually select a column heading and drag it to a new location. Or •Right-click a column cell and then select either: •Send Column Left-most. Moves the column to the first position on the left in the grid. •Send Column Right-most. Moves the column to the first position on the right in the grid. If you close the grid you are prompted to save the change to the current grid profile. For more information on grid profiles see: Managing Grid Views.
|
1.From within a grid view, click and drag either edge of a grid column heading. Release the mouse button when the column heading reaches the width you want. Or •From either an embedded grid or a standalone grid, right-click within a column cell and then select Shrink Column to Window. The width of the column adjusts to the space available in the window.
|
•Click and drag the top or bottom edge of any row. Release the mouse button when the row reaches the height you want.
|
Columns and rows can be manipulated in a number of ways to make certain aspects of quality control easier and more efficient. •To move a column. Click and hold the column header and then drop it to the desired location. •To move a column to the right-most position in the grid. Right-click any cell in that column and then click Send Column Right-most. •To move a column to the left-most position in the grid. Right-click any cell in that column and then click Send Column Left-most.
|
1.From a standalone grid, in the View menu, select Grid Colors. The Grid Colors dialog box opens. 2.Click the button next to any of the following: •Row color even •Row color odd •Grid line color •Grid text color 3.In the Color dialog box, select a color and then click OK. 4.Click OK again to save your selection.
|
In the standalone and embedded grids, you can sort records based on one or more visible index fields.
To sort by a single field when the grid is not grouped In the column by which want to sort, click a cell and then do one of the following: •On the Tools menu, click Sort Records, and then click Ascending or Descending. Or •Click either the Ascending (
To sort by a single field when the grid is grouped When the grid is grouped, you will need to use the column headers to sort the grid, because sorting the grid from the grid toolbar will cause you to lose the grid grouping. For more information about grouping search results, see Grouping Search Results on a Grid.
1.Click the column for the field you want to use to sort the records. By default the records are sorted by the field in ascending order. When fields are sorted in ascending order, the up arrow is displayed next to the field name in the column header.
The down arrow is displayed next to the field name when the records are sorted in descending order.
2.To sort the records by the field in descending order, click the column again to resort the records by the field in descending order. The sort order is retained when grouping by one or more fields, and groupings are retained when sorting by a field from a column header. For example if you sort the records by the DocID field, and group the records by the DocExt field, the records will be grouped by file extension, and the records listed under each file extension will be listed in DocID order.
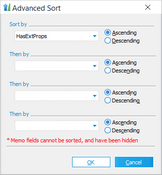
To sort by multiple fields You use the Advanced Sort feature to sort by up to four index fields at one time. A different sort direction may be specified for each of the four fields: ascending or descending. 1.On the Tools menu, click Sort Records, and then click Advanced Sort. Or •Click the Advanced Sort button on the toolbar ( The Advanced Sort dialog box appears. 2.Choose fields from one or more of the drop-down lists. Note the following: •Memo fields cannot be sorted and therefore will not appear in the lists. •Records are sorted in the order in which they appear in this dialog box. For example, in the above image, records would first be sorted by DateSent in Ascending order, then by From (Descending), then by EDFolder (Ascending), then by Importance (Descending). 3.Click OK to apply the sort to the current set of records.
|
1.From the main form, on the Tools menu, click Display all Records. •Or click the Globe icon. A standalone grid opens. 2.On the View menu, click Attachment Fields. 3.Scroll to the far right of the grid. The following fields are now available: BegAttach, EndAttach, AttRange, amd Attachmt. 4.Right-click on a column header to display the Field List and then select AttachPID and AttachLvl fields. 5.Interpret values shown in these fields as follows: •BegAttach References the beginning number of the attachment. This is the first number assigned to the parent document of the attachment group. •EndAttach References the ending number of the attachment group. This is the last number assigned to the document page within the attachment group. •AttRange Provides the range from the start of the parent to the last page of the final attachment. •Attachmt Populates the parent level only. This is the list of attachments found within the parent document. For more information about these fields, please see the Field Descriptions topic.
|


