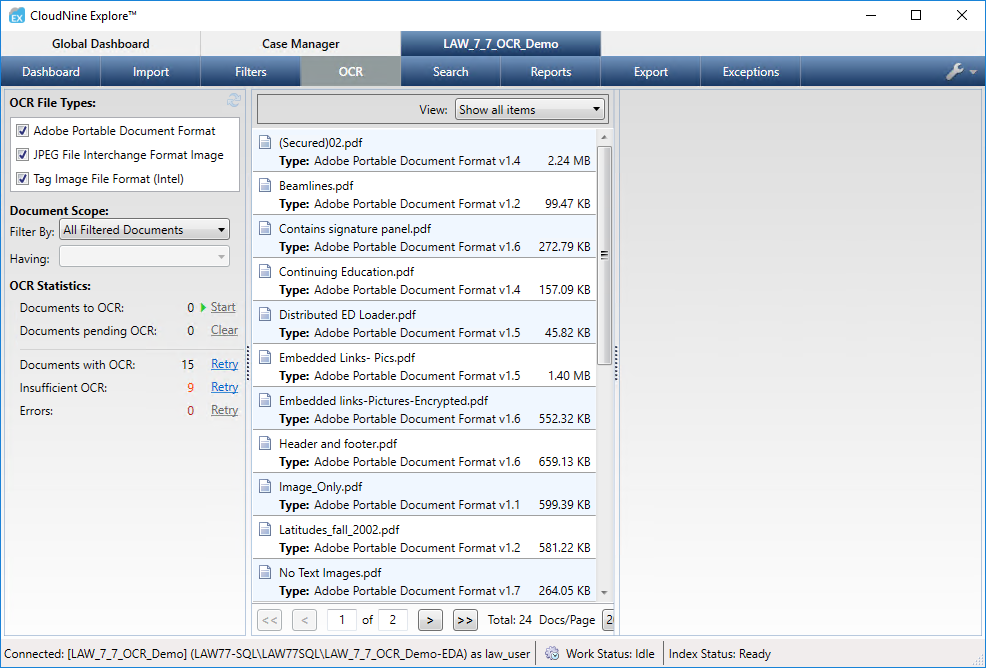
Within a top-level case tab in CloudNine™ Explore, OCR information is displayed on the OCR sub-tab. The OCR tab displays in three panes from left to right: OCR Details, Document List, and Document Details.
OCR by File Type
1.Click the Case Manager tab.
2.Double-click a case.
3.Click the OCR tab. In the left pane, OCR File Types displays the image-based file types for all documents currently in the case, regardless of the case's filtered document results. In the OCR File Types list, the check box next to each file types determines whether documents with that file type are included in the Document List that displays in the center pane (the filtered file types for OCR).
4.By default, each OCR File Type check box is selected. You can include or exclude a specific file type when performing OCR by either selecting or clearing the check box next to that file type in the OCR File Types area. The center pane updates based on the selection.
5.Filter By allows you to filter the list of documents for OCR by custodian. By default, All Filtered Documents is selected. Choose one of the Filter By options:
•All Filtered Documents - All image-based documents for file types selected in OCR File Types area are included in the Document List.
•Custodians - The Having list updates to show all custodians containing documents of the file types selected in the OCR File Types list.
•Import Sessions - The Having list updates to show all import sessions containing documents of the file types selected in the OCR File Types list.
6.Having allows you to filter the list of documents for OCR by Custodians or Import Sessions, depending on the selection in Filter By. Choose the appropriate options to refine your OCR Document List.
•All Filtered Documents - The Having list is disabled.
•Custodians - The Having list is populated with the applicable list of case custodians, along with counts of documents for each custodian. Select a specific Custodian and the Document List in the center pane updates based on that selection.
•Import Sessions -The Having list is populated with the applicable list of case import sessions, along with counts of documents for each import session. Select a specific import session and the Document List in the center pane updates based on that selection.
|
Example Scenario: The Tag Image File Format (Intel) check box is selected in the OCR File Types list, All Filtered Documents is selected in the Filter By list, and there are 100 TIFF (Tag Image File Format) files in the Document List. If you select Custodians in the Filter By list, and then select a custodian with 41 documents in the Having list, with 24 of the 41 documents being TIFF files, only the 24 TIFF files for the selected custodian will be displayed in the Document List, not the 100 TIFF files. If the Tag Image File Format (Intel) check box is cleared, all TIFF files are excluded from the Document List regardless of what is selected in the Filter By and Having lists. |
7.Use View in the center pane to view all documents, documents with OCR, or documents without OCR. The View selection only determines which documents are listed in the Document List, and does not affect which documents are included or excluded from the OCR queue.
8.The left pane displays OCR Statistics. This section updates depending on the OCR File Types selections, and the selections for Filter By and Having. The OCR Statistics contains these details:
•Documents to OCR - Total number of documents that qualify for the OCR process.
•Documents pending OCR - Number of documents in the OCR queue.
•Documents with OCR - Number of documents in the case that have had OCR performed.
•Insufficient OCR - Number of image-based documents where extracted text was larger than OCR text, so the resulting OCR text may be less than desired.
•Errors - Number of image-based documents that had errors while performing OCR.
9.Do one of the following in OCR Statistics:
•Click Start next to Documents to OCR to perform OCR on the documents without OCR.
•Click Clear next to Documents pending OCR if you need to clear the OCR queue while the OCR process is running.
•Click Retry next to Documents with OCR to perform OCR processing on documents that have already been through the OCR process.
•Click Retry next to Cannot OCR to perform OCR processing on documents that could not originally have OCR performed.
•Click Retry next to Errors to perform OCR processing on documents that had errors when previously performing OCR.
The OCR process automatically starts when Start or Retry is clicked. When the OCR process completes, the documents are automatically indexed for full-text searching.
After the OCR process is completed, if you want to view the OCR output for the document currently displayed on the OCR tab, click the Refresh link next to Document is queued for OCR in the Document Details pane to refresh the selected document. If the OCR process is completed, the Queue document for OCR button will also be displayed again in the Document Details pane when you click the Refresh link.
OCR on Individual Documents
OCR can be performed on individual documents from the Filters, OCR, Search, Export, and Exceptions tabs by clicking the Queue document for OCR button in the Document Details pane for the selected document. The Queue document for OCR button is only displayed for image-based documents in the case. It is displayed for image-based documents regardless of whether the documents are with or without OCR.
|
Encrypted files are not eligible for OCR. The Queue document for OCR option is not available for encrypted files. |
1.Click the Case Manager tab.
2.Double-click a case.
3.Click the Filters, OCR, Search, Export, or Exceptions tab.
4.Display a list of documents by selecting a filter, OCR file type, search query, export setting, or exception category on the tab.
5.In the Document list, click the document to OCR.
6.In the Document Details pane on the right, click the Queue document for OCR button. The document is added to the OCR queue, and Document is queued for OCR is displayed where the Queue document for OCR button was displayed. When the OCR process is completed, the document is automatically indexed for full-text searching.
After the OCR process is completed, click the Refresh link next to Document is queued for OCR to refresh the selected document and view that document's OCR output in the Document Details pane on the Filter, OCR, Search, Export, or Exceptions tab. If the OCR process is completed, the Queue document for OCR button will also be displayed again when you click the Refresh link.