Batch printing allows you to print what is seen in the viewer formultiple documents. In Concordance Desktop, batch printing is known as CDV Printing. The CDV Printing feature allows you to print markups (annotations), add synopsis and separator sheets, and add headers/footers and watermarks.
If you want to print documents or images from concatenated databases, each database must be similar in structure, contain media keys, a current .CIB file, and you must have a minimum of ReadOnly access.
When printing documents, be aware of the following:
•If you are printing documents that have been reviewed and redacted in the viewer, be aware that any redaction placed on the document will print transparent revealing the text underneath. If you want to print redactions as opaque, you should select the Opaque option in the Print Redactions as drop down.
•Printing documents that contain markups to Adobe PDF using the File > Print option, does not permanently burn the markups in the document. If you want markups burned in, you must run the documents through the Production process in Concordance Desktop, then print the produced document.
|
The CDV Printing bulk printing feature is only available in Concordance Desktop when you are using the viewer for reviewing and annotating documents. |
|
When including Synopsis and Separator Sheets in a bulk print job, you may experience delayed print times. This is due to how Concordance Desktop processes the synopsis and separator sheets at print time. |
Before scheduling a batch print run, you first need to identify and locate the documents you want to print using one of the Search tools available in Concordance Desktop. See, Available search tools.
To Locate Documents for Printing
1.In Concordance Desktop, open the database containing the documents you want to print.
2.Run a search query to locate the documents you want to print.
To Print Viewer Documents or Images
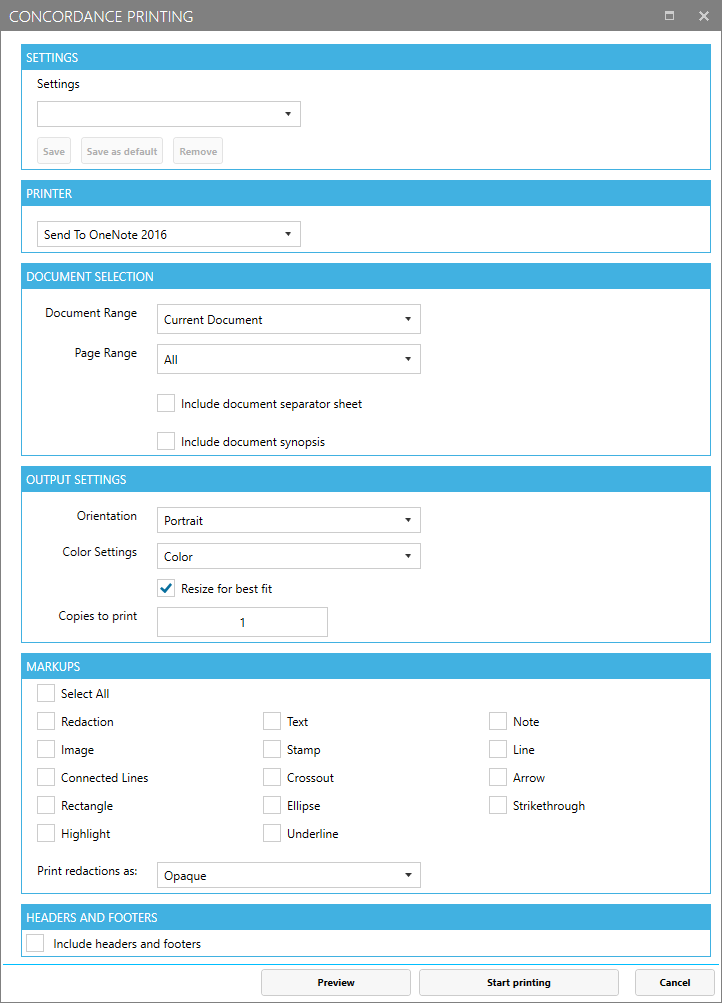
1.In Concordance Desktop, from the Tools menu, click CDV Printing.
2.Specify the printing parameters
3.When finished, click Start printing.
To Set the Printing Run Parameters
1.Select the Printer you want to use for printing the documents/images.
2.Select the appropriate Document Range:
•To include the current document, click Current Document.
•To include all the documents in the query, click All.
•To include a selected set of documents from the query, click Range, and then specify the range of documents you want to print. The default range is the complete range of documents in the current Concordance Desktop query.
3.Select the appropriate Page Range:
•To include all the pages of each document in the query, click All.
•To include a selected set of pages of each document in the query, click Range, and then specify the range of pages for each document.
4.To include data from Concordance Desktop fields to which you have Read or Read/Write access:
•Select Include document synopsis.
•Click the Configure synopsis sheet button.
•In the Document Synopsis Configuration dialog box:
oSelect the desired database fields from the Available Fields list and add them to the Selected Fields list on the right.
oTo change the order of database fields, select a field in the Selected Fields list and drag/drop it in the desired order.
oClick the FONT button, and select your font options in the Select Font dialog:
▪Select your font in the Font Family list.
▪Select your font size in the Font Size list.
▪Select Bold or Italic under Font Style if desired.
▪Click OK to close the Select Font dialog with your selections.
|
The Synopsis Separator sheets may, together, contain up to 32 unique database fields. Both sheets may contain the same database fields, which counts as a single unique field. For example, if you add three fields, BegNo, Admin1, and Filepath field to the Synopsis sheet, and two fields, BegNo, and Date Sent to the Separator sheet. You have added four unique fields. The BegNo field counts as one unique field. |
|
The synopsis page prints the first 60 characters of data within the specified Concordance Desktop database fields. If security is enabled, only those fields with a minimum of "Read" access are displayed. |
5.To add separator sheets at the beginning of each document:
•Select Include document separator sheet.
•Click the Configure separator sheet button.
•In the Document Separator Page Configuration dialog box:
oIn the text box, type the text you want to appear on the separator sheets.
oTo insert a Concordance Desktop macro (Date, Time, DateTime) or Concordance Desktop database field, click the Fields dropdown and select the macro or field from the list that displays.
oClick the FONT button, and select your font options in the Select Font dialog:
▪Select your font in the Font Family list.
▪Select your font size in the Font Size list.
▪Select Bold or Italic under Font Style if desired.
▪Click OK to close the Select Font dialog with your selections.
|
When you add print macros or select database fields, they appear in the text between angled brackets <>. When the print job is executed, the information associated with the macro or database field appears within the text where the macros or database fields were placed. There is no limit to the number of macros or database fields you can add. |
To Set the Printing Format Parameters
1.From the Output Settings section, in the Orientation dropdown, select Portrait or Landscape
|
Some document types, such as .xls, the landscape option will split the page by columns and orientated as portrait. |
2.In the Color Settings dropdown, select:
•Color (default) to print the documents using the document's original colors.
•Greyscale to print the documents in shades of gray.
|
To ensure the print job prints the documents as expected, make sure that the printer's color properties are set appropriately. |
3.Select the Resize for best fit check box to have the documents adjusted to best fit based on your output settings.
4.Type the number of copies you want to print in the Copies to print text box. The maximum number of copies is 100 and the copies are automatically collated.
To Specify Markup Types to Include in the Print Job
From the Markups section, do any of the following:
•To include all markups, select the Select All check box.
•Select each individual markup that you want included.
In the Print redactions as drop down box:
•Select Opaque to have redaction markups printed opaque, or blocking out the underlying section of document fully.
•Select Transparent to have redaction markups printed where the underlying section of document will still show through.
|
Due to how the markups are rendered during printing, if you want to include any applied crossout, strikethrough, highlight, or underline markup in a print job, please note that all four markups are treated as one and all four if applied will be included in the printed file. For example, if a crossout and highlight markup are applied to a document, if the crossout markup is selected in the CDV Printing parameters, both the crossout and the highlight markup are printed. |
To Add Headers/Footers and Watermarks
1.Select the Include headers and footers check box. The Concordance Printing dialog window displays additional parameters to configure.
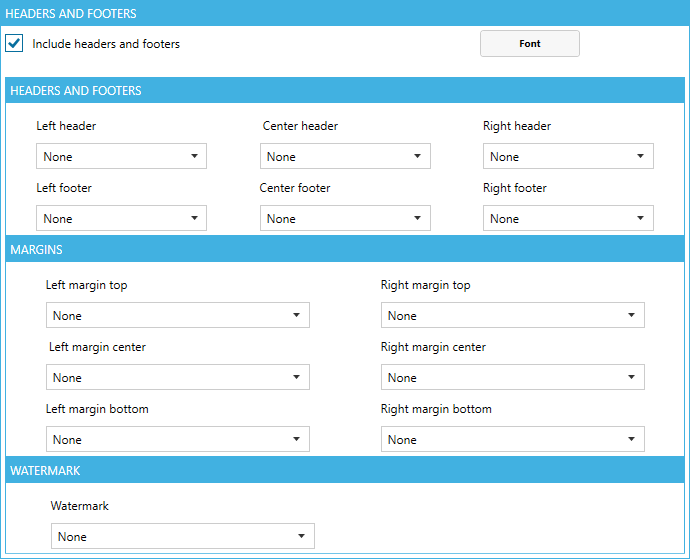
2.For each header, footer, margin, or watermark, choose an item from the corresponding drop down that you want to print in that location or leave the selection None if you want that area to be left blank. You can select from several different macro and Concordance Desktop database fields.
3.To edit the font for the headers and footers, click the Font button and select your font options in the Select Font dialog:
▪Select your font in the Font Family list.
▪Select your font size in the Font Size list.
▪Select Bold or Italic under Font Style if desired.
▪Click OK to close the Select Font dialog with your selections.
|
Printing and Production header/footer and watermark settings are separate entities. Parameters you set in the Printing dialog box are only available for printing. |
Using Parameter Sets
To save print parameters:
1.Select the printing parameters you want.
2.In the Settings drop down field, enter a name for the parameter set and then:
•Click Save as default to save the named parameter set as the default set. The default set is loaded each time the CDV Printing command is executed.
•Click Save to save this set of parameters with the name specified (not as default).
To use saved print parameters select the parameter set name in the Settings drop down list. The print parameters will be updated to reflect the selected parameter set.
To remove a saved print parameter set, select the parameter set name in the Settings drop down list and click Remove.