The Concordance Desktop user interface is similar to Microsoft Outlook.
The left side of the window is the Navigation pane where you can navigate to Concordance Desktop tasks to search, tag, sort, and add notes to documents. The right side of the window is your Workspace pane where you can tab to multiple databases. You can view databases in the Browse, Table, Edit, or Review views.
The Dynamic toolbar at the bottom of the window changes according to the views selected.
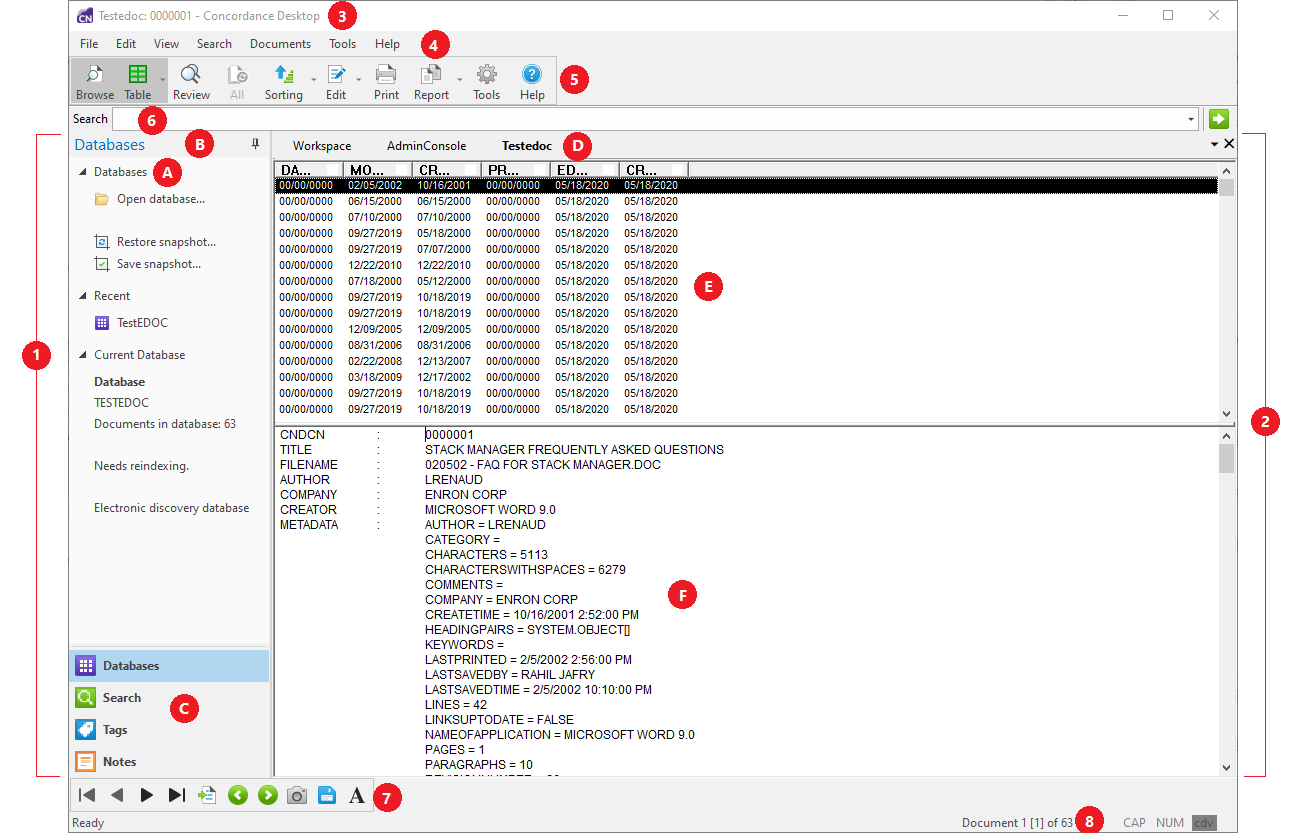
Navigating Concordance Key
Key |
Feature |
Description |
|---|---|---|
(1) |
Navigation pane |
Provides tools for performing tasks on the current database, such as searching and tagging. |
(A) |
Task pane |
Displays database tools in work areas called panels. |
(B) |
Pin |
Allows you to dock the navigation pane by pinning, or hide the navigation pane by unpinning. |
(C) |
Navigation buttons |
Opens task panes on the Navigation pane. |
(2) |
Workspace pane |
Displays databases in various views. |
(D) |
Tabs |
Allows you to move between different open databases. |
(E) |
Table view |
Displays a list of document records. |
(F) |
Browse view |
Displays one document record at a time. |
(3) |
Title bar |
Displays the current database name and information regarding the current document record. |
(4) |
Menu bar |
Contains menus, each responsible for a set of tasks. |
(5) |
Standard toolbar |
Contains buttons that let you access standard views and tools. |
(6) |
Quick Search |
Allows you to quickly enter and execute simple and advanced searches while browsing document records. |
(7) |
Dynamic toolbar |
Contains buttons for tools corresponding to the current views. |
(8) |
Status bar |
Displays status information, such as the current document record count. |
(1) The Navigation Pane
The Navigation pane allows you to manage your case record review, control database access, and conduct your daily search, sort, and tagging tasks.
The Navigation pane is divided into work areas called panels. The panels are resizable based on your personal preference.
The bottom of the Navigation pane contains buttons that determine which feature is displayed in the Task pane.
Task Pane Feature |
Description |
|---|---|
Databases |
Allows you to open and concatenate multiple databases, take a snapshot of a query session, quickly scan recently reviewed databases, and identify the current database you are reviewing and whether it needs updating. |
Search |
Allows you to perform simple to advanced queries with fast search results, save and reopen queries, clear search history, and access the dictionary and field lists. |
Tags |
Contains a menu tree for categorizing tag folders, adding new tags, and panels for running history and statistical tag queries. |
Notes |
Displays comments added to a document, allows you to sort by note or issue, and shows the properties for each file. |
Notice the pin icon in the upper right corner of the Task pane. By clicking this icon, you can keep the Task pane visible all times (pinned) or tucked away, available when you click the Task pane tab (unpinned).
(2) The Workspace Pane
The Workspace pane is located on the right side of the Concordance Desktop interface, and displays database items in various views. When you open a database in Concordance Desktop, a tab is created for the database in the Workspace pane.
|
The Workspace pane is not the same as the Workspace tab. The Workspace tab is used to display internal or external web pages. For more information about the Workspace tab, see Customizing the start-up view. |
(3) The Title Bar
The Title bar displays information regarding the current database and document.
Concordance Desktop transcript databases automatically set the Title bar to the name, date and volume of the current document. For non-transcript databases, you can define the Concordance Desktop field you want to display using the Select the field to display in the title bar while browsing field in the Preferences dialog box. The selected field is displayed on the Title bar in the Browse view, Table view, and Edit view.
When reviewing standard records in the Browse, Table and Edit views, displaying the BEGNO field on the Title bar can help you keep track of record numbering.
|
The values in the BEGNO field represent the Bates numbering system, which is a unique serial number corresponding to each record in the database. BEGNO stands for beginning number, and ENDNO for ending number. |
(4) The Menu Bar
The Menu bar contains the Concordance Desktop menus that are responsible for a set of Concordance Desktop tasks. Some of the menu commands are the same as the toolbar functions.
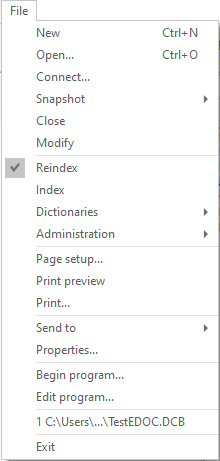
File Menu
File menu commands allow you to create, maintain, and manipulate databases and the files used by the databases. From the File menu, you can also send data from Concordance Desktop to other applications, such as CaseMap and Sanction, and edit and run Concordance Desktop programs.
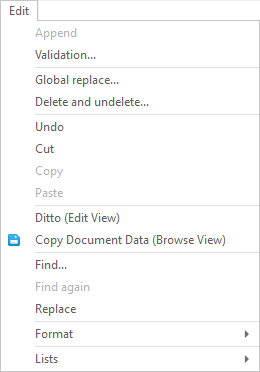
Edit Menu
The Edit menu commands allow you to edit and set data validation options for the documents in your databases.
The Undo, Cut, Copy, Paste, Ditto, and Replace menu commands are only available when actively editing in the Edit view. You can use the Copy command to copy text in both the Edit and Browse view. The Copy Document Data command on the Edit menu is only available in the Browse view.
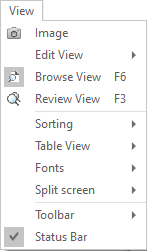
View Menu
The View menu commands allow you to open images in your viewer, work with documents in the Edit, Browse, Review, or Table view, change data and field font sizes, split your screen, and select the status bar and toolbars.
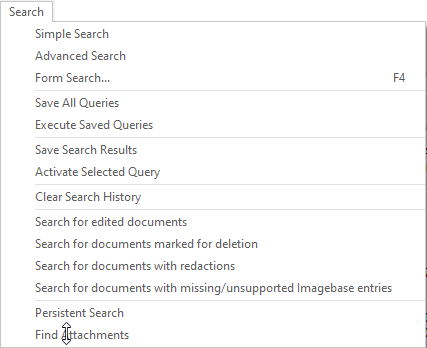
Search Menu
The Search menu commands provide access to the Simple Search and Advanced Search panels in the Search task pane, access to the Form Search - Query by Example dialog box, the Persistent Search and Find Attachments commands.
The Search menu commands also allow you to save your query session to a file, re-execute a saved query session, clear all searches, and search for documents that have been edited or marked for deletion. The Save Search Results and Activate Selected Query commands on the Search menu are only available in the Review view.
Documents Menu
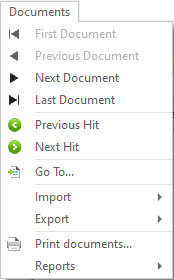
The Documents menu commands allow you to navigate documents and search results, import, export, print, and create reports in your Concordance Desktop databases. Most Documents menu commands operate on the current query. If your last search found zero documents, some the commands on the Documents menu will be unavailable.
Tools Menu
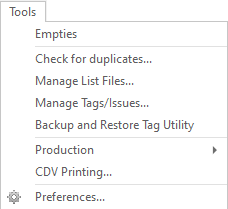
Several options are available from the Tools menu including displaying empty fields, looking for duplicate records, managing list files, managing tags and issues, and customizing your preferences.
|
Do not confuse the Tools button on the Standard toolbar with the Tools menu. Clicking the Tools button on the Standard toolbar opens the Preferences dialog box. You can also open the Preferences dialog box by clicking Preferences on the Tools menu. |
Help Menu
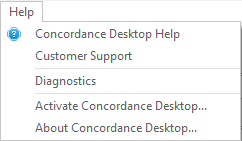
The Help menu commands allow you to access the Concordance Desktop Help system, activate Concordance Desktop, and view information about the Concordance Desktop version and contacting customer support.
(5) The Standard Toolbar
The Standard toolbar contains buttons for accessing the Concordance Desktop views and related tools, including Print and Help.
![]()
Button |
Description |
|---|---|
Browse |
Opens the Browse view. The Browse view allows you to view the documents in the database. You can also add and edit tags, notes, and issues to documents in the Browse view, and send selected text to other programs. When you open the Browse view you will be viewing the first document in the current query or the first document in the database if no query has been entered. |
Table |
Opens the Table view. The Table view displays documents from the current search in a tabular format, similar to a spreadsheet, with one document per row. In the Table view, you can add and edit tags to documents, define which fields are displayed in the view, the field order, and modify the style and color of the font displayed in the view. |
Review |
Opens the Review view. The Review view displays all searches performed since the current database was opened, indexed, reindexed, or the search history was cleared. The Review view includes the search number, number of search hits, number of documents containing the search terms, and the search terms for each search. |
All |
Selects the entire database and returns the sort order of all records to the order in which they were added to the database. This function is sometimes referred to as Zero Query. The document last displayed in the Browse view remains the active record. The documents that come before and after are the documents that physically precede and follow it in the database. When you want to return to the last query, simply click the All button again. Performing a search also resets the All button. |
Sorting |
Opens the Sorting layouts dialog box. The Sorting layout feature provides additional tools to customize and save how records are sorted in the Browse view to display the desired result. |
Edit |
Opens the Edit view. The Edit view allows you to edit the contents of the documents in the database. The Edit view also provides additional tools needed to create and save custom edit layouts that can be applied to display only the fields specified in the selected layout in the Edit view. |
Opens the Print documents dialog box. In the Print documents dialog box you can print records located from a search. You can underline search terms and produce key-word-in-context reports. Printed output can be routed to your printer or to a file. You can select a range of documents within the current query and specify the fields within the database. |
|
Report |
Opens the Report Writer dialog box. When you click the arrow next to the Report view button, you can open the Report Writer or Annotation Report dialog box. The Report Writer dialog box is used to create columnar reports for database data. The Annotation Report dialog box is used to create the Annotation Report for transcript databases. |
Tools |
Opens the Preferences dialog box. In the Preferences dialog box you can you to customize how you use Concordance Desktop, including customizing the Workspace tab, search hit color, title bar, issue coding, and indexing. |
Help |
Opens the Concordance Desktop Answer Center. |
|
Do not confuse the Tools button on the Standard toolbar with the Tools menu. Clicking the Tools button on the Standard toolbar opens the Preferences dialog box. You can also open the Preferences dialog box by clicking Preferences on the Tools menu. |
(6) Quick Search
The Quick Search field is located below the Standard toolbar and can be used in any view. Quick Search allows you to enter basic one-word searches, as well as more complex combinations, while reviewing your documents, without having to open the Search task pane. See Running quick searches.
(7) The Dynamic Toolbar
The Dynamic toolbar is located at the bottom left of the Concordance Desktop window. Each toolbar corresponds to a particular Concordance Desktop view.
Button |
Name |
Description |
|---|---|---|
|
First |
Opens the first document in the current query in the Browse view, or opens the first document in the database if you are using zero query. |
|
Previous |
Opens the previous document in the Browse view. |
|
Next |
Opens the next document in the Browse view. |
|
Last |
Opens the last document in the current query in the Browse view. |
|
Go to |
Opens the Goto dialog box where you can enter the number of the document you want to view from the current query. Concordance Desktop opens the document in the Browse view. For Transcripts, use the Goto dialog box, to enter the number for the document, page, or line you want to view. |
|
Previous Hit |
Moves the cursor to the previous search hit in the Browse view. If the document was edited since the last reindex, the document containing the search hits is displayed but the search terms are not highlighted. |
|
Next Hit |
Moves the cursor to the next search hit in the Browse view. If the document was edited since the last reindex, the document containing the search hits is displayed but search terms are not highlighted. If there isn't a next search hit to display, the next document is displayed. |
|
View Image |
Displays the image associated with the current document. Once you click the View Image button, it automatically stays selected and displays the image associated with each record in the image viewer. Click the View Image button again to release the button. This button only works when images are enabled in Concordance Desktop. |
|
Copy |
Opens the Copy dialog box. In the Copy dialog box, you can copy document data from selected fields to the output destination you specify. |
|
Font |
Opens the Font dialog box. When you modify the font in the Browse view, you are modifying the font for data displayed in the Browse view for the entire database. When you modify the font in the Table view, you are modifying the font for data displayed in the Table view for the entire database. If you are viewing a concatenated database, the font change only affects the database for the current selected record. |
|
Edit |
Adds the search terms of a selected query to the Search task pane for editing. |
|
Activate |
Select a search in the Review view and click the Activate button to activate a previous search and make it the current search. Clicking the Activate button opens the documents in the Browse view. |
|
Fields |
Opens the Fields dialog box. The Fields dialog box contains a list of all fields available for editing. Select a field from the list and click the Insert button to move your cursor to the selected field in the Edit view. |
|
Ditto |
Opens the Duplicate dialog box. In the Duplicate dialog box, you can copy field data from one record to another record or to another field in the current record. |
|
Delete |
Marks and unmarks a record for deletion. Records marked for deletion are removed from the database when the database is packed. |
|
Undo |
Opens the Edit Options dialog box. In the Edit Options dialog box, you can undo edits, mark and unmark the record for deletion, or erase all content from the document. |
(8) The Status Bar
The Status bar at the bottom of the Concordance Desktop window displays the selected toolbar button's functionality, tracks the document number being edited, and the total number of documents in the current set. The number in brackets is the document’s location in the physical database. Document indicators are also displayed here for documents that are tagged (TAG), marked for deletion (DEL), and/or locked (LCK) by another user.
A document locked by another user cannot be saved. A locked document is displayed for editing so that you can copy the document data to another document or program. When a record is locked, the record is grayed out.
This Status bar example indicates you are viewing document 1 out of 203 total documents, the document is the first record in the physical database, and the document has been tagged.