In Concordance Desktop, you can drag and drop a DAT, CSV, DCB, MSG, or EML file onto a Concordance Desktop Load File (DAT) database to add the files to the existing database. To use the drag and drop functionality, you must either log onto the Concordance Desktop server/computer where the database you want to add to resides, or use Windows Remote Desktop to log onto that server/computer.
|
If you need to update records that already exist in a Load File (DAT) database, you need to use the' Import' feature instead. For more information on the Import feature see, Importing updates to an existing database. |
|
When importing records using a DAT file, ensure that the carriage return delimiter is set to something other than "new line" (code 013). If the new line delimiter is set, change the delimiter in the DAT file before attempting to import the file. |
|
Drag and drop is not supported for DAT databases that have been migrated from Concordance 10.x. To add additional files to a migrated DAT database, you must use the 'Import' feature. See Importing updates to a migrated DAT database for more information. |
Before importing delimited text files into Concordance Desktop, be sure to review the Managing data files topic.
As an administrator, you should always make a practice of opening and reviewing your delimited text files when you receive them, as the files are not always prepared perfectly and may need to be modified.
Adding delimited text files
Following are the steps for adding delimited text files.
Step 1: Review and Edit Delimited Text Files
Review the delimited text file, and make any necessary corrections.
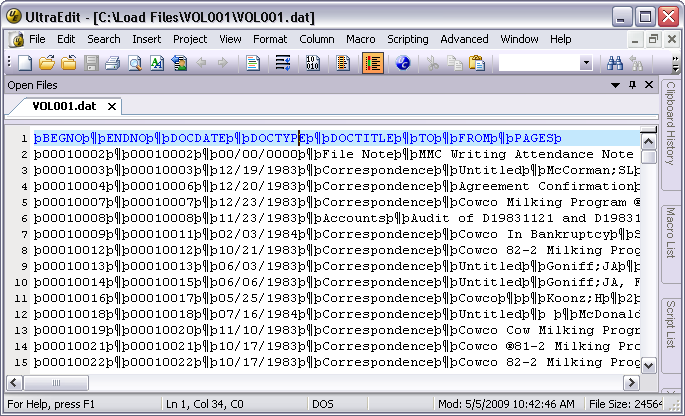
1.Open the delimited text file in any text editor program.
i.Example of a delimited text file opened in UltraEdit:
2.Review the delimited text file for the following elements:
•The file must be a text-based format with an extension of .dat, .csv, .txt, .rtf, or any normal text file extension.
•If there is no a header row containing field names, open the associated .tif file for the first record and match the data in the record to the data in the .tif file.
•Note the delimiter used in the file. Concordance Desktop can handle any standard text delimiters.
•Note the date format used in the file. Concordance Desktop can load dates containing slashes in any order with either 2- or 4-digit years, with a maximum of 8 digits. The only date formats Concordance Desktop can load without slashes is the universal date format of YYYYMMDD and the mm-dd-yyyy date format with dashes.
•Is there a carriage return at the end of the record? If not, add a carriage return at the end of the record. Concordance Desktop will not load the last record if the carriage return at the end of the record is missing.
3.Make the necessary edits, if applicable.
4.Save the file.
5.Either print a copy of this file or leave the text editor program open so you can reference the field order when importing the files.
i.After reviewing the delimited text files and prior to continuing with step 2, we recommend that you create a duplicate of the database to which you want to add the additional files. This protects the original database, should any issues arise during the importing of the additional files. You can duplicate the database by exporting it to a Concordance Desktop database. See Exporting databases for more details.
Step 2: Drag and Drop the Delimited Text Files Onto the Concordance Desktop DAT Database
Before you drag and drop the delimited text files, review them to ensure that the data contains valid formats - those that are supported by Concordance Desktop databases.
|
When dropping a file onto a database, you must first open that database in Concordance Desktop and ensure that it is open in either Browse or Table mode on the Concordance Desktop workspace. Whatever database is currently open and has focus is the database to which the file will be appended. If no database is open, the drag and drop action will fail. |
1.Open the Concordance Desktop application on the server where the database you need to add to is registered.
2.Open the database to which you need to add the DAT file, using one of the following methods:
•From the File menu click Open. Locate and select the database, then click Open.
•If the database is displayed in the Databases 'Recent' list, click on the database name to open it.
3.Open a Windows Explorer window and navigate to the location of the delimited text files you need to add to the database you just opened in Concordance Desktop.
4.Click and drag the DAT file from the Windows Explorer window and drop it onto the database displayed in the workspace pane of Concordance Desktop.
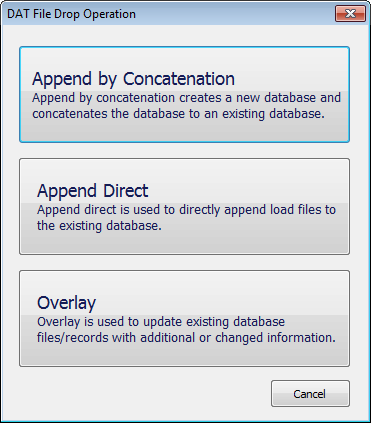
5.Do one of the following
a.Append by Concatenation
i.When dropping a DAT file onto an existing DAT database, the import process creates a new database with the same name plus an appended numerical extension (example; DBNAME-001). Concordance Desktop then concatenates the new DB with the existing, and the existing becomes the primary database for that CAT set. As you drop more DAT files onto the primary database, each is named after the primary database and the appended extension is incremented by 1 (-002, -003, etc.).
1.Click Append by Concatenation.
i.The following dialog box opens.
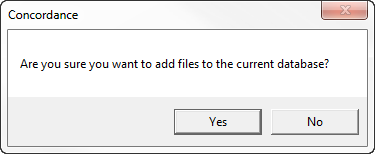
2.Click Yes to continue.
i.The load file dialog box opens.
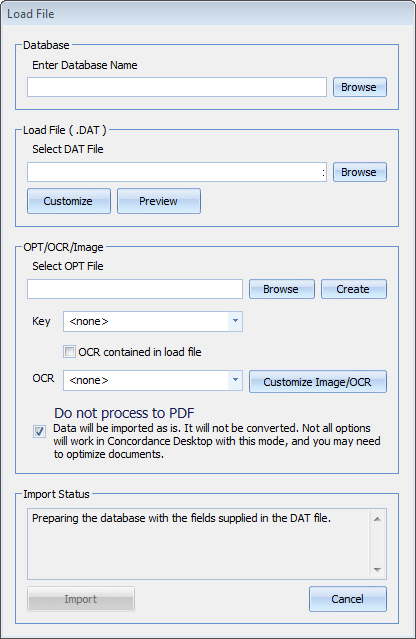
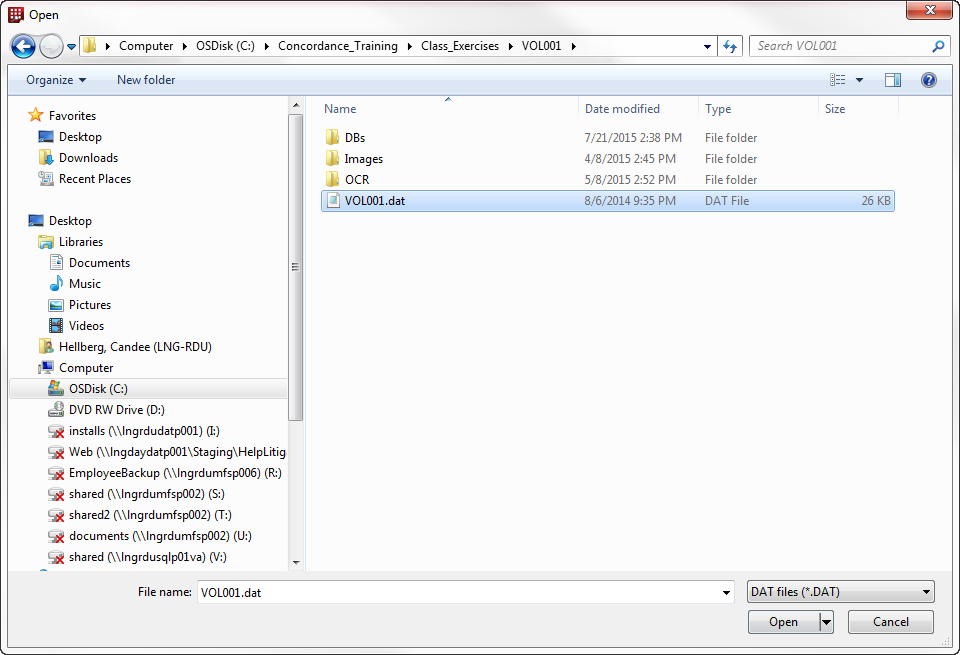
ii.The Enter Database Name field is populated with the name of the database you have open in Concordance Desktop. You cannot change this name.
iii.The Select DAT file field displays the path and file name of the file you just dropped onto the DAT database. If you accidentally selected the wrong DAT file, you can click the Browse button to find and select the correct DAT file.
3.If you need to alter the format and delimiter settings, stop here and go to the Create a new database from load files using custom settings section for detailed instructions.
i.List of settings you can change when selecting to customize:
oLoad Field Names From: Location from which to load Field Names. You can select to load Field Names from the DAT file you are loading, from a Template/Structure file, from a previously defined Settings File, or define a new set by manually creating all field names.
oSelect the delimited format to import or select custom values: You can change the delimiter settings to match the settings in the load file, should they differ from the standard Concordance Desktop delimiters.
oSelect the date format for importing date fields: You can change the date format, if the format in the load file differs from the standard yyyymmdd used in Concordance Desktop.
oLoad Tag List: You can load a set of Tags from a saved Tag List file so that those tags are available in the new database.
oField Names: You can add or modify field names.
oChange the order in which fields display in the database.
oShow System Fields: You can select to include the display of system fields in the database.
oSkip first line: The first line will usually list the fields in the DAT file and should not be imported as a record in the database.
oImport rich text: You can select to import rich text formatting when importing a text file.
oSee Attachment Fields: You can select the email/attachment range field or the beginning and ending attachment number fields. Making either of these selections allows Concordance Desktop to identify the email and attachment family members.
4. Click OK.
i.You are returned to the Load File window where the Select DAT File field is populated with the information you entered in the Open window.
b.Append Direct
i.When importing new records using a DAT file, ensure that any new fields that are not currently in the existing database are added before you begin the append process by selecting File and then Modify. Additional OCR fields will not have to be added in the database.
1.Click Append Direct.
i.The following dialog box opens.
2.Click Yes to continue.
i.The load file dialog box opens.
ii.The Enter Database Name field is populated with the name of the database you have open in Concordance Desktop. You cannot change this name.
iii.The Select DAT file field displays the path and file name of the file you just dropped onto the DAT database. If you accidentally selected the wrong DAT file, you can click the Browse button to find and select the correct DAT file.
3.If you need to alter the format and delimiter settings, stop here and go to the Create a new database from load files using custom settings section for detailed instructions.
i.List of settings you can change when selecting to customize:
oLoad Field Names From: Location from which to load Field Names. You can select to load Field Names from the DAT file you are loading, from a Template/Structure file, from a previously defined Settings File, or define a new set by manually creating all field names.
oSelect the delimited format to import or select custom values: You can change the delimiter settings to match the settings in the load file, should they differ from the standard Concordance Desktop delimiters.
oSelect the date format for importing date fields: You can change the date format, if the format in the load file differs from the standard yyyymmdd used in Concordance Desktop.
oLoad Tag List: You can load a set of Tags from a saved Tag List file so that those tags are available in the new database.
oField Names: You can add or modify field names.
oChange the order in which fields display in the database.
oShow System Fields: You can select to include the display of system fields in the database.
oSkip first line: The first line will usually list the fields in the DAT file and should not be imported as a record in the database.
oImport rich text: You can select to import rich text formatting when importing a text file.
oSee Attachment Fields: You can select the email/attachment range field or the beginning and ending attachment number fields. Making either of these selections allows Concordance Desktop to identify the email and attachment family members.
4.Click OK.
i.You are returned to the Load File window where the Select DAT File field is populated with the information you entered in the Open window.
6.To preview the records prior to loading the file:
a.Click the Preview button to open the Preview window.
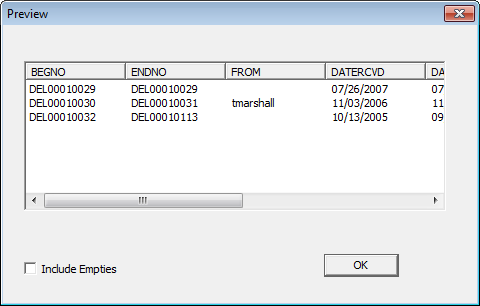
i.The preview window displays all fields in which there is data, along with a few records in the load file.
b.To turn on the visibility of empty fields, check the Include Empties check box.
i.When checked, empty fields are displayed in the preview, along with the populated fields.
c.When finished viewing the records, click OK to to close the Preview window.
7.Do one of the following:
a.If you have an OPT file to load, select it:
1.Click the Browse button next to the Select OPT File field.
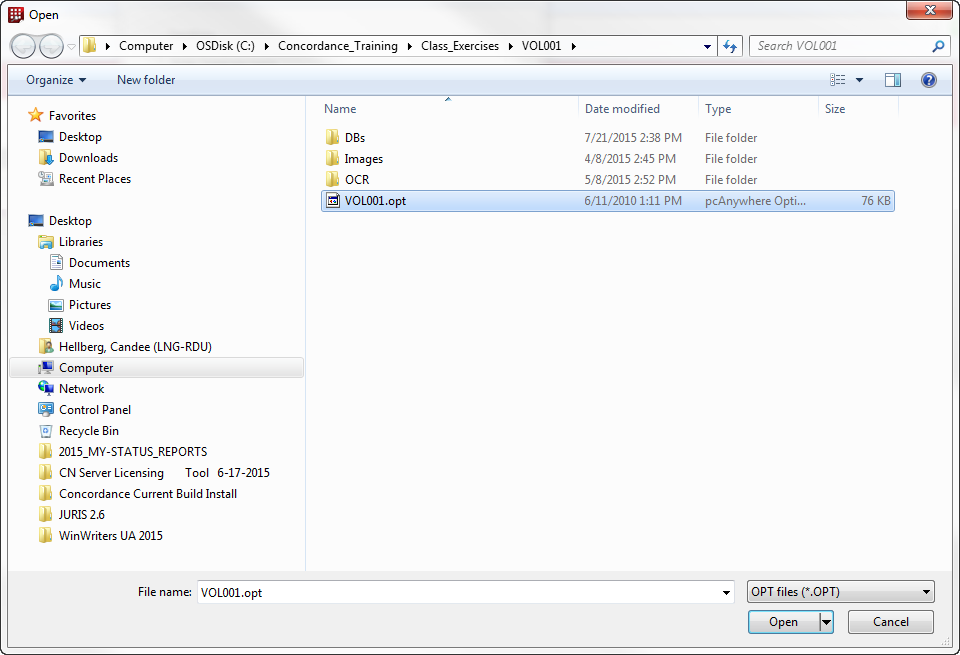
2.Locate and select the .OPT file you want to load.
3.Click Open.
i.You are returned to the Load File window where the Select OPT File field is populated with the selection you just made.
b.If you do not have an OPT file to load, you can create one:
i.Typically, the vendor who processed your documents supplies you with a corresponding load file (.opt, .log, or .txt) along with your documents and images. If you do not receive the OPT file, you can create one to use.
a.Click the Create button next to the Select OPT File field.
b.Click the ellipse button and select the location where you want to store the OPT file.
i.We suggest that you enter a folder and sub-folder that is located in the same directory as the This should be in a sub-folder as your DAT file,and have the same name as. Alternatively, you can open Windows Explorer, locate and open the folder where the image files are, and then drag and drop the image files into the large box below the OPT file.
c.Open a Windows Explorer window.
d.Locate and open the folder where the image (.TIF) files are located.
e.Drag and drag the image files into the large box below the OPT file.
f.Click OK.
i.You are returned to the Load File where the Select OPT file is populated with the OPT file location you just entered.
8.Click on the Key down-arrow and select the name of the field used to identify the beginning of new records.
i.An example would be BEGNO.
9.If OCR text is included in the load file, check the OCR contained in load file check box, otherwise leave the check box blank.
10.Click on the OCR arrow and select the name of the field to contain the OCR text in the record.
i.Some examples are TEXT1 or OCR1
|
The wizard can import both single or multi-page OCR text files. |
11.(Optional) Click the Customize Image/OCR button if you want to change the default OCR method. This option is not available when you check the 'OCR contained in load file' check box, as the OCR'ed text already exists.
i.The Customize Image/OCR dialog box opens.
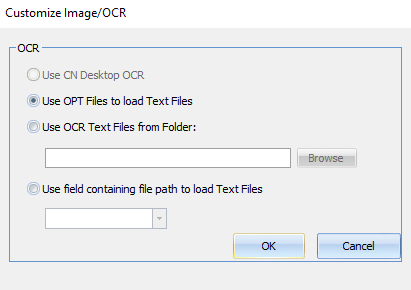
ii.Options are:
oUse CN Desktop OCR - Use this option if you want Concordance Desktop to OCR all the files regardless of any existing OCR'ed text files. By default, Concordance Desktop does not OCR the text files.
oUse OPT Files to load Text Files - Use this option if you want Concordance Desktop to load the document-level text from files existing in designated folders that are referenced in the OPT file. Concordance Desktop does not OCR the document-level text, it simply takes the text from the text files and loads it into the associated records.
oUse OCR Text Files - Use this option if you have text files that have already been OCR'ed and you want Concordance Desktop to use those OCR'ed files. As with the Use OPT Files to load Text Files option, Concordance Desktop will not do any OCRing of the text, it will simply load the text from the text files into the associated records. This option casn help save processing time. When this option is selected, you also need to click the Browse button to locate and select the text files.
oUse Field Containing File Path to load Text Files - Use this option if you want Concordance Desktop to load the document level text from an OCR path referenced in the DAT file. This new import option allows you to import document level text if your DAT file references an OCR path. The OCR path needs to be edited to reflect the directory where the text is located or edited to reflect a relative path. When using the relative path in the DAT file, the edited copy of the DAT file must be in the same directory as your text folders.
|
If the file path pointing to your text files is not accurate the text will not be imported. |
12.If you want Concordance Desktop to create optimized PDFs of the native files during the import process, uncheck the Do not process to PDF check box.
i.By default, the check box is checked, which helps to reduce processing time. When checked, rendering of supported native file types is done on the fly as they are viewed in the viewer. Unsupported file types however, cannot be viewed in the viewer until they are optimized. For more information about optimizing, please see the Optimizing documents to PDF topic.
13.Click Import to start the import of the load files you have selected.
14.If one or more files did not import properly, a dialog box displays telling you to see the log file. Click OK.
15.In the DAT Database dialog box:
•If all files imported properly (i.e., you did not see a dialog box stating one or more files imported properly) , click the Open button to open the database in Concordance Desktop.
•If any files did not import properly, click the View Log button to check the log for any files that did not import properly.