Typically, all data for a specific case is not processed or received at the same time. Subsequent data may arrive on an ongoing basis. Therefore, after a new database is created with its initial set of files, additional files can be added directly to the database using one of two methods, depending on the database. The first method is a simple Windows drag and drop action. This drag and drop functionality is available for all new databases created in Concordance Desktop, and for all migrated Concordance 10.21 E-Document databases. All other types of Concordance 10.21 databases that have been migrated to Concordance Desktop cannot support the drag and drop functionality. In addition, any databases that have been converted from a prior version of Concordance to Concordance 10.x, and then migrated to Concordance Desktop, as well as all Transcript databases, are unable to support the drag and drop functionality. To add files to these types of databases, you use the "Import" feature in Concordance Desktop.
|
Databases created in Concordance Desktop cannot be added or appended to a migrated Concordance database, nor can they be concatenated with a migrated database. |
About adding files using drag and drop
The drag and drop method is used for appending updates or adding files to existing databases that were created in Concordance Desktop, and for existing Concordance 10.21 E-Document databases that have been migrated to Concordance Desktop.
The follow table shows what types of files can be appended to each type of database:
File Type |
Load File Database |
E-Document Database |
E-mail Database |
|---|---|---|---|
DAT or CSV |
X |
X |
|
OPT |
X |
|
|
E-document (DOC, PDF, XLS, etc.) |
X |
X |
|
PST |
|
|
X |
MSG |
X* |
X* |
X |
EML |
X* |
X* |
X |
DCB |
X |
X |
X |
*Does not process attachments. |
|||
There are some limitations of which you need to be aware:
•Concordance Desktop Load File, Concordance Desktop E-Document databases, and migrated Concordance 10.21 E-Documents databases are the only databases that allow dropping (importing) of all types of electronic files (pdf, doc, ppt, image files, etc.), including msg and eml files. However, when msg or eml files are dropped (imported), attachments are not processed.
•Only email msg, eml, and PST files can be dropped onto a Concordance Desktop E-mail database.
•Both the email and attachment(s) (if any) are appended when you drag and drop a .msg or .eml file onto an E-mail database.
•DCB files can be dropped on any type of database.
•OCR files are no longer necessary for Load File databases. Instead, the OCR process is automatically run during the import, where a PDF copy is generated for each native file. This does not mean that you cannot include the OCR files. You still have the option to add them, and when you do, most often it results in a decrease of processing time.
When you drop an e-mail msg or eml file onto an existing Concordance Desktop E-Documents or E-Mail database, or migrated Concordance 10.21 E-Documents database, the import process appends the file as the last record(s) in that database, At the same time, the import process creates a PDF of the native file for viewing in the viewer. If the file is dropped on a database that is part of an existing concatenated (CAT) database set, then the file is appended to the end of the last database in the CAT set. Dropping an OPT file onto an existing database results in the same action - the files are appended to the end of the database, or the end of the last database in a CAT set. When you drop a DAT, DCB, or PST file onto an existing database, a new database is created from the dropped file, and that new database is automatically concatenated with the database on which it was dropped. The existing database becomes the "primary" database of the CAT set.
When you drag and drop a DAT or DCB onto a Concordance Desktop DAT database, a new DAT database is created and automatically concatenated with the existing DAT database. At the same time, the import process creates a PDF of the native files for viewing in the viewer. When you drag and drop an OPT file onto a Concordance Desktop DAT database, the files are appended to the end of that existing DAT database, and again, PDFs of the native files are automatically created.
About adding files with the Import feature
The import feature must be used for updating existing records or adding new files to Concordance 10.x Load File (DAT) or E-Mail databases that have been migrated to Concordance Desktop. It is also used when you need to append files to a DAT database that has been migrated from Concordance 10.x. To append files to databases created in Concordance Desktop, you must use the drag and drop method.
|
Do not use the import process if you are importing replacement data into a database created in Concordance Desktop, or into a Concordance 10.x E-Document database that was migrated to Concordance Desktop. Instead, use the Drag and drop method to add the replacement data. |
About adding files to Concatenated databases
When you add an additional file to a concatenated database, the file is appended as the last record to the very last database in the concatenated set.
|
Databases that are automatically concatenated either by a drag and drop, or by the import process when creating a new database with multiple record sets, should not be removed from the CAT set. Removing a database from an automated CAT set can cause the record numbering in the CAT database to be sequentially inconsistent. |
|
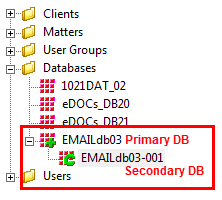
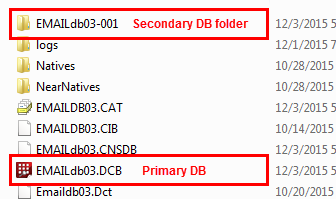
When adding files to a concatenated database set, always open the primary database and drop the files onto it. Also, never attempt to open any of the other databases in the set, as doing so can cause database corruption. To identify the other database in the set, look for the database name with -001, -002, etc. appended to the name. These are the other databases in the set. The primary database displays just the database name, without any added numbers. |
Concatenated sets can be easily identified by how they appear in both the Admin Console and in Windows Explorer.
Best Practices for successfully adding files
Regardless if you are dragging and dropping or importing, when adding additional files to a database, we recommend creating a duplicate database structure first, and then adding the new files to the duplicate. This step allows for further quality control before changing your main database. The final step is using the drag and drop functionality, or the Import feature to append and replace your new records by matching records using a common unique field.
When importing new data, consider the following:
•Run a test load by importing new data into an exported database or database structure
•Note the last record number on the status bar prior to importing the secondary database with the new data
•Reindex the database prior to loading the new data. After the data is loaded, on the Search menu, click Search for Edited Documents, to query only the records that you just loaded for verification of the number of records that needed to be loaded or to isolate the records that need to be deleted if loaded improperly.
•Decide whether to load data into a secondary database structure and then concatenate it with the primary database
To find recently updated documents, on the Search menu, click Search for edited documents. Reindex prior to importing the updated records so the search query only includes changes made to the database by the matching import.
To Create a Duplicate Database
After reviewing the delimited text files, you need to create a copy of the database you want to add the additional text files. You will duplicate the database by exporting the database's structure.
1.In Concordance Desktop, open the database you want to copy.
2.On the Documents menu, point to Export, and click Structure.
3.Clicking Structure opens the Copy Structure dialog box.
4.Navigate to where you want to save the duplicate database, type the name of the database file in the File name field, and click Save.