The following tools are available for backing up tags:
•Tag To Field command
•TagSaver CPL
Running the Tag to Field Command
The Tag To Field command in the Tag and Issues Management dialog box writes the tag names to a specified field in the database separating the tag name with the selected delimiter. To restore tags stored in a field, see the Creating tags from data within a specified field procedure in Creating and applying tags.
To Write Tag Names to a Field
1.On the Tools menu, click Manage Tags/Issues.
2.In the Tag and Issue Management dialog box, click the Tag to Field button.
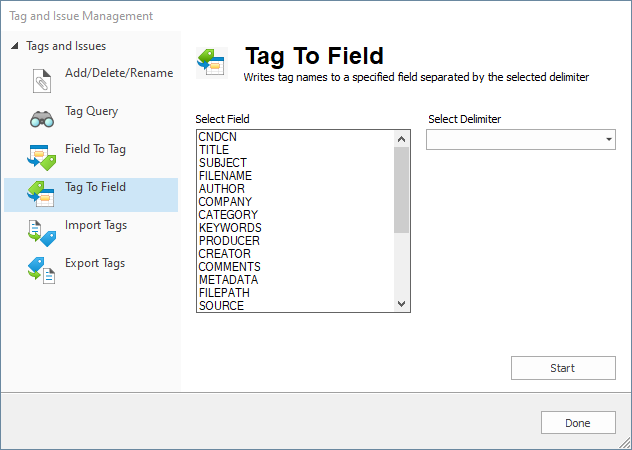
3.From the Select Field list, select the field you want to copy the tag names.
4.From the Select Delimiter list, select the delimiter to separate the tag names in the field.
5.Click the Start button.
6.When prompted, do one of the following:
•Click Yes to confirm that you want to write the tag names in the selected field.
•Click No to append the tag names to the existing field contents.
•Click Cancel to abandon the changes.
7.When finished, click Done, and verify that the selected field displays the tag names separated by the selected delimiter.
Running the TagSaver CPL
You can create a backup file of your tags or restore the backed up tags into another database using the TagSaver.cpl. We recommend running this CPL script once or twice daily, depending on how much active reviewing is occurring. The tag back-up is stored in a database's .GAT file and the tag data is retrievable, when needed.
TagSaver CPL benefits:
•You can move tag application information to different databases
•You can restore backup files (.gat) to other databases to move tag structure
|
When restoring tags from a .gat file, the maximum number of characters allowed in a tag name is 199. |
To Backup Tags in a Database
1.In Concordance Desktop, click the All button on the Standard toolbar to query all records in your database.
2.On the File menu, click Begin program.
3.Navigate to the CPL directory installed with Concordance Desktop, and click the TagSaver.cpl file.
i.The default directory for the CPL folder installed with Concordance Desktop is C:\ProgramData\LexisNexis\Concordance Desktop 10\CPL (Windows 7). For more information about CPLs, see and the TAGSAVER.cpl.
4.Click Open to open the Tag Saver Options list.
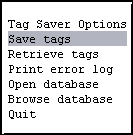
5.Click Save tags or press Enter.
i.Clicking Save tags or pressing Enter opens the field list. Use the arrow keys on your keyboard to scroll through the field list.
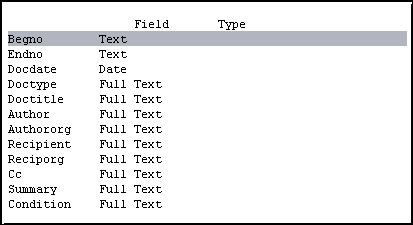
6.Click or press Enter on the field you want to associate with the tags.
i.You need a common field with a unique value, such as the Begno (Bates number) field. Do not use the Access ID field when exporting tag history.
ii.After you select the field, the CPL creates the [database name].GAT file in the same directory as the database's .dcb file. The [database name].gat file contains your tag backup.
iii.After the CPL process is finished, the Tag Saver Options list is displayed.
7.Click Quit to return to Concordance Desktop.
i.The database's .gat file is not automatically updated when you add or modify tags in the database. It is best practice to run the TagSaver.cpl periodically to ensure your tag backup is current.
To Restore Tags from a GAT File to a Database
1.Copy the .GAT file containing the tags you want to add to your database, and paste the file into the database directory for the database you want to add the tags.
2.Rename the .GAT file you copied to the database directory using the same name as the database's .dcb file.
i.For example if the database's .dcb file is Cowco.dcb, the .gat file needs to be named Cowco.gat.
3.In Concordance Desktop, open the database you want to add the tags.
4.On the Standard toolbar, click the All button to query all records in your database.
5.On the File menu, click Begin program.
6.Navigate to the CPL directory installed with Concordance Desktop, and click the TagSaver.cpl file.
i.The default directory for the CPL folder installed with Concordance Desktop is C:\ProgramData\LexisNexis\Concordance Desktop\CPL (Windows 7). For more information about CPLs, see Concordance Desktop Scripts and the TAGSAVER.
7.Click Open to open the Tag Saver Options list.
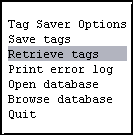
8.Click Retrieve tags.
i.When you click Retrieve tags, the CPL adds the tags for all the records that were tagged in the .gat file to the database.
ii.After the CPL process is finished, the Tag Saver Options list is displayed.
9.Click Quit to return to Concordance Desktop.
10.Open the Tags task pane to verify the tags were added and applied correctly to the database.