Snapshots are a point-in-time picture of your work history. Using snapshots is one way reviewers can help track and preserve both search history and search results.
Saved snapshots can easily be restored to see what the contents of a database were on a particular day, and what search results were found at that moment in time. During a lengthy review, tracking your work for the day is also important, not only to manage tasks and schedules, but to provide a placeholder for searches so you can jump right back into your project without duplicating previous efforts.
Unlike a query file, a snapshot saves the search results for documents retrieved, not which words were searched. This means that a snapshot will not locate new or updated documents in a database; a snapshot only displays those documents captured at the time the picture was taken. Because snapshots provide a picture-in-time reference, all your search queries and customized sort settings are preserved and can be displayed again or restored at a later time. If your database is actively being edited, changes will not be reflected in a snapshot saved last week. For instance, a document deleted from the database since the snapshot was taken will display as blank when you open the snapshot in Concordance. To capture updates after edits have been made, rerun your snapshot queries.
Snapshots are saved as .snp files and can only be restored to the original databases. When you restore a snapshot file, Concordance automatically opens the databases associated with the file, with all queries and sorts preserved.
There are two ways to save snapshots in Concordance. You can manually save snapshots or you can use the Auto restore command to have Concordance automatically save snapshots for you.
|
If you regularly save snapshots at the end of every work session, we recommend that you periodically review and delete outdated or unnecessary files due to their large file size on your hard drive or network. |
Manually Save a Snapshot
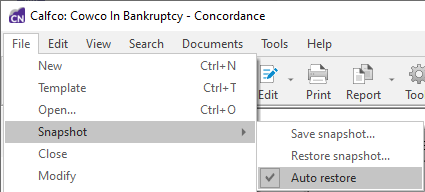
1.On the File menu, select Snapshot and then Save snapshot.
2.Navigate to the location for your snapshot file and provide a File name for the snapshot. Click Save.
3.All search queries and customized sort settings for the current Concordance session are saved in a .snp file.
Auto-Restoring Snapshots
With the Auto-restore feature, Concordance can automatically create and save a snapshot each time you close the Concordance application. The next time you open a Concordance session, the application automatically displays the exact record and view settings you had when you closed the application, including displaying your last search in the Review view.
The Auto-restore feature functions differently than manually saving separate snapshots of work your sessions. When the Auto-restore feature is enabled, Concordance automatically saves a autosave.snp file at the end of each session, overwriting the previous work session’s snapshot file. The autosave.snp is automatically saved to the user's \Documents\Concordance 10 folder on your machine.
By default, the Auto-restore feature is enabled. The Auto-restore feature is enabled and disabled by clicking the Auto restore option in the Snapshot menu. When a check mark is displayed next to the Auto restore menu selection, the Auto-restore feature is enabled.
Restore a Snapshot
1.On the File menu, select Snapshot, and then Restore snapshot.
2.Navigate to and select the snapshot file you want to open, and click Open.
3.Concordance restores the databases and documents that were accessed during the search session captured by the snapshot and launches them. The search results are displayed in the Review view, and the restored snapshot file is listed in the Recent panel in the Databases task pane.