With Concordance, you can create a copy of your database records and images so reviewers can work offline, and then synchronize any edits and changes back into the primary database to update to the document collection. The synchronization process helps merge the most recent updates with other user updates, and provides a listing of any collisions so you can resolve any field and/or note discrepancies between the original and replicated databases.
Replication versus Synchronization:
•Replication is creating an exact copy of your database while tracking the replicated copy.
•Synchronizing databases is merging the replica database to the primary database, and reconciling any updates or edits.
When replicating and synchronizing databases, we recommend that you follow the directions in all dialog boxes and use all fields, if possible. For concatenated databases, you must replicate each database individually.
|
When replicating a database, be aware that the .dir, .vol and .cib files are not replicated and the replicated database will not be able access Concordance Viewer, Concordance Native Viewer or Concordance Image. |
Enable Replication
The first step in replicating a database is to enable replication. You can replicate a database without enabling replication, but you will not be able to synchronize back to the publishing database. If replication is enabled, you can replicate both ways.
1.Back up the database you want to replicate. It is essential that you create a backup copy of your database before enabling replication. You can cancel the process before it is half-way complete. After the half-way mark, the Cancel button is disabled and the process must complete. If you want to cancel the process after the half-way mark, you will have to restore your database from backup.
2.In Concordance, open the database you want to replicate.
3.On the Tools menu, select Replication, and click Enable replication. The Enable Replication dialog displays.
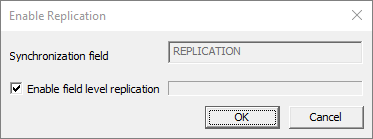
4.Synchronization field is a read-only. When you enable replication in a database, Concordance creates the REPLICATION field in the database. The REPLICATION field is system field that tracks your replicated database and is administered by Concordance. If you need to change the REPLICATION field name, you can modify the field in the Modify dialog box.
5.Enable field level replication enables field-level replication. Concordance can track changes on a field-by-field basis. If two people edit the same record and then synchronize, Concordance will detect if the edits were to different fields and merge the edits without signaling a collision. Without field-level replication, Concordance cannot arbitrate the edits and it will flag a collision. Enabling this feature adds entries to the database tracking file, called [database name].trk, for each edit. The tracking file adds overhead to the system in terms of file storage space and the computer time needed to manage it. The overhead is generally low and you should enable this feature. You can disable it later if you find that it is unnecessary.
6.Click OK to enable replication and close the Enable Replication dialog.
Replicate the Database
When you replicate a database, the replica database contains all security settings from the original database. You can create a replica database that only contains the records in the current query, in sorted order, or all the records in database.
|
Concatenated databases cannot be replicated. |
|
When replicating redlines databases, it is important to save the replica in the same directory folder as the main database replica and also name it the same to keep track of your files. |
|
If you want your database permanently sorted, you should sort the database and then create a replica by using the [#] Records in Query option. The replica database will be permanently sorted. |
1.Make sure that the database you want to replicate is backed up.
2.Run a search query to locate the records you want to include in the replica database.
3.On the Tools menu, select Replication, and click Create a replica. The Create Replica Database dialog displays.
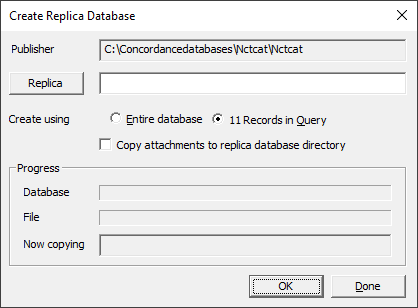
4.Publisher displays the name and path of the current database. Click Replica.
5.Browse to the location for the replica database, provide a replica .dcb File name, and click Open.
6.For Create Using select the Entire database to replicate all database records or <#> Records in Query to replicate the records from the current query.
7.When a database is replicated, the database's notes database is replicated along with the main database. Concordance can copy any external files attached to those notes to the replica database's destination directory. This is useful for laptops that will not be connected to the network, but still need to access the attachments. Select Copy attachments to replica database directory to copy the note attachments.
8.Click OK. The Progress section updates to show information while the replica is being created.
9.When the replication process is complete, click the Done button.
|
The new replica database will not be indexed. |
Synchronize the Databases and Resolve Collisions
After edits are made to the original and/or replica database, you need to synchronize the databases to update them.
Synchronization copies any changes between the databases. The synchronization options allow you to fine tune the replication process. You can set your database to publish data but not receive any updates, a read-only publishing scenario. You can set the options so that you are receiving changes, but not delivering them, or you can enable full replication with complete synchronization between the two databases.
The Replication dialog box is used to define the synchronization options and run the synchronization.The default options in the Replication dialog box are set for full symmetric, bi-directional synchronization.
1.In Concordance, open the original or replica database.
2.On the Tools menu, select Replication, and then Synchronize databases. The Replication dialog box displays.
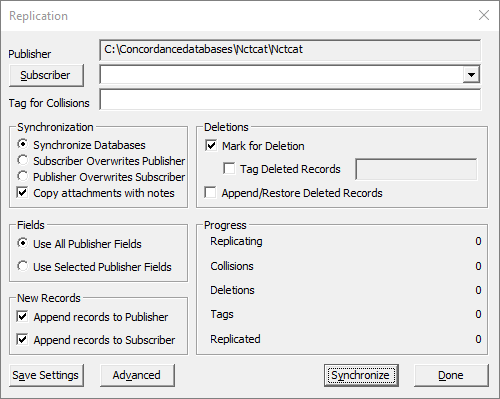
3.Publisher displays the database name and path for the database you opened.
4.Click Subscriber. Navigate to and select the database you want to synchronize with the Publisher database. Click Open.
5.If you want to use a Tag to tag records that have collisions between the Publisher and Subscriber databases, type that tag name in Tag for Collisions.
6.Based on which database is most current, in the Synchronization section select one of the following:
•Synchronize Databases - fully synchronizes both databases. All changes from the Subscriber database are copied to the Publisher database, and all changes from the Publisher database are copied to the Subscriber database.
•Subscriber Overwrites Publisher - during the synchronization, only the changes in the Subscriber database are added to the Publisher database. Data in the Subscriber database overwrites the data in the Publisher database.
•Publisher Overwrites Subscriber - during the synchronization, only the changes in the Publisher database are added to the Subscriber database. Data in the Publisher database overwrites the data in the Subscriber database.
7.Select Copy attachments with notes to copy the attachments associated with the records from one database to another.
8.In the Fields section, select one of the following:
•Use All Publisher Fields - select this option if you want Concordance to run a full bi-directional synchronization.
•Use Selected Publisher Fields - select this option if you only want to update specific fields during the synchronization. If you select this option, the Select Fields dialog will display allowing you to specify the fields to synchronize.
|
If you select the Use Selected Publisher Fields, records will not be marked as synchronized during the synchronization. The database records remain out-of-synch until a full synchronization takes place and ALL fields are synchronized via the Use All Publisher Fields option. |
9.In the New Records section:
•If you are running a full synchronization between the two databases, select both Append records to Publisher and Append records to Subscriber.
•To add new records from the Publisher database to the Subscriber database, select Append records to Publisher and clear Append records to Subscriber.
•To add new records from the Subscriber database to the Publisher database, clear Append records to Publisher and select Append records to Subscriber.
|
If you created a replica database from a query and you want to keep only the records from the query in the replica database, clear both Append records to Publisher and Append records to Subscriber, otherwise the full database will be appended. |
10.In the Deletions section:
•If you are running a full synchronization between the two databases and you want Concordance to mark deleted records from one database for deletion in the other database, select Mark for Deletion. Remember, marking a record for deletion does not delete the record from the database. A record marked for deletion is not deleted from a database until the database is packed.
•To tag records that have been marked for deletion, select Tag Deleted Records and type the tag name you want to use in the corresponding field.
•Select Append/Restore Deleted Records to have Concordance copy a deleted record back to the database it was deleted from, effectively restoring the record. This can only take place if it was not marked for deletion and packed from both databases. The record must still exist in one of the databases to restore it.
|
When you synchronize databases with Append/Restore Deleted Records selected, the deleted records are restored, but the restored records are not displayed in the database until the database is reindexed. |
11.Click Advanced to update Replication Lockout parameters:
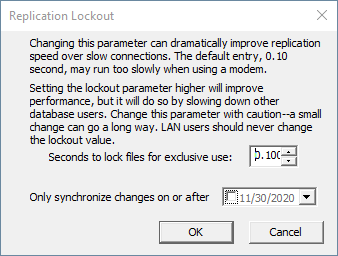
•Replication lockout is the time that replication holds the <database>.key file open for exclusive use. No other network user can access the file when it is in exclusive use. The Seconds to lock files for exclusive use value defaults to 0.10 seconds, which balances performance with file sharing. However, some wide area network (WAN) connections perform file and record locking very slowly. The default lockout parameter may be too small for reasonable synchronization performance.
•To set a specific date for synchronization, select the Only synchronize changes on or after drop down and pick the date you want to use.
12.You can click Save Settings to save all the options you have selected as the default settings each time you display the Replication dialog.
13.Click Synchronize to start synchronizing the databases. If any collisions are found a message will be displayed asking if you want to resolve them.
|
New notes added after replication to either the original or replica databases will not cause a collision during synchronization. Only notes created in the replication process, that are then edited, will cause a collision when synchronizing. |
|
Collisions do not need to be resolved during the synchronization process. You can resolve collisions later or choose to enter additional text in the primary database field to note the differing entries, and notify reviewers of the discrepancy to verify whose annotations are correct. To resolve collisions after synchronization, see the Resolve Collisions after Synchronizing the Databases section below. |
14.Click Yes to resolve the collisions during the process:
•If Concordance finds field collisions, the first record containing a collision in both databases will be opened in Edit view. The fields containing data collisions are displayed in red text. The Status bar at the bottom of the screen displays the number of records containing field collisions found during the synchronization. Select either:
oResolve all collisions with publisher
oResolve all collisions with subscriber
•If Concordance finds only note collisions, clicking Yes opens the Resolve note collisions dialog. The number of note collisions found during the synchronization is displayed at the bottom of the screen. Do one of the following:
oIf you want the data in the publisher database's record to overwrite the data in the subscriber database's record, click Publisher overwrites.
oIf you want the data in the subscriber database's record to overwrites the data in the publisher database's record, click Subscriber overwrites.
•If Concordance finds both field and note collisions during synchronization, Concordance displays all field collisions first and then displays the note collisions.
|
If you exit the field collisions view by clicking on another view, closing the database, or exiting Concordance before all field collisions are resolved, the Resolve note collisions dialog will not appear. |
15.When you are finished resolving all collisions you will see a message stating All collisions have been resolved.
16.Click OK.
17.If changes were applied to either databases during the synchronization they will need to be reindexed.
Resolve Collisions after Synchronizing the Databases (Optional)
During the database synchronization process, if Concordance finds collisions between the records in the publisher database and the subscriber database, you have the option of resolving the collisions during or after the synchronization process.
Collisions do not need to be resolved during the synchronization process. You can resolve collisions later or choose to enter additional text in the primary database field to note the differing entries, and notify reviewers of the discrepancy to verify whose annotations are correct.
You have two options for resolving collisions after synchronizing the databases:
1.Rerun the synchronization. If you need to work with your associates to resolve the collisions found during the synchronization, once you have the information you need to resolve the collisions, you can rerun the synchronization and resolve the collisions during the synchronization process. Before rerunning the synchronization, reindex the databases. If you do not reindex the databases, you will not be prompted to resolve collisions when you rerun the synchronization.
1.Query the collision tag in both databases. If you need to work with your associates to resolve the collisions found during the synchronization, once you have the information you need to resolve the collisions, you can query both databases for the collision tag you created during the synchronization process and manually resolve the collisions between the two databases.
Resolving Collisions Using the Collision Tag:
1.In Concordance, open the original database and the replica database.
2.Run a query for the collision tag in both databases. The collision tag is created in the Tag for Collisions field in the Replication dialog box and applied during the synchronization process. When Concordance finds a collision during the synchronization process, Concordance applies the collision tag to the record in both databases.
3.Compare the records tagged with the collision tag, and locate the field data and/or note collisions between the same record in each database.
4.For field collisions, in the Edit view, make the necessary edits to resolve the collisions, and click the Edit view button or move to another record to save your changes.
5.For note collisions, click the note in the Browse view or right-click the note in the Notes task pane to open the Notes dialog box, make the necessary edits to resolve the collisions, and click OK to save your changes.
6.After resolving the database collisions, reindex the modified databases.
Purge Old Events
Replication makes use of a database tracking file, <database>.trk, to log edits, deletions, and other modifications for each database in a replication set. Many of the entries in the file are no longer needed when all replica databases have been synchronized. Unfortunately, Concordance has no way of knowing if all replica databases have been synchronized or even how many replica databases exist, so it cannot automatically purge old entries from the tracking file.
It is best practice for Concordance database administrators to purge old events from time to time as the databases are synchronized.
1.On the Tools menu, select Replication, and click Purge Events. The Purge Logging Information dialog displays.
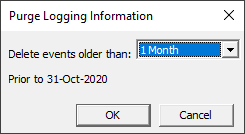
2.For Delete events older than, select the starting timeframe to purge events from the file. You can select from one month ago up to a year ago. Concordance purges data older than the timeframe selected. After making your selection, the Purge Logging Information dialog box displays the specific date Concordance uses to delete events from the file.
3.Click OK to purge the events.
4.After the events are purged from the .trk file, the Purge Logging Information dialog box displays the number of events that were deleted.
5.Click Cancel to close the Purge Logging Information dialog box.
Replicating Databases for Working Offline
You can make a copy of your images and existing redlines for a user to work offline. In order to create a copy of your images and existing redlines for working offline, you need to create:
•A replica of the <database>.dcb database file
•A copy of your images
•A replica of your <database>-redlines.dcb
To create a copy of the images, you need to create a production. When you create a production, an imagebase is created. You will want to name the imagebase's .dir file the same as your replicated database name and save it in the same directory folder.
When you replicate a redlines database, you will have a copy of the existing marks on the images and can create new ones.