Navigation:
Using CloudNine LAW > Exporting Documents >
Export Utility: Formats / Documents
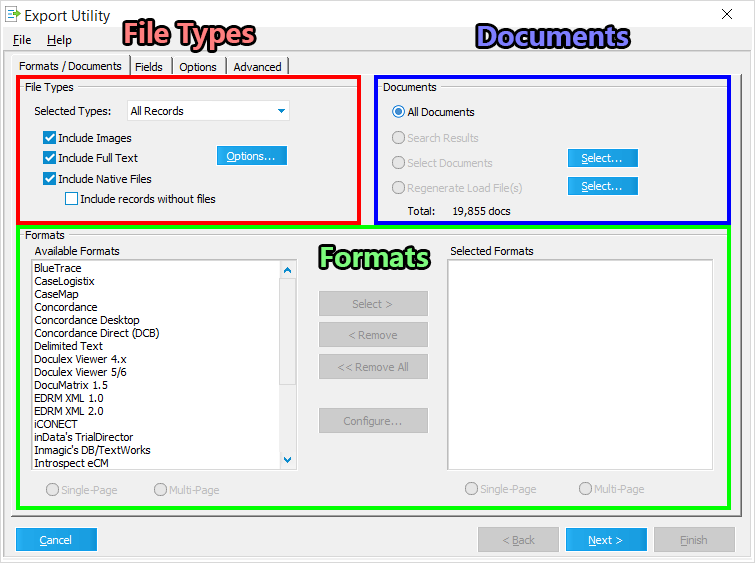
Use the Formats / Documents tab to determine which documents from the active Case Database should be exported, along with their associated file types, and the Formats (applications) desired for load file creation.
Running the Export Utility - Part 2 of 5
2.Skip this step if you're not manually selecting documents and/or folders to export. Manual selections can be made by doing the following:
A.In the Documents section, next to the Selected Documents option, click on the Select... button to open the Select Folders window.
B.Use the Select Folders window to navigate through the Case Directory and select entire folders for export.
C.To choose specific documents from folders, select a folder from the list, and click the Set Range... button to open the Set Document Range window for that folder.
D.Use the Set Document Range window to select specific documents contained within any folder.
E.When you are happy with the selections made within either window, click OK to confirm those selections.
3.Determine which File Types should be included in the export by choosing one of the Selected Types from the drop-down menu, and check the box next to each additional option as desired.
i.If you want to Include Full Text in the export, make sure to click the Options... button to configure your Text Options window as desired.
4.Select your desired load file export Formats from within the Available Formats list, and click the Select > button (while they are highlighted) to move them to the Selected Formats list.
i.Each Format has its own load file type(s) that will be created during the export process, and some Formats cannot be chosen alongside others.
i.Some of these Formats have additional configuration windows available. Click the Configure... button with those Formats selected (in the Selected Formats list) to configure their related settings windows.
5.When you're ready to proceed, click Next in the bottom-right corner of the Export Utility to continue to the Fields tab.
Use this section of the Export Utility to determine which File Types (associated with selected Documents) should be included in the export:
•Selected Types - Use this drop-down to determine which grouping of files to include, based on the following import methods:
oAll Records - All files will be included, regardless of how they were imported.
oScanned Data - Only files imported through methods other thanED Loader or Turbo Import will be included.
oElectronic Discovery - Only files imported via ED Loader or Turbo Import will be included.
•Include Images - Image files from scanned documents, imported via Raw Import or Load File, or created from TIFF Conversion, will all be included. Does not include native image files that were imported via ED Loader or Turbo Import.
•Include Full Text - When available, the extracted/OCR text files for each document will be included.
oOptions... - This button opens the Text Options window, allowing you to configure settings for the text being exported.
•Include Native Files - All native document files imported during Electronic Discovery (ED Loader or Turbo Import) will be included. This option is not supported by all Formats, and is disabled when using Scanned Data as the Selected Type.
oInclude records without files - Case records for documents without an associated native file will be included.
Documents
Use this section of the Export Utility to determine which case documents should be included in the export:
•All Documents - All documents from the active Case File will be exported. This will initially be the only option available when launching the Export Utility from the Main User Interface.
•Search Results - Documents belonging to the current record set (when launched from the Grid View or Database Query Builder) will be exported.
•Selected Documents - Only user-selected documents will be exported. Use the Select... button to choose those documents and/or their Case Directory folders.
oSelect... - This button opens the Select Folders window, allowing you to navigate through the Case Directory to select entire folders to export. With a folder selected, you can also click on the Set Range... button to open the Set Document Range window, which will let you select specific documents from within those folders instead. Note that selecting any document/attachment will automatically include all attached/parent documents as well. From within either of these windows, use the Select All button to select all available documents/folders, the Clear All button to remove all selections, and the OK button to confirm your selections.
•Regenerate Load File(s) - This option is only available for Case Files using SQL databases, and allows you to repair or re-create a load file from a previous export. Use the Select... button on the right to choose the desired export.
oSelect... - This button opens the Select Existing Export window, allowing you to choose an export for regeneration. Previous exports will be listed by Name, their export Status, the document Count, and date Created. Once an export has been selected from the list, click OK to close this window and automatically load all related settings for that export into the Export Utility. The Regenerate Load File(s) option will then be selected, and some settings will no longer be configurable.
•Total - Displays the total number of documents currently selected for exporting. You can display the total numbers of pages as well by enabling the Calculate total pages in batch/export dialogs option from the Main User Interface (Tools > Options... > Preferences). Note that this may cause a delay when opening the Export Utility.
Formats
Use this section of the Export Utility to specify your desired export Formats (load files). Each of these Formats is named after the application for which they were intended to be used.
•Available Formats - This section lists all Formats supported by LAW. Some of these Formats have additional configuration windows available for them.
Configurable Formats:
For a full table of all Available Formats, including their output (load) files and supported data types/structure, see the Supported Formats Quick Reference topic.
•Selected Formats - This section lists all Formats chosen for export by the user. Each Format has its own load file type(s) that will be created during the export process, and some Formats cannot be chosen alongside others.
•Select > - This button moves the selected Format from the Available Formats list to the Selected Formats list.
•< Remove - This button moves the selected Format from the Selected Formats list back to the Available Formats list.
•<< Remove All - This button moves all Selected Formats back to the Available Formats list.
•Configure... - This button opens the associated configuration window for any Configurable Format highlighted within the Selected Formats list.
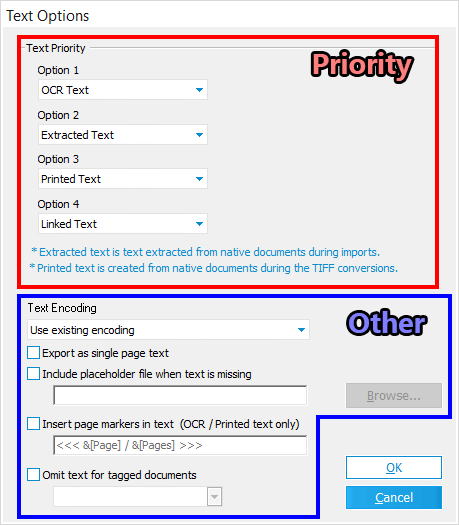
In instances where case documents have multiple text files available, use this section to determine the Priority of those text file origins. LAW will search for associated text files in the order of Priority established here (Options 1-4), exporting the first Option (text file origin) found for each document.
Other
Use this section to determine how text files (chosen based on Priority) are exported:
•Text Encoding - This drop down determines the encoding (character set) to use for all exported text files, from the following options:
oUse existing encoding - The native encoding format of each text file is used.
oUse existing encoding (Add BOM to Unicode) - The native encoding format of each text file is used, with the exception of any text containing Unicode characters, which are instead converted to UTF-8 and will have a BOM (Byte Order Mark) applied to them unless a BOM is already present. Use with caution, as this option may cause issues with export Formats that do not support Unicode characters.
oANSI - All text files are converted to ANSI, and any Unicode content will be lost.
oUTF-8 with BOM - All text files are converted to UTF-8 and will have a BOM (Byte Order Mark) applied to them.
•Export as single page text - All text will be exported as single-page files. Only supported with Summation and Sanction Formats.
•Include placeholder file when text is missing - For documents without an associated text file, a placeholder TXT file will be exported instead. Either type the full path to the desired placeholder file in the input box provided, or use the Browse... button on the right to locate and select one.
oBrowse... - This button opens a File Explorer, allowing you to navigate to and select a TXT file to use as a placeholder for the Include placeholder file when text is missing option.
•Insert page markers in text (OCR /Printed text only) - Exported text files will have each page marked with the value specified here (using the provided input box). This is not recommended, since extracted/OCR text is typically stamped by default already, thus redundant page markers may occur with this option.
•Omit text for tagged documents - Documents whose records have been text-tagged as Y within the specified Metadata Field will not have their text included in the export. Use the drop-down to specify the desired field. A tag-enabled Custom Metadata Field must be tagged with hits prior to using this feature.
 Running the Export Utility - Part 2 of 5