Export Utility: Fields

<< Click to Display Table of Contents >>

Navigation:  Using CloudNine LAW > Exporting Documents >

Export Utility: Fields

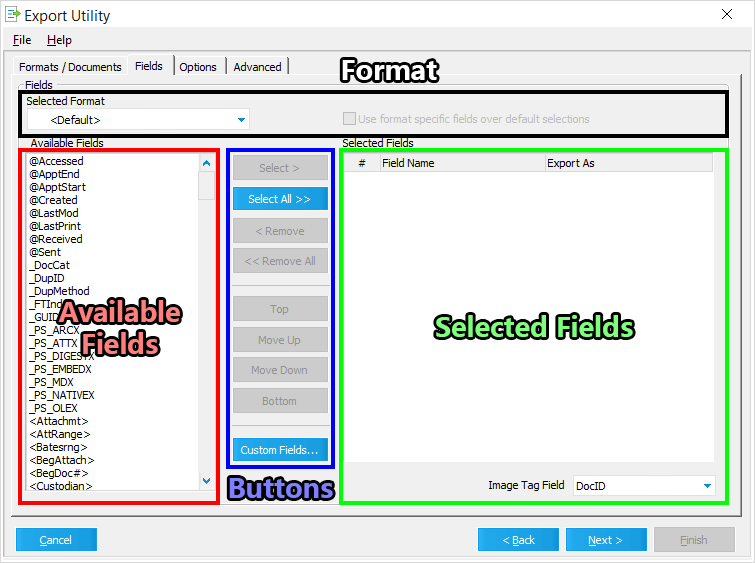
Use the Fields tab to determine which Metadata Fields should have their data exported, and which Formats (load files) they should be included in. This tab is also used to create and manage Custom Export Fields.

Export Fields are specialized category of Metadata Fields which are exclusive to the Export Utility. They are divided into the following sub-categories:

System Export Fields - These fields are used for document/file identification purposes in the various load files created during export. They do not appear in the Case Database, are only created as needed, and cannot be edited by the user.

Custom Export Fields - These are user-defined Export Fields which allow you to combine the data from multiple Metadata Fields for export purposes. They are preceded by an @ symbol in the Available Fields list, and are exclusive to each Export Profile.
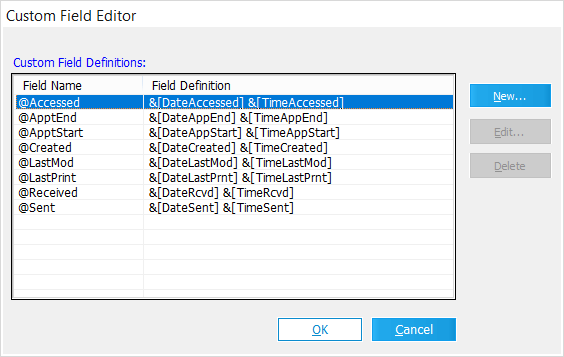
Default Export Fields - These are the eight predefined (default) Custom Export Fields that cannot be edited by the user. They are also preceded by an @ symbol in the Available Fields list.


RightArrow For a complete list and explanation of all seven System Export Fields, see the System Export Fields Table.

RightArrow For creating/editing Custom Export Fields, use the Custom Field Editor window.


InfoIcon Running the Export Utility - Part 3 of 5

6.If you want to use Custom Export Fields in your load files, then click the Custom Fields... button to configure them within the Custom Field Editor window.

i.All Custom/Default Export Fields will appear at the top of the Available Fields list, preceded by an @ symbol.

7.If you want to configure separate lists of Metadata Fields for each Format, then enable the Use format specific fields over default selections option next to the Selected Format drop-down.

i.Only the Concordance, Concordance Direct (DCB), Ringtail CaseBook, and Summation Formats can be configured separately.

ii.All other Formats will have the <Default> list of Metadata Fields included in their load files.

8.Add Metadata Fields to your load files by highlighting each desired field from the Available Fields list, and then clicking the Select > button to add it to the Selected Fields list. Repeat for each desired Metadata Field.

i.If you're configuring separate lists of Selected Fields for each Format, then use the Selected Format drop-down to choose which Format (load files) the Selected Fields list should apply to.

ii.Repeat Step 8 for each Format that needs to be configured separately, changing the Selected Format each time.

9.Select an Image Tag Field to use with the <Default> list of Selected Fields. This will be used as a document identifier in all exported load files.

i.When configuring separate lists of Selected Fields, the Image Tag Field cannot be changed for individual Formats.

10.When you're ready to proceed, click Next in the bottom-right corner of the Export Utility to continue to the Options tab.

RightArrow These instructions are continued in the Export Utility: Options topic.


ExportUtilityFieldsTabIcon Fields

Format

This section only applies when selecting Concordance, Concordance Direct (DCB), Ringtail CaseBook, or Summation Blaze as a Format within the Formats / Documents tab of the Export Utility. When any of these Formats has been selected, they will appear as options in the following drop-down:

Selected Format - This drop-down determines which Format (load file) the Selected Fields pane specifically applies to. By default, all selections made will apply to the <Default> format, which in turn applies to all load files being exported. However, you can opt to have different sets of Selected Fields apply to different load file exports by changing the Selected Format in this drop-down. You will also need to enable the Use format specific fields over default selections option to the right.

oUse format specific fields over default selections - Allows you to apply different sets of Selected Fields to individual Format (load file) exports. By default, all Selected Fields will apply to the <Default> format instead (when not enabled).

Available Fields

Provides a list of all Metadata Fields that can be included in the Selected Format (load file). This is a combination of all System Fields, Extended Properties Fields, and Custom Fields that are available from the current Case Database, as well as all Export Fields available from the active Export Profile.

Select the desired field(s) from this list, and use the Select > button to add that field to the Selected Fields list. You can also use the Select All >>  button to add all the Available Fields to the Selected Fields list instead.

Selected Fields

Displays a list of Metadata Fields which have been included in the Selected Format (load file). The columns across the top of this list provide the # for each field, the Field Name as it appears in LAW, and the name as it will appear (Export As) in the load file.

The Export As column can be edited for individual Selected Fields by left-clicking on the name provided and typing directly into that region (treat it like an input box). Any Field Names that are displayed with red text must be renamed in the Export As column in order to avoid conflicts with the Selected Format.

Fields that have been added to this list can be re-organized by using the Top, Move Up, Move Down, and Bottom buttons with the desired field selected (highlighted). You can remove unwanted fields from the list by using the < Remove button on a single highlighted field, or with the << Remove All button to remove all Selected Fields from the list instead.

Image Tag Field - The Metadata Field selected from this drop-down will be used as an identifier, linking all exported documents/files to their matching Selected Field data in the load file. It's recommended to leave this as either DocID or BegDoc# for ease of reference, but another field may be used as long as it doesn't contain blank values for any record.

Buttons

Select > - Adds the currently selected (highlighted) field within the Available Fields list to the Selected Fields list.

Select All >> - Adds all fields listed within the Available Fields list to the Selected Fields list.

< Remove - Removes the currently selected (highlighted) field from the Selected Fields list.

<< Remove All - Removes all fields currently displayed within the Selected Fields list.


Top - Moves the currently selected field within the Selected Fields list to the top of the list.

Move Up - Moves the currently selected field within the Selected Fields list up by one position.

Move Down - Moves the currently selected field within the Selected Fields list down by one position.

Bottom - Moves the currently selected field within the Selected Fields list to the bottom of the list.


Custom Fields... - This button opens the Custom Field Editor window, allowing you to create/edit Custom Export Fields for the active Export Profile.

ExportCustomFieldEditorWindowIcon Custom Field Editor

Use this window to create/edit Custom Export Fields for the active Export Profile. You can also view the eight Default Export Fields here.

To open the Custom Field Editor window, click the Custom Fields... button located within the Fields tab of the Export Utility.

Custom Field Definitions - Displays a list of all Custom/Default Export Fields available for the active Export Profile, organized into the following columns:

oField Name - This column displays the name(s) of each field as they will appear in either the Available Fields or Selected Fields lists within the Fields tab of the Export Utility.

oField Definition - This column displays which Metadata Fields are being combined together. Each individual Metadata Field shown in the definition is enclosed in brackets and preceded by an & symbol.


New... - This button opens the New Custom Field window, allowing you to define a new Custom Export Field. The Field Name can be up to 30 characters in length, may not include any Unicode characters, and will automatically have an @ symbol applied to the front once created. For the Field Definition, either type directly into the input box provided, or click ExportCustomFieldInsertFieldToken (Insert Field Token) on the right to open the Insert Field Reference window and select a specific Metadata Field from the list provided to be inserted instead.

Edit... - This button opens the Edit Custom Field window, allowing you to edit the Field Name or Field Definition of the selected (highlighted) Custom Export Field. The eight predefined Default Export Fields cannot be edited.

Delete - This button will remove the selected Custom Export Field from the Custom Field Definitions list. The eight predefined Default Export Fields cannot be deleted.