Buttons for Subtopics ![]() Return to Section Header
Return to Section Header![]()
To begin using CloudNine™ LAW, you first need a Case File - the most basic unit of organization within LAW. These Case Files establish a Case Directory to keep records on all case documents, and a database for the gathering and maintaining of electronic documents along with their related metadata, images, extracted text, and any attached or embedded files.
![]() To open or manage existing Case Files, see the Managing Existing Cases topic.
To open or manage existing Case Files, see the Managing Existing Cases topic.
 Creating a New Case
1.From the Menu of the Main User Interface, select File > New Case....
i.You can also click the Create a new case button in the Toolbar of the Main User Interface.
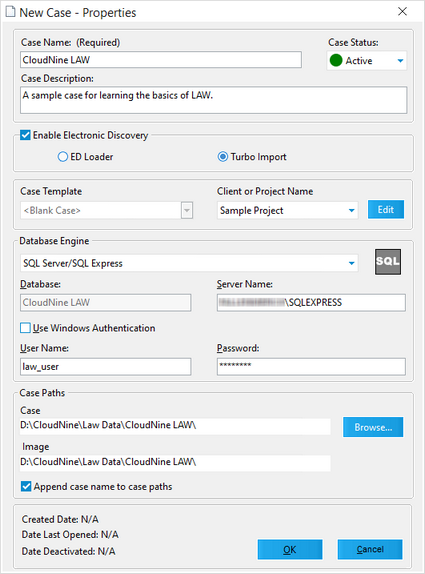
New Case - Properties
 NOTICE: Changes to Case - Properties when opened for existing case files. Some fields will be restricted to view-only.
•Case Name - Should be unique and must adhere to the file name requirements of the host (currently in use) Operating System. There is a 120 character limit.
oThe following characters cannot be used for case names < > : " / \ | ? *
•Case Description - Optional field, useful for later identifying the case among longer lists of Case Files.
•Case Status - Select InActive from the drop-down menu to deactivate this case, and update the Date Deactivated at the bottom-left with the current date and time.
•Enable Electronic Discovery for This Case - Registers the case for Electronic Discovery, allowing electronic documents to later be imported via the selected utility. Select either ED Loader or Turbo Import as the import utility using the radio buttons provided.
oED Loader - This option will create an ED Loader case for single threaded importing documents.
oTurbo Import - This option will create an Turbo Import case for muti-threaded importing documents.
▪Turbo Import cases are not eligible for importing (dii or opt) load files, or case to case imports.
•Case Template - Not available for cases with Electronic Discovery enabled. Select a Template from the drop-down menu to apply to this case. For more information see Case Templates.
•Client or Project Name - Select a project from the drop-down menu to associate with this case. Clicking the Edit List button to the right opens the Project Administration window.
•Database Engine - Select which type of database the case will use from this drop-down menu. The remaining input boxes are for SQL Server databases only, specifying the Server Name and user credentials (User Name and Password) for the SQL server to be used with this case.
oTurbo Import cases can only be created with SQL Server databases.
•Case Paths - These Case is editable specify the file paths where the case's data is stored. As Case and Image paths must be the same. These paths must point to an identically mapped location for any network drives being used at multiple computer stations. Mapped drives are not recommended in paths for Turbo Import cases.
oAppend Case Name to Case Paths - Creates new folders at the Case Paths specified above using the Case Name.
Once you have your properties configured, click on OK at the bottom right of the window to create and begin working with your new case.
Naming Case FilesAs the Case List grows, it can help to implement a naming scheme for your Case Files. Applying a consistent and intuitive naming scheme can make it easier to find cases and ensures that the right case is selected as the target for importing documents and other processing. Below is an example of some possible naming schemes: •ClientName_SubjectMatter_InvoiceID •ClientName_InvoiceID_StartDate •SubjectMatter_ClientName_StartDate •JobNumber_StartDate_ClientName •ClientName_JobNumber |