To perform full-text searches, the text for the records must first be indexed. The following indexing capabilities are offered by CloudNine™ LAW:
•Allow automatic indexing occur after you:
•Use ED Loader or Turbo Import to create new records.
•Import a case.
•Import raw images if the new record has associated text.
•Create scanned images and then OCR them.
•Manually start the indexing process as necessary.
•You can reindex documents, for example when you import a load file that contains records with text; or after you add text to previously indexed documents, as when you perform OCR or TIFF conversion after import.
•You can also disable automatic indexing as a post import action in ED Loader.
 To Configure Indexing Options
 To Change the Order of Text Priority
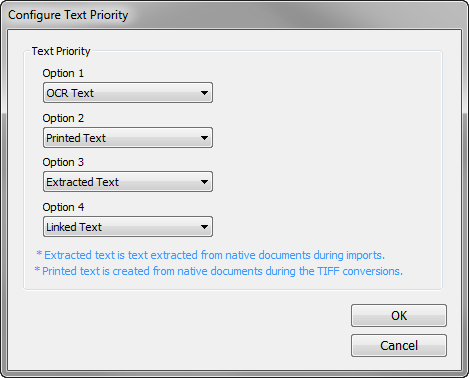
Records in LAW can have up to four types of text: text extracted from a document by optical character recognition (OCR), printed text, text extracted from electronic documents, and text from the text document linked to a document. Only one type of text for each record can be included in the index at any given time. The default priority is: 1.OCR Text 2.Printed Text 3.Extracted Text 4.Linked Text
Note the following facts that apply to text priority: •If the default values above are used, OCR text will be indexed. If OCR does not exist for a document, then printed text is used. If no OCR or printed text is available, extracted text is indexed. If no OCR, printed, or extracted text exists for a document, the text from the text file linked to the document will be indexed. Documents are linked to a text file if the "Link to source files in place when importing load files" check box was selected on the Preferences tab in the Options dialog box (Tools menu > Options), and the document was imported into LAW using a load file. •The sequence of priority can be changed as needed. •For positions 2, 3, and 4, you can select <None> to remove alternate text types from consideration for indexing.
1.On the Tools menu, click Options. 2.Click the Indexing tab. 3.Click the Configure button. The Configure Text Priority dialog box appears. 4.Choose the desired text types for options 1, 2, 3, and 4. For example, to include only a particular type in the index, such as Extracted Text, choose Extracted Text for Option 1, and then choose <None> for options 2, 3, and 4.
|
 To Flag Documents and Reset Flags for Indexing
Documents must be in a "flagged" state in order to be included in the indexing process. A document that is flagged for indexing means that it will be indexed when you run the indexing process manually. The steps required to flag or reset flags on documents depend on whether you are setting this on an OCR operation, a TIFF conversion, or whether flagging or reset will occur on one folder or a set of folders.
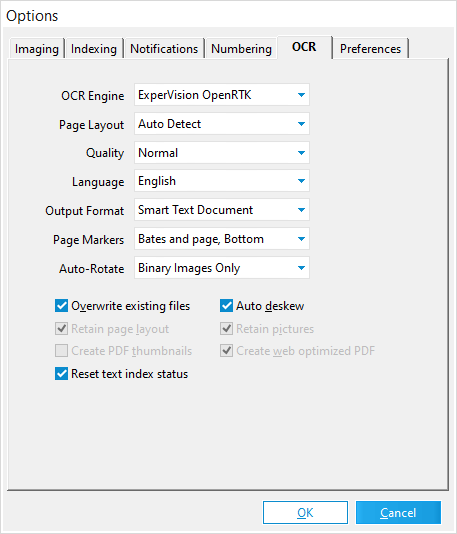
To set the option to reset text index status for OCR 1.From the main window, on the Tools menu, click Options, and then click the OCR tab. 2.The OCR Options dialog appears. 3.Select [OCR] Reset text index status to reset text index status for OCR processing of individual records or batches of records. Clearing this option will prevent LAW from re-flagging the document for indexing after the OCR process is performed. This means the OCR text for affected records will not be searchable in CloudNine™ LAW.
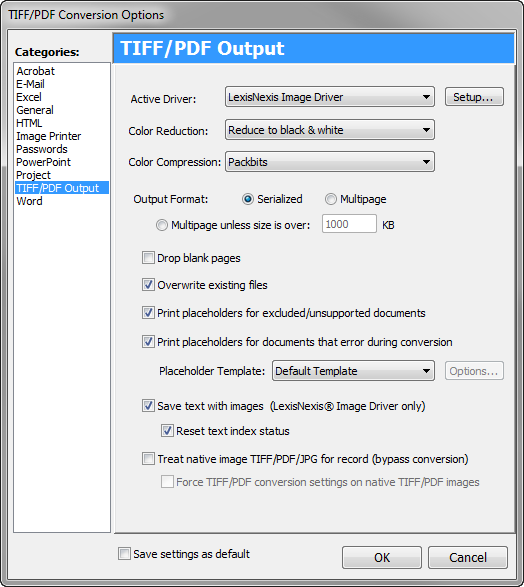
To set the option to reset text index status for TIFF conversion 1.From the main window, on the Tools menu, click Batch Process. 2.In the Batch Process dialog, on the Options menu, click TIFF Output. 3.The TIFF Conversion Options dialog appears.
Do one of the following: •Select [TIFF Conversion] Reset text index status to reset the status and allow indexing to occur again. Or •Clear [TIFF Conversion] Reset text index status to prevent LAW from re-flagging the document for indexing after the TIFF conversion and printed text is created. This means the printed text for affected records will not be searchable in CloudNine™ LAW.
To manually flag documents for indexing In certain situations, one or more documents may need to be manually flagged for indexing. For example, if the OCR text for a document was deemed unusable and deleted outside of CloudNine™ LAW, the document could be manually re-flagged for indexing so the printed text for that document would be indexed instead.
To reset the text index flags for documents in one folder 1.In the main form, select the documents in the document list. 2.On the Edit menu, click Reset Full Text Flags, and then select ON. To remove the flag, choose OFF instead.
To reset all documents or documents that span folders 1.From the main form, click click Tools and then click Display All Records. The standalone grid opens. 2.In the standalone grid, on the Tools menu, click Reset Full Text Flags, and then click ON to enable records to be reindexed, or OFF to prevent records from being reindexed. The full text index flags for all documents in the current record set are set to ON or OFF. For more information about the text flag values stored in this field, see the _FTIndex field values section in this topic. After the desired documents have been flagged, they can be indexed. 3.In the main form, on the Tools menu, click Full Text Index and then click Index New Documents.
|
 To Enable Automatic Background Indexing
An auto-indexing feature is available for indexing text as a background process, allowing text to be indexed as records are being imported rather than waiting for an EDD import to complete.
1.On the Tools menu, click Options and then click Indexing. 2.Set options as needed. When records with associated text are imported via the LAW case import, LAW will prompt to index once the import has been completed.
|
 To Index New Documents After Importing
If the indexing is not performed immediately after the import, it may be performed at any time thereafter.
•On the Tools menu, click Full Text Index, and then click Index New Documents. The Index New Documents feature will index any records that are "flagged" to be indexed.
|
 To Reindex All Documents
A case can be reindexed if needed.
1.From the Tools menu, click Full Text Index, and then click Re-Index All Documents. Clicking Re-Index All Documents opens the Confirm Re-Index All Documents dialog box. 2.Click Yes to reindex all documents in the case. The Re-Index All Documents feature is useful in the event an indexing option needs to be changed or the index has somehow become corrupt.
|
 FTIndex Field Values
The _FTIndex system field is automatically created when a case is ED-enabled. It holds a numeric code that represents the status for the indexing process.
The possible values for this field are: 0: No text is available for indexing. 1: The record has text that is ready for indexing. 2: The record was flagged again for indexing but has not yet been reindexed. 3: The record text is indexed.
|
 To Access Full-Text Index Properties
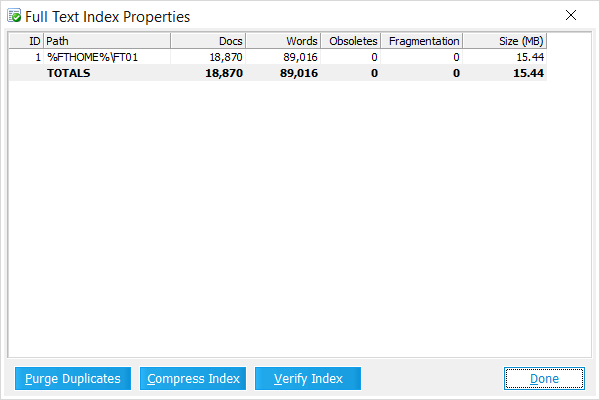
1.On the Tools menu, click Search Records. The Query Builder starts. 2.Select the Full text search check box. 3.Click the Options button, and then click the Index Properties button. The Full Text Index Properties dialog box appears. This screen provides details about the full-text indexes for the current LAW case, such as the size and the number of indexed documents and words in each index. 4.Select options as needed: •Purge Duplicates - This function removes all records that were flagged as duplicate records in LAW (DupStatus=G or C) from the full text index. This feature will first scan the case and then return the duplicate count in a message box. •Click Yes to remove the duplicates from the index or click No to cancel. To prevent these records from being included prior to indexing, use the Ignore duplicate documents during indexing option. •Compress Index - Compressing the index removes obsolete records from the index. Obsolete records may include documents that were deleted from the case or records that were removed from the index using the Purge Duplicates feature. These obsolete documents are not returned in searches. If the "ObsoleteCount" value in this dialog is greater than zero, use the Compress Index function. •Verify Index - This function will check the full text index for problems or corruption. If any issues are discovered, an error will be returned after running the verify and the case will likely need to be reindexed.
|
 To Configure ED Loader Auto-Indexing
1.In the main window, on the File menu, click Import and then click Electronic Discovery. 2.Click the Settings tab and then select Post Import Actions. 3.Select or de-select Perform full-text indexing as necessary. If the Perform full-text indexing option is enabled, after import you will be prompted to choose whether to index the text of the new documents. If the setting is disabled, import will complete without your having the option to perform full-text import.
|


