In order to add a reviewer to a review, the following conditions must be in place:
•The user's account must have Standard Access (not read-only).
•The user must be assigned to the client and to the case that will be reviewed. You can assign a user to a client and to a case as a part of creating the user, or after the user is created. See Managing Clients for more information.
•The reviewer must be assigned to review batches. This can be done after the reviewer is assigned to the review.
Assigning a Reviewer to a Case
1.Sign in to CloudNine™ Explore Web using an Administrator account. The Cases list displays.
2.Click Administration in the menu bar (top right). The Administration page displays.
3.Click Users in the menu on the left. The Manage Users page displays.
4.Click the name of the user you want to add as a reviewer. The Edit user page displays on the User Information tab.
5.Click the Case Assignment tab.
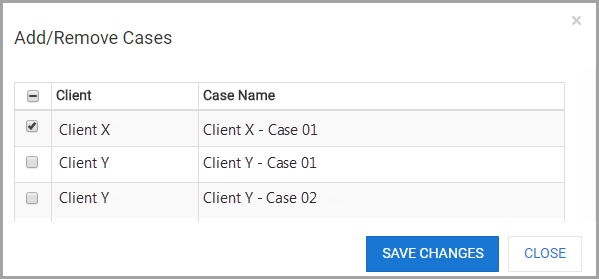
6.Click ADD/REMOVE CASES. The Add/Remove Cases dialog displays.
7.Select the check box next to the client + case combination to add to this user.
8.Click SAVE CHANGES.

9.Select the client/case line you want to add the reviewer to. You can sort the list by client or by case name by clicking on the column header.
10.Click Save Changes. The user is added to the review and the Case Assignment tab displays with the updated list.
Adding or Removing Reviewers from a Review
This procedure assumes that the user you want to assign to the review is already assigned to the client and to the case.
1.Sign in to CloudNine™ Explore Web as an Administrator. The Cases list displays.
2.Select the case you want to add or remove reviewers for. The DASHBOARD page displays.
3.Click REVIEW. The REVIEW page displays.
4.Click VIEW DETAILS on the review you are interested in. Details for the review display.
5.Click the Edit Reviewer (people) icon in the upper right. Depending on the review type, you will see the Edit review dialog on the REVIEWERS page.
6.Select or clear the check box to add or remove the specific reviewer for this review.
7.Click SAVE. The review is updated based on your selections.
Assigning Reviewers to a Batch
1.Sign in to CloudNine™ Explore Web as an Administrator. The Cases list displays.
2.Select the case you want to assign reviewers to. The DASHBOARD page displays.
3.Click REVIEW. The REVIEW page displays.
4.Click VIEW DETAILS on the review you are interested in. Details for the review display.
5.Click ASSIGN REVIEWER in the appropriate batch. A box displays with available reviewers.
6.Select a reviewer from the list.
7.Click CONFIRM. The batch is updated with the selected reviewer.
Unassigning Reviewers From a Batch
1.Sign in to CloudNine™ Explore Web as an Administrator. The Cases list displays.
2.Select the case you want to add or remove reviewers for. The DASHBOARD page displays.
3.Click REVIEW. The REVIEW page displays.
4.Click VIEW DETAILS on the review you are interested in. Details for the review display.
5.Click UNASSIGN REVIEWER in the appropriate batch.
6.Click YES to confirm removing the user from this batch. The display updates and the batch shows the new list of assigned reviewers.
|
To remove the reviewer from all batches you can either select each batch individually and remove the user, or you can remove the reviewer from the case. |