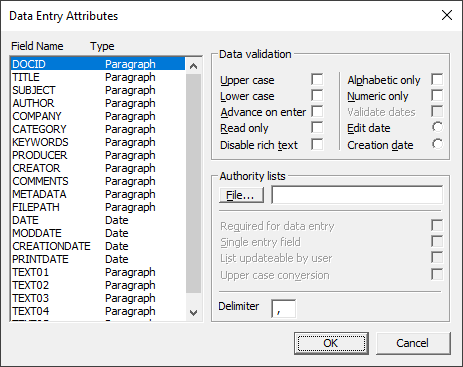
Once you have created your database and its fields, you can define the data validation attributes for your database fields in the Data Entry Attributes dialog. Data validation attributes are settings that define how data is entered in fields from Edit view.

Define Data Validation Attributes for Fields
1.On the Edit menu, click Validation. The Data Entry Attributes dialog displays.
2.In the Field Name list, select the field to edit data validation attributes for.
3.In the Data validation section, select the options you want to apply to the field.
•Upper case - converts field text automatically to all upper case letters.
•Lower case - converts field text automatically to all lower case letters.
•Advance on enter - advances the cursor to the next field when a user presses the Enter key in the Edit view. This functionality is the default setting for fixed-length fields. If you select the Advance on enter check box for a full-text field, but need to insert a carriage return within the field, press CTRL+ENTER.
•Read only - allows users to view and copy data from the field, but they cannot edit or modify the field.
•Disable rich text - disables the Rich Text Toolbar and only allows plain text to be entered in the field. Existing rich text will remain in the original format. Used for text fields.
•Alphabetic only - allows only alphabetic characters in the field.
•Numeric only - allows only numeric characters in the field.
•Validate dates - used for date fields to validate whether a real date is entered in the field. This check box allows users to enter partial dates in the field, with zeros for unknown days, months, or years. If an invalid date is identified, users can correct the date or ignore the error.
•Edit date - populates the field with the current date automatically when a record is edited. Select this option for the EDITTRAIL field or its equivalent.
•Creation date - populates the field with the current date automatically when a record is created in Concordance. Select this option for the CREATEDATE field or its equivalent.
|
Upper case, Lower case, Alphabetic only, and Numeric only are only supported with English text. |
4.To assign an authority list to the field, click the File button. In the Open dialog box, navigate to and select the appropriate authority list file.
|
The Data validation and Authority lists sections in the Data Entry Attributes dialog box are independent sections. For example, assigning an authority list with words to a field selected as Numeric only does not cause an error. The data from the authority list overwrites the Numeric only setting. |
5.Select the check boxes that apply to the authority list.
•Required for data entry When the user's cursor is placed in the empty field, the authority list automatically opens. If the field is already populated, the authority list opens when a user clicks the right mouse button or attempts to type in the field. When the Required for data entry check box is selected, users can only choose a field value from the list or cut, copy or paste the text in the field.
•Single entry field The field allows only one field value from the list to populate the field. If a user clicks another field value from the list, the original value is replaced by the newly selected value. You can select both the Single entry check box and the Required for data entry check box to ensure users can only populate the field with one field value from the authority list.
•List updateable by user Users can add and delete field values from the authority list assigned to the field. If you do not want users to modify the authority list, make sure that the List updateable by user check box is not selected. When the List updateable by user check box is selected, the Insert and Delete buttons are displayed at the bottom of the authority list dialog box.
•Upper case conversion Concordance automatically converts all text to upper case before text is copied to the field or the text is added to the authority list. Do not select the Upper case conversion check box if you are using an existing authority list containing lower case field values. If the check box is selected in this scenario, when a user selects a lower case field value from the list, the value will not be added to the field.
7.The Delimiter field defaults to the comma character. To change the field delimiter, type a different character in the Delimiter field. The character in the Delimiter field is used to separate field values that were added to the field from an authority list. Delimiters are also used by exploded sort reports and the tally function to determine where one entry ends and another begins.
8.Click OK to save your changes.