Return to Section Header
When using the Database Query Builder or its related Full-Text Searching Tools to search through large amounts of case records, its more efficient to Tag Text Hits rather than manually flagging documents which contained the specified keywords or strings of text within the search results. You can also quickly generate more focused search queries with the Database Query Builder afterward by directly targeting these tagged records. In order to use this tagging feature, you must first create at least one tag-enabled Custom Metadata Field for your Case Directory:
![]() Creating Custom Metadata Fields for Text-Tagging
Creating Custom Metadata Fields for Text-Tagging
1.From the Menu of the Main User Interface, select Index > Modify Fields.
2.The Modify Fields utility opens. Click on the + Add Field button located at the top-left in the Toolbar. The Add Field window opens.
3.Enter a Name for the new custom field, observing the following rules:
i.The following characters cannot be used for field names < > : " / \ | ? *
ii.Field names cannot begin with a number.
iii.Field names are case-insensitive, and must be unique. For example, "data" = "Data" = "DATA" when naming fields.
4.Choose either Tag (Boolean) or Numeric from the Type drop-down menu.
a)Tag (Boolean) fields populate with Y once tagged to indicate that the target text was located within that record. Otherwise, N populates instead.
b)Numeric fields populate with the frequency that the target text is located within that record.
5.Click on OK to create this new field. The Add Field window closes, and the Add Another Field prompt opens.
6.To create more custom fields for text-tagging, select Yes and repeat steps 3-5 for each new field. Otherwise, select No to close the prompt.
7.Click on Close at the bottom-right of the Modify Fields utility. The LAW PreDiscovery prompt appears.
8.Select Yes to save these field changes to your Active Profile. You are now ready to Tag Text Hits within your Case Directory.
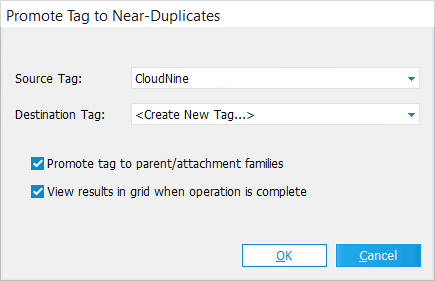
When using the Tag Text Hits feature, some Near-Duplicate documents may not match the same search criteria, and thus are excluded from being tagged. In these instances, you can instruct LAW to apply that same tag to those Near-Duplicates by using the Promote Tag to Near-Duplicates tool:
|