Scan Profiles

<< Click to Display Table of Contents >>

Navigation:  Using CloudNine LAW > Importing Documents > Document Scanning >

Scan Profiles

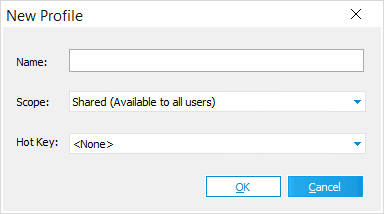
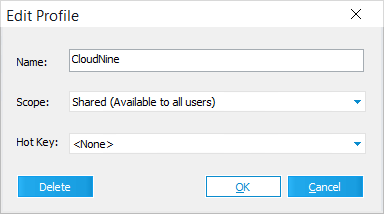
Scan Profiles are INI files containing complete sets of LAW scanner settings that are unique to individual scanner models. Each Case File comes equipped with its own unique <Default> profile, which is provided at the user-level for whoever created the case. Additional Scan Profiles can be created and made available at different Storage Levels depending on who should have access to them, and can be reused across multiple Case Files with access to the same scanner model.

The possible Storage Levels are as follows:

Local (Available to only you)

Shared (Available to all users)


When connected to a scanner, these Scan Profiles are created and managed within the Scan Toolbar. You can also double-click on the name of the active Scan Profile within the Scanner Status Bar at the bottom-right corner of the Main User Interface:

ScannerStatusBar

ScanToolbarNewProfileInfoIcon Creating New Scan Profiles

1.A scanner must be connected before proceeding. From the Main User Interface, use the Menu to select Scan > Connect to Scanner.

2.Open the Scan Toolbar through the Menu by selecting Scan > Scan Toolbar.

3.Click the New... button to the right of the currently selected Scan Profile to open the New Profile window.

4.From here, set the following options for this new profile:

a.Name - Sets a name to be displayed for this profile.

b.Scope - Determines the Storage Level for this profile.

c.Hot Key - Establishes a keyboard command in LAW for quickly activating this profile.

5.Click OK when finished to save this profile and close the New Profile window. This new profile will now be selected from the Scan Profile drop-down menu.

6.You can now configure the Settings for this new profile. Click the Show Settings >> button at the bottom-left of the Scan Toolbar to expand it downwards.

7.Configure the Settings for this new profile as desired:

i.Settings:

8.Any changes made to the Settings for this new Scan Profile are saved automatically, so you can safely select a different Scan Profile or close the Scan Toolbar at any time.

EditScanProfileInfoIcon Editing/Deleting Scan Profiles

1.A scanner must be connected before proceeding. From the Main User Interface, use the Menu to select Scan > Connect to Scanner.

2.Open the Scan Toolbar through the Menu by selecting Scan > Scan Toolbar.

3.Select the desired Scan Profile from the appropriate drop-down menu, and then click the Edit... button on the right to open the Edit Profile window.

i.The <Default> profile cannot be altered in Edit Profile window, but can still have its Settings changed.

4.From here, you can Delete this profile (click Delete at the bottom-left) if desired, or change any of the following profile options:

a.Name - Sets a name to be displayed for this profile.

b.Scope - Determines the Storage Level for this profile.

c.Hot Key - Establishes a keyboard command in LAW for quickly activating this profile.

5.Click OK when finished to save any changes and close the Edit Profile window.

6.To change the Settings for the selected profile, click the Show Settings >> button at the bottom-left of the Scan Toolbar to expand it downwards, and configure your Settings as desired:

i.Settings:

7.Any changes made to the Settings for your selected Scan Profile are saved automatically, so you can safely select a different Scan Profile or close the Scan Toolbar at any time.