Return to Topic![]()
LAWtsi has many buttons that will be seen throughout the application. Commonly used buttons and their explanations are listed below.
•Arrow buttons - These buttons move the scroll bars in the direction the arrow is pointing. In certain places, these buttons will be used to increment or decrement values. |
|
•Numpad button - This button displays the Numpad dialog for numeric input |
|
•Text Input button - This button displays the Interactive Keyboard for text input. Which can be found under Setting > Data Entry |
|
•Page Jump buttons - Used in Re-numbering dialogs these buttons will move through page numbers. The up arrow will increase the page number and the down arrow will decrease the page number. |
|
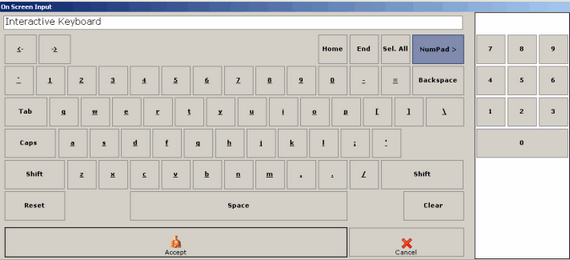 LAWtsi has a built in Interactive Keyboard that can be used to input text.. The Interactive Keyboard acts just like a regular keyboard except it is digital and accepts mouse or touch screen input only. It includes a NumPad similar to the NumPad on a regular keyboard.
Note: When the Interactive Keyboard is visible, all keyboard input is disabled. To input text from the keyboard, users will need to manually type the text in the Text Input box next to the Text Input Button.
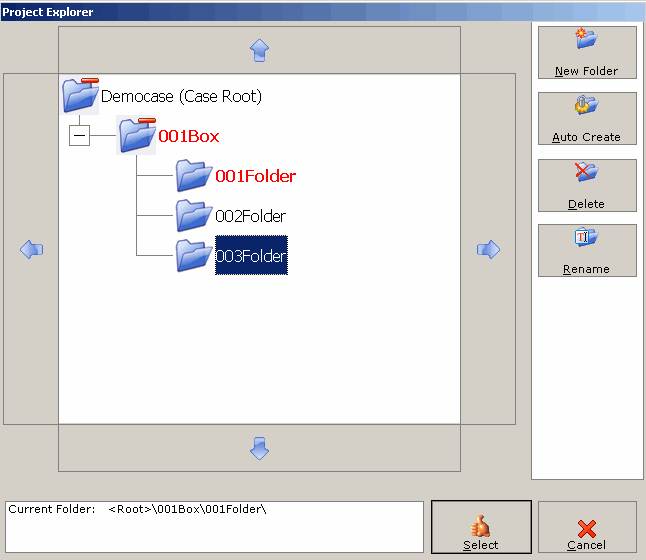
![]() Folders are managed by the Browse button on the Main Interface of LAWtsi. This allows users to change the folder that is will be scanned into. Along with that, this is where creation, deletion and renaming of folders is performed.
Folders are managed by the Browse button on the Main Interface of LAWtsi. This allows users to change the folder that is will be scanned into. Along with that, this is where creation, deletion and renaming of folders is performed.
Project Explorer - This dialog is where folders are managed.
To change folders in LAWtsi, select the folder desired in the Project Explorer.
There are two ways to create folders in LAWtsi. To do this, click either the New Folder or Auto Create buttons.
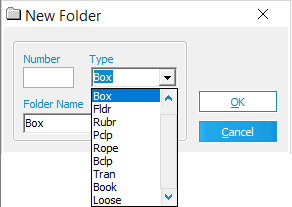
•New Folder - The New Folder button will display the New Folder dialog. This allows users to creates a new folder with any folder name using either the keyboard or the Interactive Keyboard.
•Auto-Create Folder - The Auto-Create Folder button automatically create the next logical folder on the same level as the selected folder. This will increment the numeric value within the folder name. For example, in a new case there is one folder called "001Source", when the Auto-Create Folder button is clicked it will create a folder called "002Source" on the same level as the first folder. Now if the button would be clicked again, LAWtsi would create a folder called "003Source" continuing on in a logical order.
New Folder dialog - This dialog is used to create a new folder. |
|
To delete a folder, first select a folder. Then click the Delete button. Doing this will delete the folder and all of the documents within the folder.
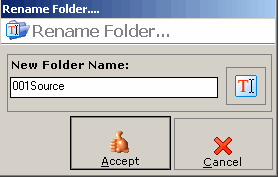
To rename a folder, first select a folder. Then click the Rename button. This will display the Rename Folder Dialog which allows users either type in the new folder name with the keyboard or the Interactive Keyboard. |
|
![]() Navigation
Navigation
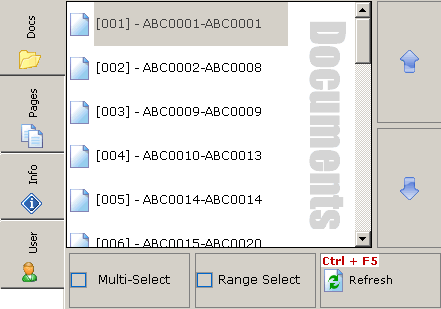 Image Navigation can occur a few different ways. The Case Directory, Page panel, and Navigation toolbar offer multiple ways to navigate.
The Case Directory (Figure to the right) allows users to click through the documents. Each time a document is selected the Page panel will be populated will all the pages within a document. The Document tab will show Document Order, BegDoc# and EndDoc# for each document in the selected folder. This will be represented in this format [Document Order] - BegDoc#-EndDoc#. Multiple documents can be selected by using the Selection Mode buttons. This panel will show the OCR flag if the Display OCR Status (Doc Lvl) option is set.
The Page Panel displays the pages within a document and the Page IDs associated with them. Multiple pages can be selected by using the Selection Mode buttons. This panel will show the OCR flag if the Display OCR Status (Doc Lvl) option is set.
|
![]() File Information
File Information
 The File Information tab (Figure 1) contains properties for both the current record and the physical image currently loaded in the viewer. Document record properties are located below the top most Document node. File properties are located below the Image node.
Info tab - This tab displays document and file properties.
Page panel - This panel is used to navigate pages within documents.
Another way to navigate is by using the Navigation toolbar
![]() Navigation Toolbar - Documents and Pages can be navigated by using the Navigation Toolbar.
Navigation Toolbar - Documents and Pages can be navigated by using the Navigation Toolbar.
The buttons on the navigation toolbar will help navigate through documents. The buttons are listed from left to right.
•First Document - The First Document button will jump to the first document in the current folder.
•Previous Document - The Previous Document button will jump to the previous document in the current folder.
•First Page - The First Page button will jump to the first page within the selected document.
•Previous Page - The Previous Page button will jump to the previous page within the selected document.
•Next Page - The Next Page button will jump to the next page within the selected document.
•Last Page - The Last Page button will jump to the last page within the selected document.
•Next Document - The Next Document button will jump to the next document in the current folder.
•Last Document - The Last Document button will jump to the last document in the current folder.
Since LAWtsi was designed to work with a touch screen, there are some selection modes added to the Document and Page tabs in lieu of a keyboard. The two selection modes are Multi-Select and Range Select. 
The Range Select option allows users to select documents or pages in a consecutive range.
 The Multi-Select option (Figure 2) allows users to select multiple single documents or pages, like holding down the <CTRL> key in a standard windows list.. Each time an element is clicked, it will be selected (or de-selected depending on its existing state).
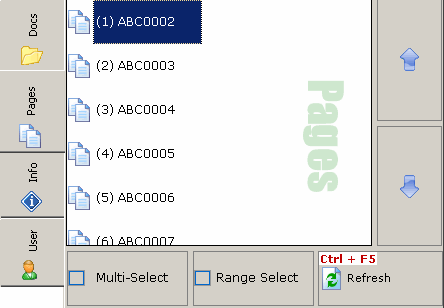 Case Directory - This panel is used to navigate through documents.