The LAW Profile Manager is the utility used for managing licenses. The licensing type you are using for LAW determines which functionality is available in the LAW Profile Manager.
All licenses are maintained in a software product key on the license server. A license server is where a software product key is activated.
You can use the LAW Profile Manager to perform the following tasks:
•Connect to a license server for CloudNine™ LAW
•Add, edit, and delete custom license profiles for LAW
•Monitor usage and availability of licenses
![]() To Start the LAW Profile Manager
To Start the LAW Profile Manager
•Click Start, point to All Programs, point to CloudNine LAW, and then click Profile Manager. |
![]() To Create or Change a Password
To Create or Change a Password
To create a password for the first time on a computer: 1.Click Start, point to All Programs, point to CloudNine LAW, and then click Profile Manager. 2.Click Advanced. •A prompt to enter an administrative password appears. The password is stored at a workstation level, meaning each computer on which LAW is launched, whether running locally or in a client/server configuration, will prompt for a password when executed initially. 3.In the Enter Admin Password dialog box, type a case-sensitive password that is at least 6 characters long and then type it again to confirm. 4.Click OK.
To change the password on a computer: 1.Click Start, point to All Programs, point to CloudNine LAW, and then click Profile Manager. 2.Click Advanced. •If you are not in administrative mode, the Enter Password dialog box appears. 3.Type the current administrative password and then click OK. 4.On the Tools menu, click Change Administrative Password. •Clicking Change Administrative Password opens the Change Admin Password dialog box. 5.In the Enter new password field, type a case-sensitive password that is at least 6 characters long, and then type it again in the Confirm Password field. 6.Click OK. |
|
A prompt for a password after clicking Advanced means that you are not running the LAW Profile Manager in administrative mode. For more information, see the To switch to Administrative Mode section in this topic. |
|---|
![]() To Use a Temporary License in CloudNine LAW
To Use a Temporary License in CloudNine LAW
When a temporary license is in use, the LAW Profile Manager dialog box is not displayed when starting the LAW application. •To active a Temporary licenses, use the Licenses Manager just like you would with any other licenses. |
![]() To Connect to a License Server
To Connect to a License Server
1.Setting the license server in in the LAW Configuration Utility needs to be done prior to launching LAW. •If a valid license server computer name has been entered, the LAW Profile Manager dialog box opens. •If a license key is not found on the specified server, a message will appear stating that the key was not found and will ask to try another server. If this happens click Yes, and then follow the prompts to change the license server.
|
![]() To Select Licenses by Using a License Profile
To Select Licenses by Using a License Profile
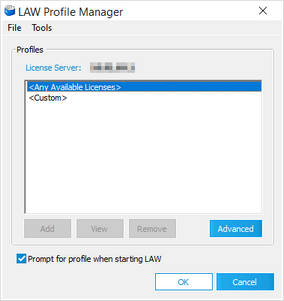
Each time you start LAW, instead of selecting licenses singly, you can load a license profile. 1.Start the LAW Profile Manager. 2.Check out licenses by means of a license profile by selecting one of the following: •<Any Available Licenses> Checks out one of each available license. These licenses will not be available to other workstations using the same license key. •<Custom> You can check out specific licenses based on their tasks. For example, if you need to scan documents, you can select just the Scan license. Click OK to open the list of licenses. •User defined. Any user-defined license profile is listed below the two system profiles. To create a user-defined license profile, see the next section in topic call To Create Custom Profiles. 3.Select the licenses needed for the session and then click OK. •Only the selected licenses are checked out and available on that workstation. If one or more license modules cannot be checked out, a message box appears stating which licenses could not be acquired.
|
![]() To Create Custom Profiles
To Create Custom Profiles
1.Start the LAW Profile Manager. 2.Click Add. •If the Add button is grayed out, switch to administrative mode to enable it. On the File menu, click Switch to Administrative Mode and then enter and confirm the password, click OK twice and then click Add. 3.In the Add New Profile dialog box type the name of the new profile and a description. 4.Select the licenses to include in the profile. 5.To set this profile as the default profile for the current user, select Default Profile. 6.Click OK. •The new license profile is displayed in the LAW Profile Manager dialog box. If selected as the default profile, it is automatically highlighted. 7.To automatically check out licenses and bypass the LAW Profile Manager, select the profile as the default profile. Then deselect Prompt for profile when starting LAW in the LAW Profile Manager dialog box.
|
|
To re-enable the setting that automatically opens the LAW Profile Manager, set Prompt=1 in the profman.ini file in <application path>\ProfMan. The section in the INI file containing this setting is in the following format: [<user name>]. |
|---|
![]() To Hide the System Profiles
To Hide the System Profiles
Hiding a profile can be useful to safeguard against inadvertently selecting the wrong profile. For example, the LAW Profile Manager populates the Profiles area with two system profiles <Any Available Licenses>, and <Custom>. To prevent users from checking out more licenses than needed, these profiles may be hidden. 1.Start the LAW Profile Manager. 2.Click File, and then click Switch to Administrative Mode. Enter the administrative password, click OK, and then OK again. 3.Right-click the system profile to hide and then click Hide System Profile.
|
![]() To Restore the System Profiles
To Restore the System Profiles
•Right-click anywhere in the Profile area and then click Restore Hidden Profiles. |
![]() About Administrate Mode
About Administrate Mode
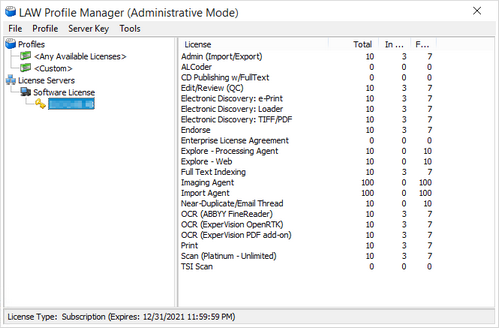
You must switch the LAW Profile Manager to administrative mode before you can perform several administrative functions, such as working with licenses and working with profiles. One way to switch to administrative mode is to start the LAW Profile Manager, and then, on the File menu, click Switch to Administrative Mode and then type the administrator password. Alternatively, there are many features that require you to provide the administrator password before continuing. Switching to administrative mode enables you to: •Add, edit, and delete profiles. •Refresh licenses to add any newly purchased licenses to the software product key. •Enter the advanced view of the LAW Profile Manager. •Hide/restore system profiles.
|
![]() To Switch to Administrative Mode
To Switch to Administrative Mode
1.Click Start, point to All Programs, point to CloudNine LAW, and then click Profile Manager. •The LAW Profile Manager dialog box appears. 2.Click File and then click Switch to Administrative Mode. The Enter Password dialog box appears. 3.Type the administrative password and then click OK. •Clicking OK opens the Successfully switched to administrative mode message. 4.Click OK.
|
![]() To Configure Administrative Details
To Configure Administrative Details
1.Click File and then click Switch to Administrative Mode. The Enter Password dialog box appears. 3.Type the administrative password and then click OK. •Clicking OK opens the Successfully switched to administrative mode. message. 4.Click OK. 5.Click Advanced. •The LAW Profile Manager searches for the license servers. •The LAW Profile Manager (Administrative Mode) dialog box appears.
6.Use the following menu commands to configure the administrative mode of the LAW Profile Manager:
|
![]() To Acquire or Release Licenses From CloudNine LAW
To Acquire or Release Licenses From CloudNine LAW
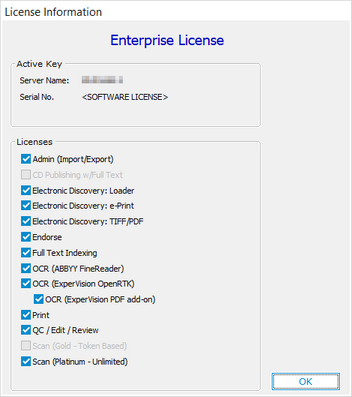
To avoid closing LAW and launching the LAW Profile Manager, to change the selection of license modules, licenses can be checked out and released from within the LAW application. 1.In LAW on the Help menu, click About CloudNine LAW, and then click Licenses. •The License Information dialog box appears. •In the Active Key area, the Server Name field displays the license server name. The Serial No. field displays SOFTWARE LICENSE for software key licensing and the product key expiration date(s) (if applicable). •The Licenses area displays the LAW licenses. When a license's check box is selected, it means the license is currently checked out. If a license name is grayed out, the product key does not contain this license. 2.Perform one of the following: •To acquire a license, select the license's check box. A message box will appear indicating whether license acquisition was successful. •To release a license, clear the license's check box. No message box will appear.
|
|
•At least one license must remain checked out while LAW is running. •If the OCR license is released, OCR Add-on (PDF) will be automatically released because it also depends on the OCR license. |
|---|


