The installers for LAW and Explore are packaged into a single executable file known as the LAW Installer. You can obtain this installer from the link below:
![]() Official CloudNine™ Software Download Center
Official CloudNine™ Software Download Center
A Knowledge Based Article on this subject can be found here: Installing LAW (cloudnine.com)
Once you've downloaded the LAW Installer, you are ready to begin installing LAW. The instructions below will guide you through the installation process:
|
These instructions cover the installation of LAW and/or Explore on the local machine. You can install them both at once, or separately as desired. |
1.Start by running the LAW Installer as an administrator (right-click > Run as administrator). Click Yes when prompted to allow the app to make changes to your device.
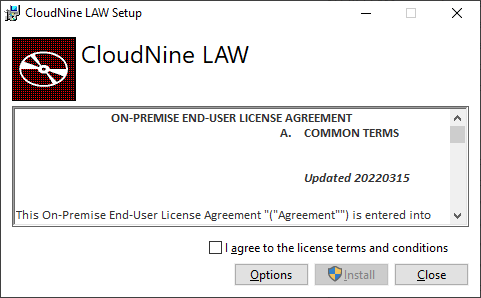
2.You will first be greeted by the End User License Agreement. If you agree to these terms, then check the box stating I agree to the license terms and conditions, and click Install to proceed.
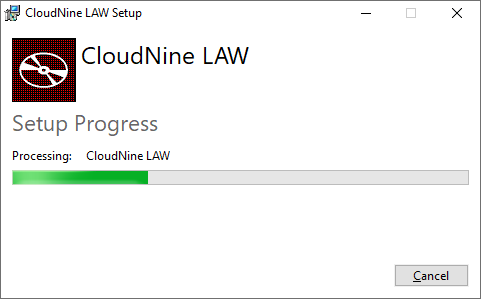
3.The LAW Installer now displays the Setup Progress screen, which will remain in place for the duration of the installation. It will start automatically installing the necessary prerequisites.
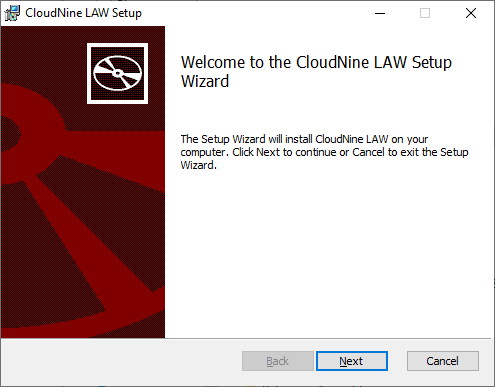
4.Once the necessary prerequisites have been installed, the Setup Wizard will open in a separate window, and you will be brought to the Welcome screen. Click Next to proceed.
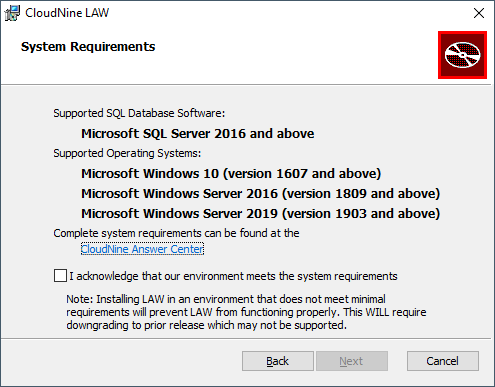
5.At the System Requirements screen, review the information. If the system you are installing on meets the listed requirements, select I acknowledge that our environment meets the system requirements and I acknowledge that we are not using any licensing dongles / hard keys then click Next to proceed. Please note if your system does not meet the system requirements you should click Cancel and discontinue the installation.
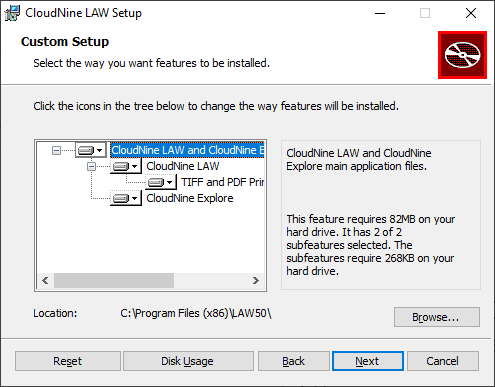
6.At the Custom Setup screen, decide which features/programs you want to install by clicking the icons on their left and selecting Will be installed on local hard drive from the drop-down menu. Any feature/program with an X will not be installed.
By default, LAW and the TIFF Printer Drivers are enabled for installation. CloudNine™ Explore is not enabled for installation by default.
The features available for installation are as follows:
Feature |
Description |
Select for the use of |
|---|---|---|
CloudNine™ LAW |
Installs LAW50.exe and related folders, system files, templates, and utilities. |
Needed to Install LAW Needed to Install a Licenses Server |
CloudNine™ Explore |
Provides advanced prefiltering functionality. This feature requires additional licensing to run. |
Needed to Install Explore |
TIFF / PDF Printer Drivers |
A driver for batch printing, and for batch- and single-TIFF conversion. Supports text extraction during TIFF conversion. Installation is recommended. Also includes the LAW Image Driver 300 DPI Printer. This is used to convert documents to TIFF at a resolution of 300 dots per inch. |
Needed if you want to use the native batch imager in LAW |
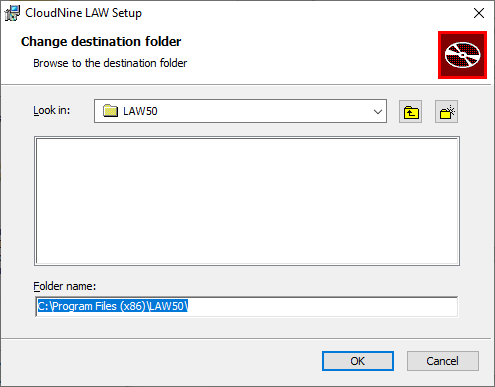
7.You can change the install location for all programs/features selected within the Custom Setup screen by clicking the Browse... button to the far right of the Location shown near the bottom. This will open the Change destination folder window, allowing you to determine a new root folder (on this computer) to use as the install location. If you choose a new folder, be sure to click OK to apply those changes.
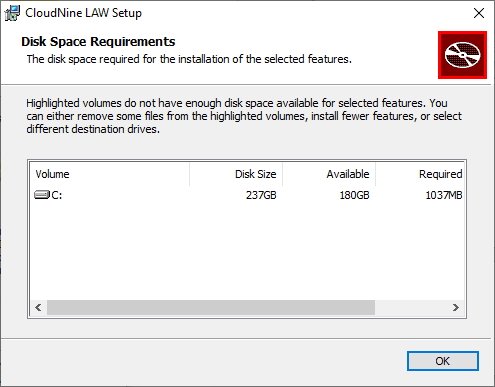
8.You can also determine how much hard drive space is Required/Available for these programs/features from the Custom Setup screen by clicking the Disk Usage button at the bottom-left. This will open the Disk Space Requirements window, indicating these details for all available Volumes. When you're done reviewing the information, click OK to close this window.
9.When you're satisfied with the features/programs and install location shown in the Custom Setup screen, click Next to proceed.
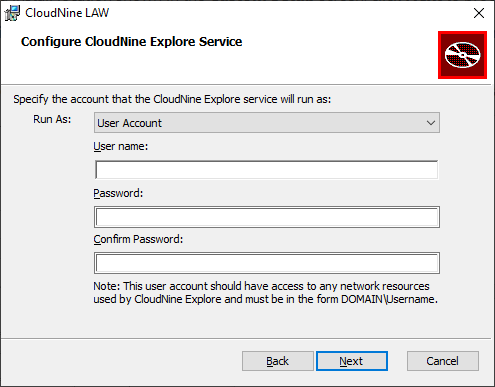
10.Skip this step if you're not installing Explore
•At the Configure CloudNine Explore Service screen, either enter a
oMicrosoft Windows account (User name and Password) that the Explore Service will run on.
oEnter or create an account into a group that will not hinder the access rights below.
oFull read/write/modify access to share/location (source data and case folders), SQL, & any workstations.
oAdd this account to SQL with db_owner role.
oUser Names should be in this format (without angled brackets or quotations): <"network domain"\"network user name">
oLocal System Account option from the Run As drop-down
oThen the current Windows user must have access permissions to the SQL Server, or you will be unable to connect
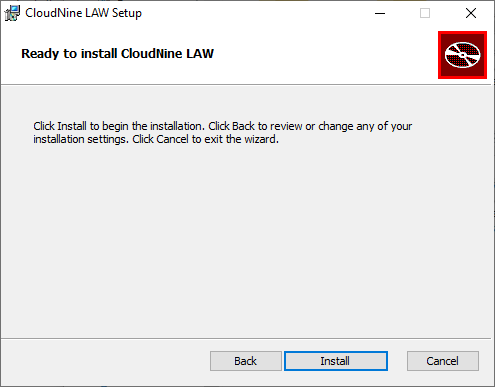
11.At the Ready to install CloudNine LAW screen, you have one last chance to go Back to any of the previous screens and change the installation settings. Otherwise, click Install to begin the installation process.
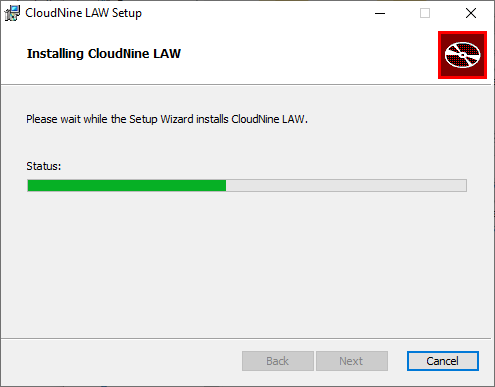
12.You will be brought to the Installing CloudNine LAW screen, where the installation progress is displayed. This process may take several minutes.
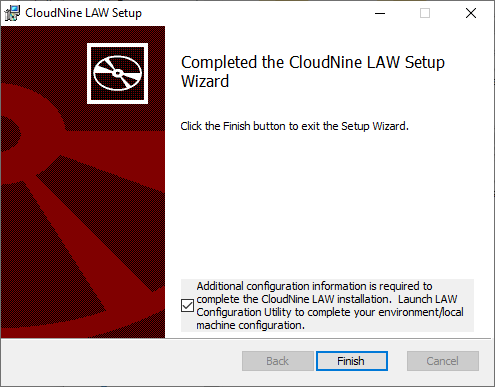
13.Once the installation finishes, you will arrive at the Completed screen. If a License Server has been assigned, and your License has already been activated, you are ready to continue to the LAW Configuration Utility. Leave the option on your screen checked. Otherwise, you will need to activate your License on a License Server before you can correctly configure LAW. Uncheck this option before continuing. Click Finish to exit the Setup Wizard.
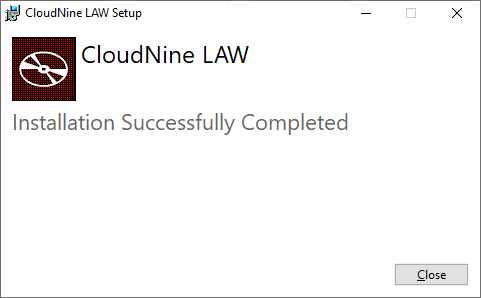
14.The LAW Installer will now indicate that the installation was Successfully Completed. Click Close to exit the LAW Installer.
15.You have now finished installing LAW! There are some additional steps we recommend you take to ensure a fully functioning LAW experience:
1)Activate your LAW Licenses through the License Manager utility if you haven't already done so. Instructions for doing so can be found in the topic.
2)Configure your Environment and/or Local Machine through the LAW Configuration Utility. Instructions can be found in the topic.
3)Have your system administrator grant all users who will be running LAW full read/write/modify permissions to the root directory (install location) for LAW. This ensures that their program settings/options are saved properly.
4)Have your system administrator adjust the Properties of Law50.exe within the root directory (install location) of LAW to enable the Run this program as an administrator option under the Compatibility tab. This will prevent several known Windows related usability issues from occurring.
If you would like to create desktop shortcuts for LAW and CloudNine™ Explore, you can create desktop shortcuts from the LAW and Early Data Analyzer .exe files. The Law50.exe file is located in the ...\Program Files (x86)\Law50 directory, and the LAW.EdAnalyzer.exe file is located in the ...\Program Files (x86)\Law50\EDAnalyzer64 directory.