Delimited Text and Tag Lists

<< Click to Display Table of Contents >>

Navigation:  Using CloudNine LAW > Importing Documents > Other Sources >

Delimited Text and Tag Lists

ImportDelimitedTextWindowIcon Import Delimited Text

CloudNine™ LAW can import delimited text files to link records in LAW with existing index information stored in delimited text format. This feature is useful when coding was performed in another application, for example.


Note

In Version 7.0 & 7.1, Turbo Import cases are not eligible for scanning, importing (dii, opt, dat, or csv) load files, case to case imports, or raw image imports.  Only EDRM XML load files are supported.  Not all options are available in Turbo Import enabled cases for File, Edit, and Folder.  The Scan tab is not able to be viewed in Turbo Import enabled cases.


In Version 7.2+ Delimited text files and Tag lists for overlaying fields onto records in Turbo Import enabled databases are available for use.

1.On the File menu click Import, and then click Delimited Text.

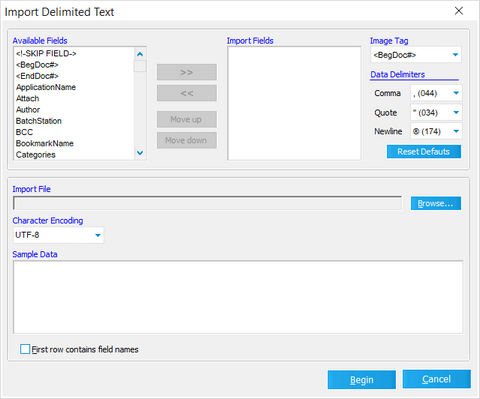
2.The Import Delimited Text dialog appears.

3.Select a delimited text file (*.csv , *.txt) to import.

A sample of the data contained in the file is displayed. This preview can be used to check the order of the fields being imported and whether or not the first record contains the field names.

4.If necessary, adjust the Character Encoding value to ensure the file is parsed correctly.

5.To ignore the first row if the first record of the file contains field names, select First row contains field names.

6.Select the fields being imported from the list of Available Fields according to the following requirements:

The fields must appear in the same order as they appear in the text file.

The records must either be already numbered (i.e., PageID for image records) or have at least one coded field to act as the image tag. Otherwise, the coded data cannot be linked to the images.

Select Image Tag must be marked as one of the fields to import. The Image Tag field must be selected because it is used to match the imported data with existing records. It acts as a "link" between the records in the imported field information and the existing records in the LAW case. If no match is found for the incoming record, it will be ignored. If a duplicate match is found, both records matching the Image Tag value found in the LAW case will be updated with the same information.


Note

Extended property, page-level, and system fields with field names that start with an underscore, _, are not shown in the Available Fields list.  In version 7.2+ Import Set, EdaId, Custodian Id, ImportSet Id, EdSource Id, EdFolder Id, and EDSession Id are not listed in the Available Fields list nor Image Tag list.


7.Select <!-SKIP FIELD-> for fields not to be imported.

8.Select a Data Delimiter to allow other types of delimited files to be imported.

9.Click Begin.


Note

To return the options on this page to their original values, click Restore Defaults. This action resets the delimiters back to the default comma/quote delimiters.


ImportTagListWindowIcon Import Tag List

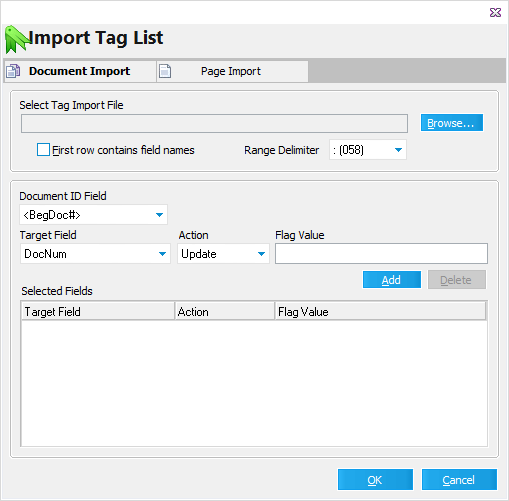
1.On the File menu, click Import and then click Tag List.  The Import Tag List dialog box appears.

2.Click Browse to locate the tag import file.

If the import file's first record contains the field name, check the First row contains field names box. The range delimiter is used when importing ranges of records to be updated rather than a list of individual ID numbers (i.e. ID0001-ID0048).

3.Configure Target Field, Action, and Flag Value as needed. Note the following when configuring these options:

The Document ID Field lists fields that may be used to link the incoming import file with existing records. For example, if the user is provided a text file containing a list of DocIDs that match the DocIDs in the case, then the user would select DocID as the Document ID Field.

For greater performance in cases with a large number of records, it is recommended to apply an index to the selected Document ID field. You can manually apply a tag to a field by using the Modify Fields dialog box. However, CloudNine™ LAW will check for the existence of an index on the selected Document ID field. If the field is not indexed after initializing the import, LAW will allow the addition of an index for the selected Document ID field at that time. When adding an index using this method, the grid displays will need to be closed prior to adding the index. If the grid is active, LAW will display a prompt requesting the grid be closed in order to continue.


A memo field cannot be used as the Document ID field.


The Target Field is the field to be updated with the "tag" value. If a tag field is selected, the Flag Values will appear as "True" and "False". The Action drop-down will have two options: Update (which will update the records with the specified Flag Value) and Reverse (which ignores the Flag Value and simply toggles the current value of the tag field for each affected document). If other field types are selected, such as a text field, the Action options will change to Update (explained above) and Append, which allows users to append the specified Flag Value to any existing field data. Date fields will only have an Update option.

4.Click Add. The entry is added to Selected Fields.

5.Select additional target fields as needed.

6.Click OK. The import process starts.

After the import is complete, a report appears that lists the number of records that have been updated and any errors that may have occurred during the import. These records may then be returned by a search using the filter functions or query tools.