Scanner settings are those properties that control the operation of the scanner directly. Before you can configure scanner settings you must add a scanner. For more information on adding a scanner, see Selecting a Scanner.
To configure scanner settings
1.On the Scan menu, click Scanner Settings. The Scanner Settings dialog box appears. The availability of specific settings will vary, depending on the scanner model. 
2.Configure scanning settings as needed. Some important settings are described as follows:
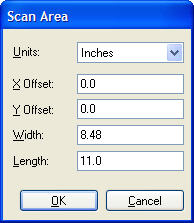
•Scan Area - The scan area can be further adjusted by selecting the Area button. A Scan Area dialog will be displayed that allows users to fine-tune the scan area for the current page size. The scan area dialog allows users to set an X and Y offset for the page as well as a custom height and width. This custom area applies only to the current page size. The custom area for each page size is retained between sessions, so users will only have to customize a scan area once for each page size. Setting a custom scan area may be necessary with some scanner models that frequently exhibit a black border around scanned images. Because the black border is not even on all sides, it cannot be adequately removed with black-border removal and must be removed by adjusting the scan area.

•Scan brightness - Scan brightness can be adjusted in the Brightness section of the Scanner Settings dialog box. Alternatively, the following shortcut keys may be used: •Press ALT+UP ARROW to increase brightness by 32 points. •Press ALT+DOWN ARROW to decrease brightness by 32 points. Pressing either of these hot keys will cause the scanner settings to pop up for visual inspection and fine-tuning of the new brightness. When the dialog appears, focus will be placed on the brightness setting so that it can be quickly adjusted by holding the CTRL key while pressing LEFT ARROW or RIGHT ARROW.
•Scanner-specific settings - To display any special settings for your particular scanner, select the More button from the Scanner Settings dialog. Available settings vary depending on the scanner. |
|


