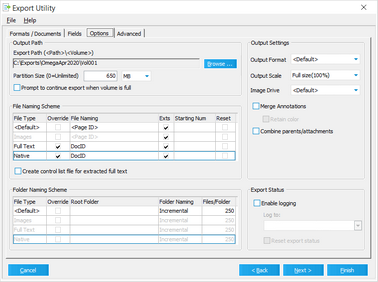
In the Export Utility, the Options tab is where you configure many general settings that control how your export works. For example, the Options tab is where you set the output path, images, native, text, and load files, as well as the folder and file naming schemes, export logging, and various other output settings, such as file format.
To access this feature, from the main window, on the Tools menu, click Export Utility, and then click the Options tab.

This area of the Options tab contains settings related to the location in which the files will be exported.

Export Path - This value will be the location to which the exported files will be saved. These files may include one or a combination of images, native files, full text, and load files, depending on the selected options.

|
The maximum character length for file paths in the Export Path field is 250 characters. If the file path exceeds 250 characters, any load files generated by the export will be saved to the $Invalid_Paths folder in the export directory. The rest of the files exported by LAW will be exported to the file path entered in the Export Path field.
|
Partition Size - This setting is used to determine how much data is written to each volume. The last folder listed in the output path is considered to be the volume name. For example, if the export path listed is C:\Exports\EDD_001\Vol001, then the first volume will be Vol001. When the partition size has been reached, a Vol002 folder will be created, etc. The default of 650 MB should be used if planning on burning the exported data to CDs but may be increased or decreased as needed (0=unlimited, all records will be written to one volume).
Prompt to continue export when volume is full - When this option is enabled, a prompt will appear on the screen each time a volume becomes full and a new volume must be created. The user must click Yes each time in order for CloudNine™ LAW to create the new volume and continue with the export.
|
You can specify a default export path by providing the following settings in LAW50.ini under the LAW install folder (i.e. C:\Program Files (x86)\Law50 or under the VirtualStore folder if you don't have write access to the install folder)
[Export]
DefaultDrive=L:
DefaultPath=<Drive>\Exports\<Case Name>\Vol001
Where DefaultDrive is the mapped network share of the export location.
LAW will automatically replace <Drive> and <Case Name> in the path above with DefaultDrive and the current case name.
|
The file naming grid is used to specify the type of file name to be used for images, native files, and full text.

The grid columns are described in the following table:
Column
|
Description
|
File Type
|
Lists each file type included in the export as well as a Default option, which will apply to all types unless the Override option is used. Only file types that are selected on the Formats/Documents tab will be displayed; the Default option will always be displayed and represents all three file types. Having each type listed separately allows users to apply different options to each (native, images, full text) if desired.
|
Override
|
Overrides the default settings for the desired file type. For example, if BegDoc# is needed as the filename for images and the original filename is needed for native files, select the Override option in the Native row and choose <Original Filename> in the File Naming column, leaving BegDoc# as the default.
|
File Naming
|
Specifies a file naming scheme for the exported files. Lists user-defined and system fields in the drop-down for use as the file naming convention, including DocID and BegDoc#.
|
Exts
|
Includes the file extension in the exported file name. This will be useful for single-page imports when a document-level file naming scheme is used (otherwise resulting in .001, .002, etc. extensions).
|
Starting Num
|
Available when the Auto Number file naming scheme is selected. Enter a starting number for the exported files; the value will increment by one for each exported record.
|
Reset Num
|
Available when the Auto Number file naming scheme is selected. Forces auto-numbering to restart to the specified starting number for each new folder.
|
Create control list file for extracted full text
|
Provides a control list (*.lst file) that consists of a unique document identifier for each record with full text as well as a path to the text file.
This option is commonly used to import text into a Summation case with existing records but may be used for other purposes if needed. The .lst file will be created in the currently specified Export Path, also found in the Options tab.
|
|
The folder naming grid is used to specify the folder structure to be used for the exported images, native files, and full text.

Each column in the grid and its purpose is described in the following table:
Column
|
Description
|
File Type
|
Lists each type of file (images, native, text) included in the export as well as a '<Default>' option, which will apply to all types unless the Override option is used.
|
Override
|
Used to override the Default settings for the desired file type. For example, if <Default> is set to Mirror Original, but the job specifications call for Incremental folders for native files only (and mirrored for images and text), the user could select 'Override' beside the Native file type and then choose Incremental in the Folder Naming column.
|
Root Folder
|
If a root folder value is specified here, the file type(s) (images, native, and/or full text) will be placed in the mirrored or incremental folders, following this folder structure: <Export Path>\<Root Folder>. For example, if a ”r;Text” root folder is specified for the Full Text file type, and the specified export path is C:\Exports\EDD_001\vol001, then the full text will be placed in C:\Exports\EDD_001\vol001\Text. The Folder Naming scheme (see next option) will be applied following the Root Folder.
|
Folder Naming
|
Three options exist for folder naming: Custom, Mirror Original, and Incremental. One option may be applied to all by selecting the desired option as the <Default>. Or, use the Override setting and choose different options for each.
Custom - Uses 1-3 of the specified index fields to create a folder structure when exporting (see Files/Folder option below).
Mirror Original - Mirrors the current structure as shown in the folder tree in CloudNine™ LAW’s main interface.
Incremental - Places the specified number of files in a "001" folder, creates a "002" folder, etc. (see Files/Folder option below).
|
Files/Folder - This option only applies to the Incremental and Custom folder naming schemes. If Incremental was chosen, enter the desired number of files to be placed in each folder or use the default of 250. If Custom was chosen, use this field to launch the Custom Folder Structure dialog and choose the field or fields containing the folder structure.

|
If a folder or file name length exceeds 250 characters for any records, the export path for those records will be changed to <Export Path>\$Invalid_Paths.
|
|
The Output Settings section contains options related to output image files, annotations, and other miscellaneous settings. These settings are described as follows:
Output Format
The Output Format setting allows users to convert images to an alternate format during the export process. The Output Format settings are:
•<Default> When <Default> is selected, LAW will automatically determine whether the image is exported as a:
•24-bit color JPEG •8-bit grayscale JPEG •1-bit black and white TIFF •Image-only PDF if exporting PDF files to a single-page format other than the PDF Conversion format on the Formats/Documents tab. •JPEG The JPEG format only support single-page image files and should NOT be used with exports that produce multi-page images.
•PCX The PCX format only support single-page image files and should NOT be used with exports that produce multi-page images.
•PDF The PDF format can be used to convert images to PDF and may be used with single- or multi-page image formats. This setting has the same effect as choosing the 'PDF Conversion' export format. The PDF Conversion format provides a means to export images as PDF with no load files, whereas the PDF output format setting produces PDF images with all specified load files.
•PDF (Image Only) The PDF (Image Only) format exports images as image-only PDF files.
•PNG The PNG format only support single-page image files and should NOT be used with exports that produce multi-page images.
•TIFF •TIFF (Binary) The TIFF (Binary) format exports images as black and white 1-bit TIFF files.
|

|
Note the following when configuring output formats:
•When exporting PDFs to any single-page format other than PDF Conversion, if <Default> is selected as the output format, the PDF files will be converted to image-only PDF files. If PDF is the output format, the PDF files will be searchable.
•If exporting multi-page color or grayscale TIFF images to a single page format with the Output Format set to <Default>, LAW will automatically export these files as JPEG images. This is done for better compatibility with older image viewers that may not support TIFF w/JPEG compression and to minimize the file sizes of the color images. Black and white TIFF images will not be affected by this process. |
Output Scale
The Output Scale setting allows users to reduce the size (AND quality) of the images during the export process. This setting is typically used to create a set of images to be viewed over the Internet or an intranet where bandwidth is limited. This feature may be used to create a second set of images to be viewed as thumbnails for browsing and allow the entire original image to be loaded upon request from a separate location.
Image Drive
The Image Drive setting allows users to specify an alternate drive letter for hard image paths written to load files. If using hard paths for images (not recommended, but necessary with some formats), this setting will replace the drive letter (with the designated letter) written to the load files, so they can be imported without modification from another system. The <Default> setting uses the drive letter of the export path. This setting should only be used if importing the data from another system and the drive letter from which it will be read is known.
Merge Annotations
Merging annotations will "burn" all annotations onto the exported images. See Annotations for more information on merging.
Retain Color
This setting allows color annotations to be preserved when merging annotations. It is ONLY applied when an output format of TIFF is selected for a multi-page export. The Retain Color setting for annotations currently only exists in the Export Utility.

|
This requires changing the color format of the page and may significantly increase the size of the images. Also, if using the PDF setting users should first ensure that the target application supports PDF images.
|
Combine parents/attachments
This feature merges attached documents to their respective parents during the export process, creating a single document.
|
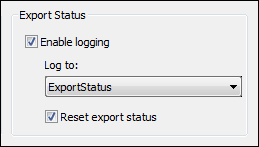
This feature allows users to track whether or not a file has been exported.

A user-defined field must be selected to store the export status from the drop-down. Exported files will receive a value of Y; records that did not export will receive a value of N. If an index field was created for this purpose, enable this setting and choose the field from the list. If the "Reset export status" option is enabled, LAW will update the export status for all documents in the case (regardless of the documents selected for export).
|


