Using the LMC
You use the LMC to monitor client computers, jobs, and licenses in use. You can also use the LMC to help manage clients and jobs.
Client management tasks:
•Force computers to leave a batch process or distributed electronic discovery loading session.
•End a batch process or distributed electronic discovery loading session.
Jobs management tasks:
•Cancel a job for all clients.
•Change the type of invitation for a job to control which computers will participate in a job.
•Prioritize Turbo Import cases for importing and Turbo Imaging jobs.
The LMC can join computers to a shared job. LAW will launch, open the SQL case, and begin processing the job without user interaction. Jobs will be joined in the order in which they were created, but are sorted visibly by name under the Jobs node. The following conditions apply when joining a client computer to a shared job: •LAW must not be running on the client. •The LMC must be running on the client. •The LMC must be connected to the same SQL Server as all other computers participating in the process. •The LMC only runs when the client computer is left in an idle state. The idle state is how long the system has processed no keyboard or mouse movement for a specified number of seconds. You can set the number of seconds value in the LMC on the Tools menu. Click Options, and then General. In the System Idle Timeout field change the value to a number greater than 0, which represents the number of seconds. When the workstation is idle in the LMC, the second panel in the status bar changes to System Idle: YES. The LMC will attempt to join a job provided all other criteria have been met. •The client must not be in the Excluded Clients list for a job. •The job status must be Active.
|
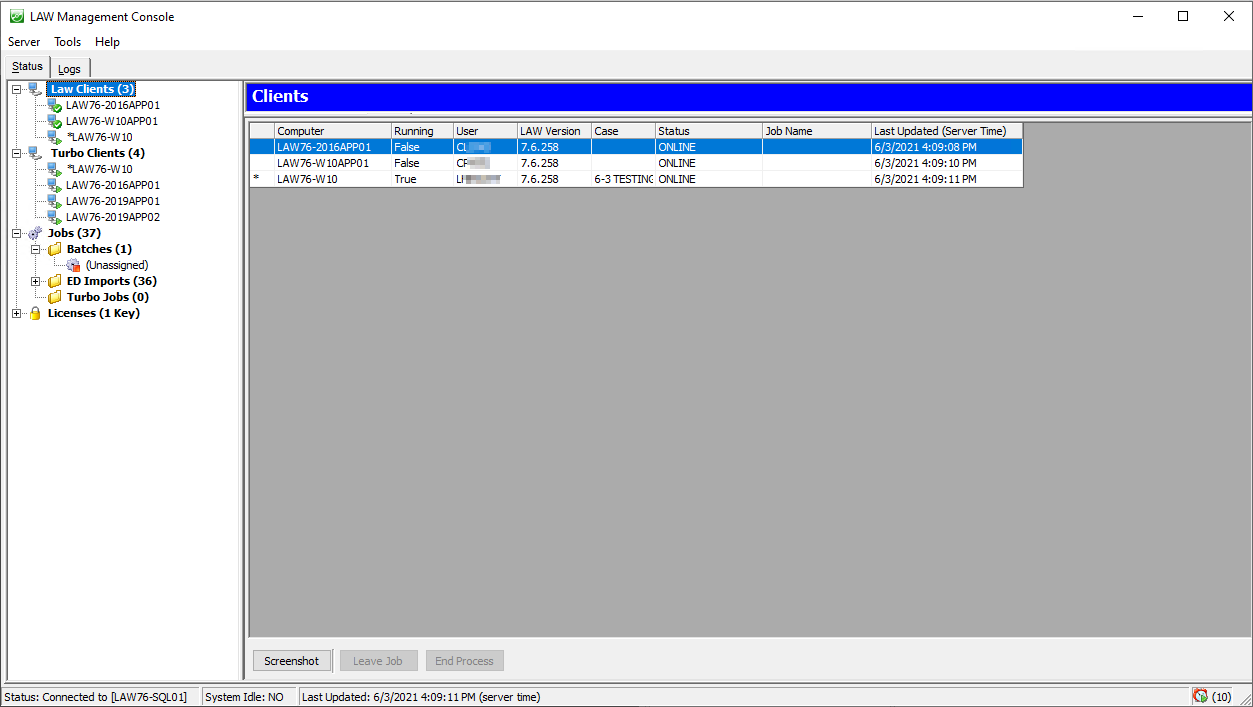
1.Start the LMC and if necessary, connect to a SQL Server instance. For more information, see Starting the LMC. 2.Expand a node under Law Clients, Turbo Clients, Jobs, or Licenses and then click an item. The node expands and the right pane provides details for the client, job or license that you select.
|
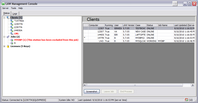
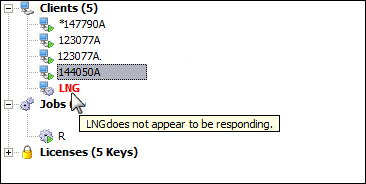
1.Start the LMC and if necessary connect to a SQL Server instance. For more information, see Starting the LMC. 2.By default the Law Clients node is selected with a table listing of clients populating the right panel. •Law Clients is followed by a number in parentheses. This number represents the total number of clients (workstations running the LMC) connected to the same SQL Server and visible to the current instance of the LMC. •The computer name preceded by an asterisk (*) is the computer on which you are running this instance of the LMC. •You can identify a client as unresponsive if the client name appears in bold red text. If you hover over the client name you will see a tooltip "<Client Name> does not appear to be responding". 3.In the Clients table located in the right hand part of the window, each computer currently connected to the SQL Server is listed in a row. Fields in the list are: •Computer. The name of the computer. •Running. True if CloudNine™ LAW is running or not, otherwise False. •User. The Windows user name currently logged into the computer. •LAW Version. The version of LAW running on the computer. •Case. The name of the case open. This field is blank if no case is open. •Status. ONLINE if not running a job but available. WORKING if running a batch process. If a client status is listed as WORKING but the client is listed in the Clients list to the left in bold red font, this means the client has stopped responding and might need to be removed from the job and restarted. STARTING if starting a job. CANCELLING if leaving a job unfinished. •Job Name. The name of the distributed batch process that the computer is running. This field is blank if the computer is not running a job. •Last Updated (Server Time). The last time the client status was checked by LMC. By default each client status is updated every 10 seconds. 4.Select a client from the list and then, if necessary, click one of the following buttons: •Screenshot - Creates and opens a picture of the current Desktop of the client. This tool is useful for monitoring the state of the workstations when processing jobs or preparing to process jobs. •Leave Job - Removes the client from the job that it is currently working on. When a workstation is forced to leave a job in this manner, the client is added to the Excluded Clients list for the job it was working on. •End Process - Stops the job that the client is currently working on. 5.Expand the Clients node and then click a client name. The node expands and the right pane provides details about the selected client. •Status - Displays the status of the current workstation. Possible values are: ONLINE, STARTING, WORKING, or CANCELLING. •User - Displays the user currently logged in on the workstation. •Workstation - Displays the machine name of the selected workstation. •IP Address - Displays the IP address of the workstation. •Console Version - Displays the version of the LAW Management Console. Typically, this version should match the LAW version shown in the Clients section.
|
1.Start the LMC, connecting to a SQL Server instance that has been configured in the LAW Configuration Utility. 2.By default the Clients node is selected with a table listing of clients populating the right panel. 3.Select the Turbo Clients node on the left. (This is a list of computers in the environment that have been configured with a Local LAW Service. The Turbo Import clients are configured in the LAW Configuration Utility under the Configure Local Machine.) •Turbo Clients is followed by a number in parentheses. This number represents the total number of LAW Services (workstations configured for Turbo Import and Turbo Imager processing as LAW Services) connected to the same SQL Server and visible to the current instance of the LMC.
•The computer name preceded by an asterisk (*) is the computer on which you are running this instance of the LMC. •You can identify a client as unresponsive if the client name appears in bold red text. If you hover over the client name you will see a tooltip "<Client Name> does not appear to be responding". 4.In the Turbo Clients table located in the right hand part of the window, each computer currently connected to the SQL Server is listed in a row. Fields in the list are: •Machine. The name of the workstation running the LAW Service. •Status. The status of the LAW Service. •User. The Windows user name currently logged into the computer. •LAW Service Version. The version of LAW running on the computer. •SW Updated. The date and time the software was updated. •Last Updated. The last time the Turbo Import Client status was checked by the LAW Management Console. By default each client status is updated every 10 seconds. 5.Expand the Turbo Clients node and then click a Turbo Import client name. The node expands and the right pane provides details about the selected client. Service Details:•Status - Displays the status of the selected Turbo Import LAW Service. Possible values are: ONLINE, STARTING, WORKING, or CANCELLING. •User - Displays the account currently logged in on the LAW Service. •Last Active - The date and time that the Turbo Import service last communicated with the SQL server. •LAW Service Version - Displays the version of the installation of LAW Service. Typically, this version should match the LAW version shown in the Clients section. •SW Updates - The date and time the software was last updated. Service Activity: •Agent - The name of the agent on the LAW Service running the process. •Case - The name of the case that the agent is processing. •Activity - The activity that the agent is currently processing. •Start Time - The time that the process started (displayed in local time). •File Name - The name of the file being processed (displayed during Analysis only). •Size - The size of the file being processed (displayed during Analysis only). •Attempts - The number of attempts for the current activity.
|
1.Start the LMC and if necessary connect to a SQL Server instance. For more information, see Starting the LMC. 2.Select Jobs. •The node expands and the jobs overview panel is visible to the right. •Jobs is followed by a number in parentheses. This is the total number of jobs on workstations running the LMC, connected to the same SQL Server, and visible to the current instance of the LMC. 3.The right pane updates to show a table of information for all known jobs. You can also Start or Cancel a Job. •Name - The job name as entered in the Name field when creating the batch. •Case - The name of the case currently open on the workstation. •Status - Displays the status of the Job. •# Clients - The number of clients working on the job. •% Comp. - Displays the percentage completed thus far for this job. •Errors - The number of errors that have occurred so far in this batch job. •Invite - The invitation type for the job. •Processes - The processes selected when the batch was created.
4.See additional details for a specific job by selecting it in the list in the left pane. The Job Details section displays: •Job Name •Status •Case Name •Created - Displays the date and time the batch was created and the user who created the batch. •Processes - The processes selected when the batch was created, such as TIFF, OCR, or Endorse. •Req. Lic. - Lists the license modules required in order to work on the batch. •Invitation - Displays the invitation type for the current job.
The Job Progress area displays: •Complete - Displays the total number of documents completed thus far in the batch. •Remaining - Displays the estimated amount of time remaining in the batch. •Total - Displays the total number of documents included in the batch. •Expanded •Errors - Displays the number of errors that have occurred thus far in the batch. •View Errors - Opens the batch process log. It displays errors that occurred during a batch. •Speed
The bottom of the job information pane shows three additional tabs: •Clients - Displays each client working on the job, the process currently taking place on the machine (i.e., OCR), and the document currently being processed. •Client Activity - Shows client activity specific to the selected job. Entries will appear when a client attempts to join a job, successfully joins a job, fails to join a job, is excluded from a job, etc. •Excluded Clients - Lists clients excluded from a job. The computer name and reason for the exclusion are listed.
5.Change the invitation type, cancel the job, or remove the job from the Jobs area as needed. •To change the invitation type, select the specific job in the list on the left, then click the ellipsis button to the right of the Invitation field. You can then configure the new invitation type. •To cancel the job, click Cancel Job. This action cancels the batch for all clients but does not delete the job from CloudNine™ LAW. •To remove the job from the Jobs area of the LMC, right-click the job and then click Remove Job.
|
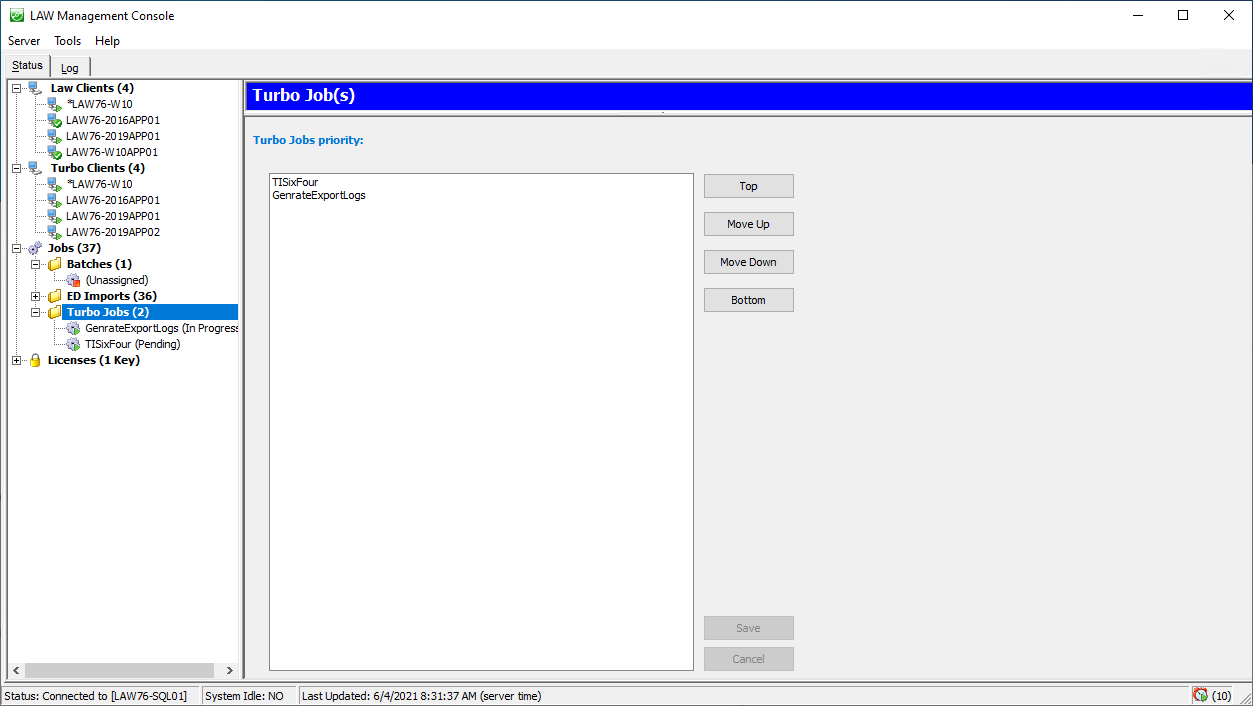
You can use the LMC to prioritize the processing for Turbo Jobs (Turbo Import processing and Turbo Imaging jobs). If you have multiple Turbo Jobs that have been started, you can change the priority of those jobs by need. The job with the highest priority and will have the most agents for processing and start processing first.
1.Start the LMC, connecting to a SQL Server instance that has been configured in the LAW Configuration Utility. 2.By default the Clients node is selected with a table listing of clients populating the right panel. 3.Expand the Jobs section by selecting the plus symbol. 4.Select Turbo Jobs
5.The Turbo Jobs panel is visible to the right. 6.A list of Turbo Jobs in process are displayed under Turbo Jobs Priority: 7.The job that is at the top of the list is the first priority for processing.
To Change a case's priority:Select the case from the Turbo Jobs Priority list and one of the following: •Top - to move the selected job to the absolute top of the list. •Move Up - Move the selected job one level up in the list. •Move Down - Move the selected job one level down in the list. •Bottom - Move the selected job to the absolute bottom of the list.
Committing the job priority - Select one of two options for committing priority level changes.•SAVE - When user clicks Save the new priority level is committed. No job prioritization changes are made unless Save is selected to commit the new priority level. •CANCEL - When user clicks Cancel, the new priority level is NOT committed. All changes made to job priority revert to the original position in the list.
|
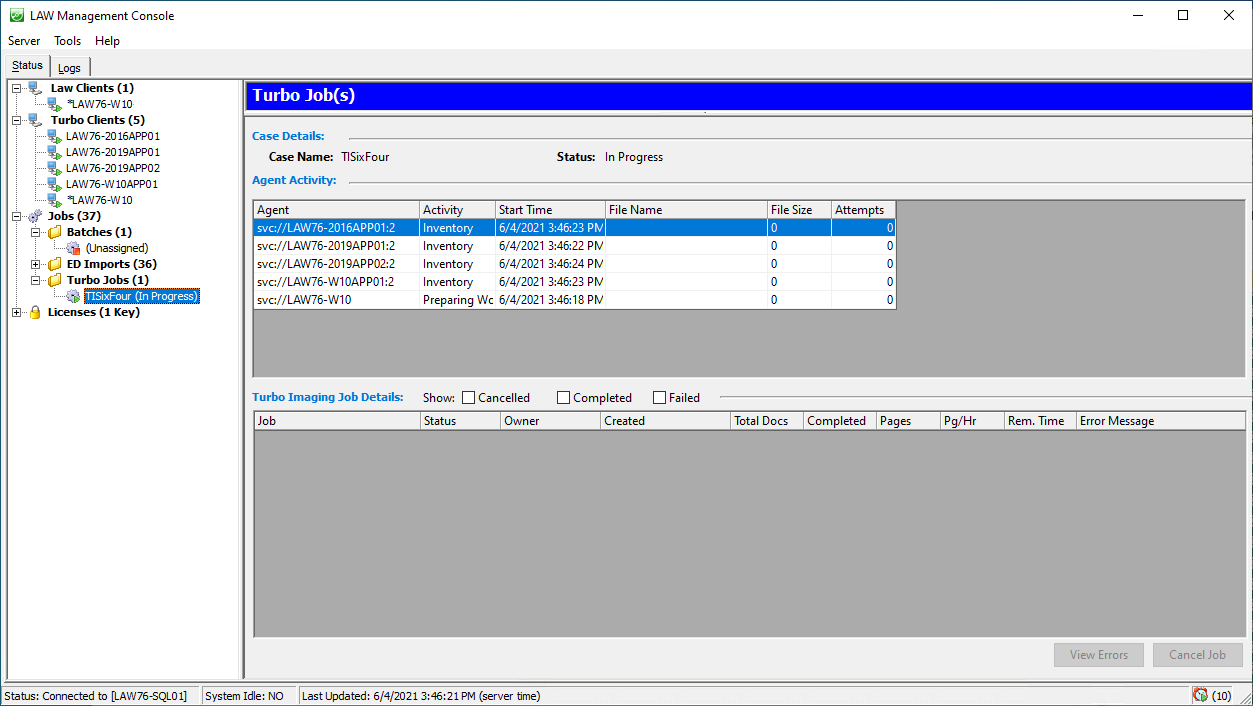
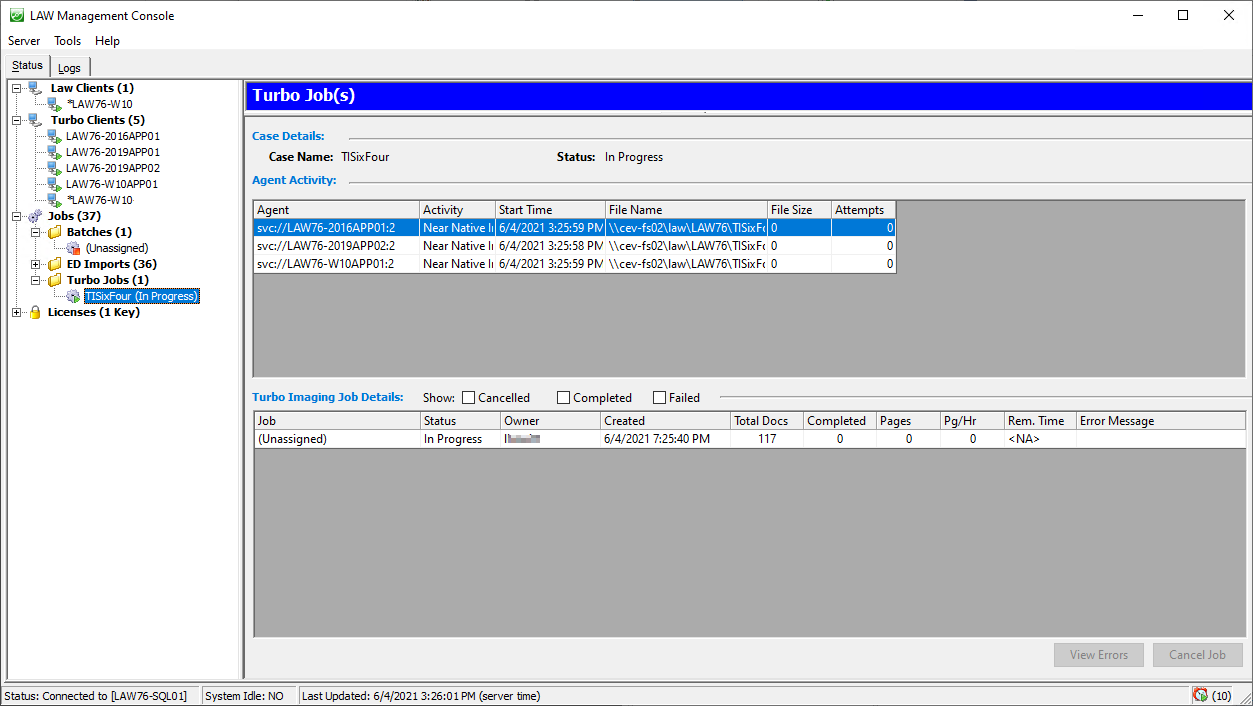
You can use the LMC to view details for Turbo Jobs - both Turbo Import and Turbo Imaging. From the LAW Management Console, expand Turbo Jobs in the left pane, then select the specific Turbo Job you want to see. The job name will be the name of the case that ran a Turbo Import or Turbo Imaging job. The right pane updates to show Agent Activity and Turbo Imaging Job Details.
This shows an example of what is displayed for a Turbo Import job.
This shows an example of details for a Turbo Imaging job. Turbo Import jobs will not display a File Size.
|
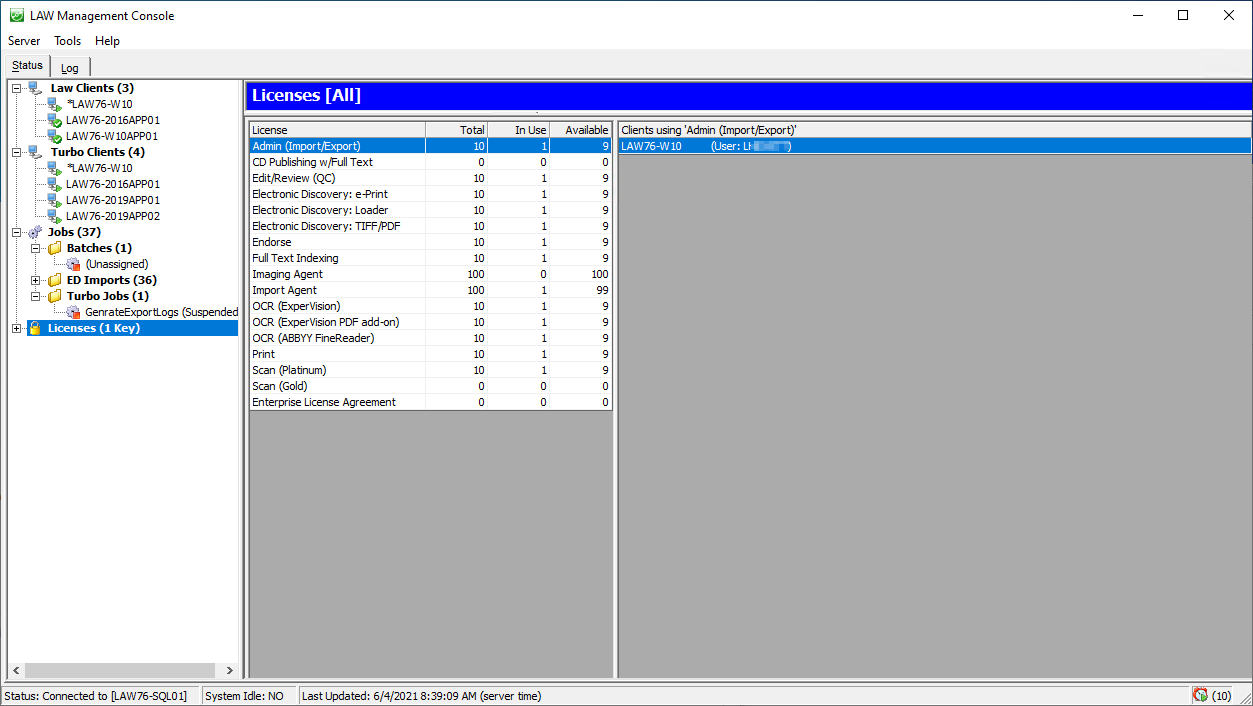
1.Start the LMC and if necessary connect to a SQL Server instance. For more information, see Starting the LMC. 2.Select Licenses in the left panel. Licenses is followed by a number of keys in parentheses. This is the total number of license keys on workstations running the LMC, connected to the same SQL Server, and visible to the current instance of the LMC. 3.The Licenses overview panel opens on the right.
•License column - Lists all license modules found on the keys listed below the Licenses node. •Total column- The total of each license module found on the collection of keys listed below the Licenses node. •In Use column- The total of license modules in use on workstations running the LMC and connected to the same SQL Server (for all keys listed below the License node). •Available column - The total of available licenses for each module for all keys listed below the Licenses node. •Clients using '<license module>' - Lists the clients that are using the module selected in the license module list. The machine names and user names are shown.
4.If you have multiple license keys, you can view information for that particular key by expanding the Licenses node on the left and selecting the specific license key underneath. 5.Selecting a license in the middle pane updates the right pane to show which client machine and user is currently using that license.
|
You can cancel a job for all clients. 1.In the LMC, expand the Jobs node and then select a job. 2.Click Cancel Job.
|
You can remove a client from a distributed batch process. 1.In the LMC, expand the Clients node and then select a client. 2.Click Leave Job.
|
1.Within the LMC connected to SQL Server, identify a client as unresponsive if the client name appears in bold red text. 2.Hover your mouse over the client to see the following tool tip: <Client Name> does not appear to be responding. This condition can be caused by the client being either hung or by it simply having paused the job.
3.Select the unresponsive client. Details for the client are shown in the panel to the right. 4.Click Screenshot. An image viewer appears showing a screen capture of the client Desktop. 5.Take corrective action based on what you see in the screen shot: •If a viewer appears showing the client Desktop, look in the screen shot for the Batch Process Status dialog box. If this is visible, check the status in the title bar of the dialog box. If it is (Paused), you can go to the client computer and then click Resume. The client will continue processing the batch and its status in the LMC will return to normal. •If the viewer does not appear, or opens showing only black: click Leave Job to remove the client from the job. This action adds the client to the Excluded Clients list for that job. Or click End Process, to stop the job entirely. Use the Batch Process utility to restart a stopped job. For more information, see Batch Processing.
|
The LMC provides a listing of errors, messages, and debug information pertaining to LMC operation. The LMC also provides direct access to batch process error log.
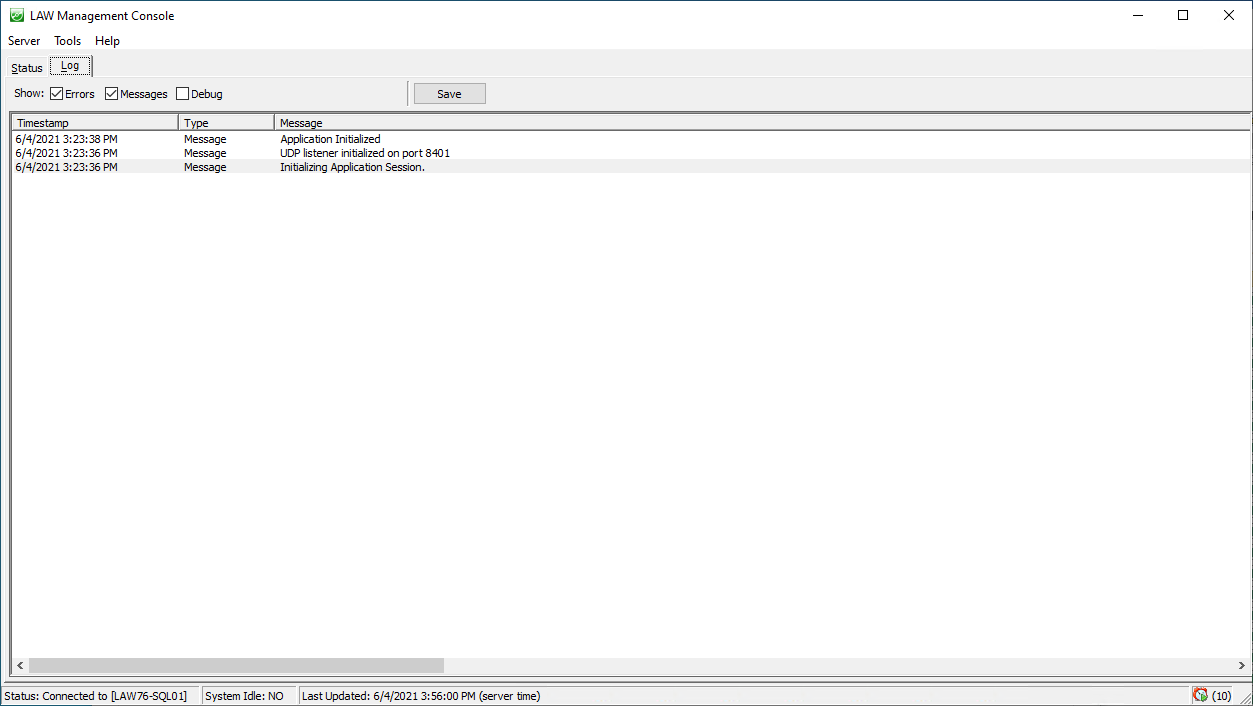
To view logs of LMC errors, messages, and debug information 1.Start the LMC. For more information, see Starting the LMC. 2.Click the Log tab. The last 500 entries that were logged during the application session are visible. The log is composed of data from multiple application sessions and has a maximum size of 5MB. This log is written to: %APPDATA%\LAWConsole\LAWConsole.log.
3.Select or unselect Errors, Messages, or Debug as necessary to filter the view. 4.To save a copy of the log, click Save and then choose a folder and a file name. The saved copy of the log will contain all errors, messages, and debug information regardless of the filter applied to the view.
To view the batch process error log 1.Start the LMC. For more information, see Starting the LMC. 2.Expand the Jobs node. 3.Select a job. 4.Click View Errors. The batch processing error log opens.
|

