Grid Functions
This topic describes procedures for working with grid data and viewing grid reports.
|
The grid displays do not currently support Unicode. However, Unicode data can be displayed by resting your pointer over a cell containing Unicode. The Unicode data appears in a pop-up text box beside the cell. |
The contents of a grid column, can be copied into another column. 1.Make sure a field to accept the incoming data has been created. 2.Start a standalone grid. 3.Click the column header of the source field. 4.On the Edit menu, click Copy. 5.Click the column header of the destination field. Note that LAW will not copy data into locked or system fields. 6.On the Edit menu, click Paste. 7.Click Yes to proceed with the copy.
|
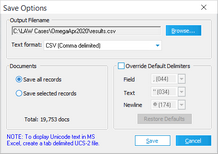
You can save the visible field data that is displayed in a grid. Saving grid data to a file is useful when you want to work with grid data in a word processor or spreadsheet. Only fields visible in the grid will be included in the output file.
Text formats CloudNine™ LAW can save grid data to a text file encoded using any of the following text formats: •Comma separated value (CSV): ANSI. Can be imported into Microsoft Excel. •Tab delimited: ANSI. Can be imported into Microsoft Excel. •Tab delimited: Unicode UCS-2. This format can be opened directly with versions of Microsoft Excel. •Tab delimited: Unicode UTF-8. Can be imported into Microsoft Excel.
To save grid data to file 1.From a grid, on the File menu, click Save, or click the Save button in the toolbar. The Save Options dialog box appears. 2.Configure options for saving the file. These options are described as follows:
3.Click Save. 4.After the file is saved, the Save Results dialog box appears.
5.Click Yes to open the file using the default application registered in Windows for the chosen file extension, or click No to return to the grid.
|
The visible field data associated with records displayed in a grid may be printed. Only fields visible in the grid will be included in the output. 1.Select records to print or select none to print all records. 2.On the grid toolbar, click the Print button ( •Print Selected Records Only. Or •Print All. 2.Select a printer and set other print options. 3.Click OK.
|
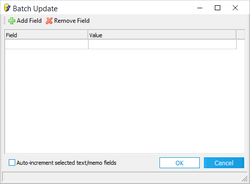
You can use the Batch Update tool to change the value stored in one or more fields for all the records in a grid at once. For example, if you sent all the source documents for a case to a specific custodian, you could use the Batch Update tool to update the Custodian field for all the case records at once.
1.From a standalone grid, on the Edit menu, click Batch Update. The Batch Update dialog box appears. 2.In the Field list select the field that you want to update. 3.In the Value area type the value that should go in the field. 4.Exercise the following options as needed: •To add a new field to the list, click Add Field. •To remove a field from the field list, click anywhere in the row and then click Remove Field. •To append an incrementing number to each value, select Auto-increment selected text/memo fields. 5.Click OK. A message box reports the number of records updated.
|
In the standalone grid display, you can reset flags to ON or OFF that apply to full text indexing or OCR. The flag setting options described here apply flags to all records in the grid display, not just to highlighted records.
1.Open a standalone grid. 2.Click the Tools menu. •To reset tags for full text indexing on all records in the grid, click Reset Full Text Flags and then click ON or OFF. •To reset tags for OCR on all records in the grid, click Reset OCR Flags and then click ON or OFF. For information on working with OCR flags, see Flagging Documents/Pages for OCR. For information on working with full text indexing flags, see Full Text Indexing.
|
You can use the spell check feature to find and fix misspelled words in user-defined fields. The spell checker cannot be used to check spelling in system fields or fields that are locked.
1.Ensure the user-defined, unlocked field to be searched is visible in the standalone or embedded grid. 2.Select a cell in the column that you want to spell check. •If in an embedded grid, on the grid toolbar, click the spell check button: •If in a standalone grid, click the spell check button, or on the Tools menu click Spell Check. 3.The Spelling Check dialog box appears. The first word in the column not found in the dictionary is displayed in the Change To field. 4.Exercise an option to spell check the word that appears in the Change To field. These options are described as follows:
|
From a standalone grid you can permanently delete records along with their associated files and field data.
1.Select one or more rows to be deleted. 2.On the Edit menu click Delete Record(s). 3.Click Yes on the warning message box. The records are permanently deleted.
|
The number of documents currently displayed in the grid is shown at the bottom of the dialog in between the navigational arrows. If a page-level query was executed, this number will be the total number of pages instead.
•From a standalone grid, on the View menu, click Doc/Page Totals. The document and page counts appear in the lower right corner of the grid. For example, Documents: 660 / Pages: 21,166.
|
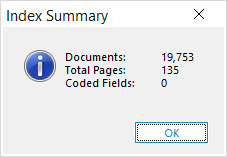
An index summary can be generated from the standalone grid. When invoked, this feature will display a message box containing three pieces of information: total number of documents currently displayed in the grid, total number of pages associated with the documents currently displayed in the grid, and the total number of fields associated with the currently displayed documents that are coded with information. From a standalone grid, on the Tools menu, click Summary. The Index Summary message box appears.
|


