Distributed Batch Processing
Distributed processing is available for those batch types that do not require sequential execution. You can run distributed batch processes on these kinds of jobs:
•Image Cleanup
•Endorse
•OCR
•Scan for Suspect Footers
•TIFF Conversion
•Turbo Imager
•Update Page Data
For information on running these and other kinds of batch processes in a non-distributed manner, see: Batch Processing.
|
When performing distributed processes, it is best practice to have all machines participating in the distributed processes running the same version of CloudNine™ LAW. Running distributed processes on machines with different versions of LAW may cause unexpected results. |
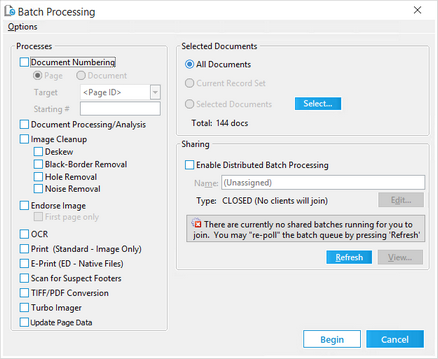
1.On the Tools menu click Batch Process. The Batch Processing dialog box opens.
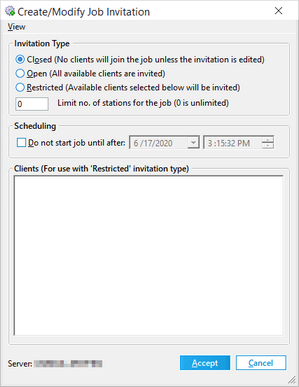
2.In the Batch Processing dialog box select documents to be processed. 3.Choose one or more batch type that is supported for distributed processing. 4.In the Sharing section of the Batch Processing dialog, select Enable Distributed Batch Processing. 5.Type a name for the batch over the default of (Unassigned). The batch name is visible to other workstations when they are prompted to join a distributed job. The batch name is also visible in the LAW Management Console (LMC). 6.Click Edit to modify the invitation type. The Create/Modify Invitation Type dialog box opens. The invitation type determines how the job is handled by other stations when utilizing the LMC. 7.Select an invitation type. •Closed. (Default) None of the LMC instances will be able to auto-join LAW to the shared batch. LAW workstations can still be joined to the job manually. •Open. All LMC instances automatically join LAW to the shared batch. •Restricted. Only selected LMC instances will automatically join the process. If you choose Restricted, select computers that can participate in the batch process from among available computers in the Clients area of the dialog box. 8.In the Limit no. of stations for the job field, enter the maximum number of work stations that can process data for the batch process job at any given time. The Limit no. of stations for the job field defaults to 0. When the Limit no. of stations for the job field is set to 0, all available work stations will process data for the job. 9.Configure a scheduling restriction as needed. This option prevents the job from starting until after the date and time that you specify. 10.Click Accept. After the shared batch is initialized on a machine, the job appears below the Jobs node in the LMC, and other LAW workstations can join the job. 11.Click Begin to start processing.
|
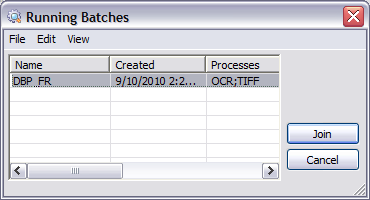
1.After a distributed batch is started on a computer, open the case on a second computer. 2.On the Tools menu click Batch Process. The Running Batches dialog appears. All active batches created in this case are listed. The batch may also be started by clicking View in the Batch Processing dialog in the Sharing section. This will launch the Running Batches dialog as well and allow users to choose a batch to join.
3.Select a batch and then click Join. LAW opens the next unprocessed document in the batch for processing using the same settings that were used on the computer that started the batch process. When the batch completes it is removed from the Running Batches list.
|
You can join a computer to a distributed batch process from within CloudNine™ LAW.
1.Start CloudNine™ LAW. 2.Opening the case that the distributed process is running on. 3.On the Tools menu, click Batch Process. The Running Batches dialog box appears.
4.Select a batch and then click Join.
|
1.Start CloudNine™ LAW. 2.Opening the case that the distributed process is running on. 3.On the Tools menu, click Batch Process. The Running Batches dialog box appears.
4.Select the batch in the Running Batches dialog box. 5.On the Edit menu click Delete. The shared batch will be deleted from the list.
|
You can review individual documents to determine which workstation executed the batch process.
1.From the main form in CloudNine™ LAW, on the Index menu, click Modify Fields. 2.Scroll to BatchStation. 3.Select Visible. 4.Click Save As, name the profile, and then click Accept. 5.Click Close. 6.In the main form in CloudNine™ LAW, select a document from the folder list. 7.Scroll to the BatchStation field. The name of the computer that performed the batch process is listed.
|


