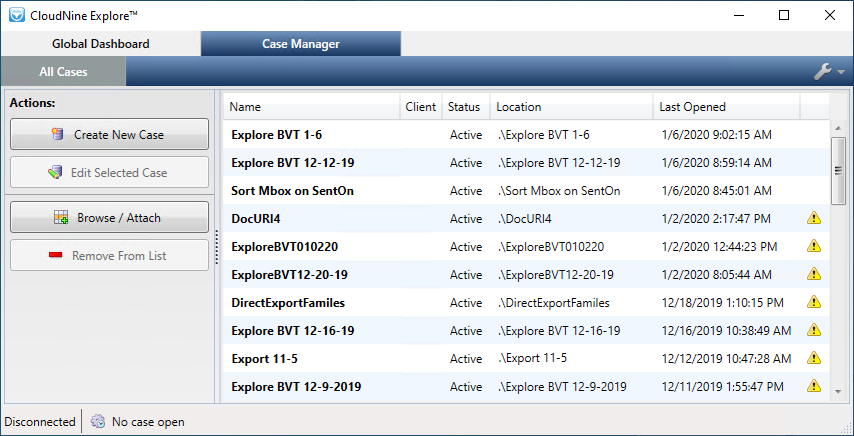
When you launch CloudNine™ Explore, the Case Manager is displayed. All Cases will be displayed in the list, sorted by Last Opened by default. You can change the list sorting by clicking on one of the column headers: Name, Client, Status, Location, or Last Opened.

Open a Case
1.In CloudNine™ Explore, click the Case Manager tab.
2.Double-click the case you want to open. A new tab opens with the selected case, on the Import tab.
|
If the case that you want to open is not immediately visible in the case list, click Active Cases or All Cases. If the case is still not visible, click the Browse/Attach button, open the cases folder, open the folder named after the case you want to open, select the eda-case.ini file for the case, and then click Open. |
View or Edit Properties for an Existing Case
|
After a case has been created not all settings are editable. |
1.From the Case Manager tab, select a case and then click Edit Selected Case. Alternatively if the case is already open, you can select Case Settings from the Tools (wrench) drop-down. The Edit Case Settings dialog displays.
2.Browse the tabs to view or change settings:
•General - the following fields are editable: Description, Client, Case is active, and Case Time Zone.
•Database - if the Use Windows Authentication check box was selected when the case was created, no database connection settings are editable after case creation. If the User Windows Authentication check box was not selected and SQL Server authentication is being used for the case, the Login and Password fields are editable.
•Analysis - you can modify the maximum number of agents, enable or disable the option to save all content to disk, and download the latest NIST hash database.
•Indexer - you can edit any of the indexer settings.
•OCR - you can edit any of the OCR settings.
•Passwords - you can add or delete Adobe Acrobat PDF, Microsoft Word DOC and DOCX, Microsoft Excel XLS or XLSX and archive encryption passwords.
•Tags - you can add, delete, and export the case tags.
•Footer Exclusions - you can add or edit content to be excluded from the case's near-duplicate analysis process. For more information, see Running Near-Duplicate & Email Thread Analysis.
3.Click OK.
|
If index settings were changed on the Indexer tab, clicking OK displays "Index configuration changes detected, would you like to re-index the case?". Click Yes to re-index the case, or click No if you do not want to re-index the case. If you modified the Use case-specific noise word list (noise.dat) and/or the Use case-specific alphabet file (default.abc) check box settings on the Indexer tab, and were not prompted to re-index the case after clicking OK, then you will need to rebuild the case's index. For more information, see Managing Indexes and Searching. |
View the Connection, Work, and Index Statuses
When CloudNine™ Explore is first opened, the status bar at the the bottom of the main window indicates Explore as Disconnected with No case open.
![]()
When you open a case, the connection status, work status, and index status for the case are updated accordingly.
![]()
Note the following:
•After the connection status, the case name displays in brackets. After the case name, the SQL instance/database name displays in parenthesis, followed by the name of the current user.
•If you add a source to the case and then commit that source to processing, the Work Status state will change from Idle to any of the following: Work Pending, Working: Inventory, Analysis, or Analysis: Indexing. When processing finishes, the status returns to Idle.
•The Index Status on the toolbar indicates the following:
oIndexing - files are being indexed
oCompacting - files are being compacted
oRe-indexing - files are being re-indexed
oReady - no index processes are running and the index is ready for processing
Remove a Case
When you are finished working on a case, you can remove it from the case list. Removing a case from the case list does not delete the case database or files. You can restore the case to the case list as needed, and it will appear again in the list (see Restore a Case to the Case List below).
1.Click Case Manager.
2.Select the case you want to remove.
3.Click Remove From List.
4.In the Detach Case dialog box, click Yes. The case is removed from the list.
Restore a Case to the Case List
1.Click Case Manager.
2.Click All Cases.
3.Click Browse / Attach. A Browse window displays, opened to the cases folder by default.
4.Navigate to the folder named after the case you want to open.
5.Select the eda-case.ini file for the case, and then click Open.