New tags are easily added to a list of persistent ones that are custom designed for a particular case. Any new tag created is immediately accessible to all users in Concordance Desktop. This provides a standard format, easy access, and a faster, more efficient review for all users.
Often tags are placed in folders or grouped by type or purpose so all reviewers have an immediate understanding of the case tag organization.
Tag names always display and sort alphabetically. If you intentionally want a tag to appear in a specific location, use the tag name to accomplish that.
Tagging Individual Records
Before you begin tagging records, it is best practice to run a search to limit the number of documents you have to review.
|
Tags can be applied and removed by any user, at any time. Contact your Concordance Desktop administrator or supervisor if you have concerns regarding the permanence of applied tags. |
To Apply a Tag to a Document
1.Open the Tags task pane.
2.Run the appropriate search to limit the documents you have to review.
3.Review your search results and identify the documents you want to tag.
4.In the Table view, select the document.
i.You can also tag documents from the Browse view. Tags can be applied to the document currently displayed in the Browse view.
5.In the Tags task pane, do any of the following:
•Click the tag's check box.
•Right-click the tag and click Tag document.
•Double-click the tag's name.
When you double-click a tag Concordance Desktop can either apply the tag or open the tagging options menu. The double-clicking option is set on the Browsing panel in the Preferences dialog box. Double-clicking a tag to apply the tag is the default setting.
A red check mark appears in the tag's check box and the tag is now applied to the document.
To Remove a Tag from a Document
1.Select the document in the Table view.
i.You can also remove tags from documents in the Browse view. Tags can be removed from the document currently displayed in the Browse view.
2.To remove the tag from the document, in the Tags task pane do one of the following:
•Clear the tag's check box.
•Double-click the tag's name.
When you double-click a tag Concordance Desktop can either apply the tag or open the tagging options menu. The double-clicking option is set on the Browsing panel in the Preferences dialog box. Double-clicking a tag to apply the tag is the default setting.
The tag's check box is now cleared and the tag is removed from the document.
Tagging Multiple Records
In some review projects, you may want to conduct searches first and tag all documents for review later. This method is often referred to as bulk tagging.
For example, if you want to review all documents containing references to Mr. Goniff, you can search for these documents and tag all the documents in the search results for a later review.
|
Tags can be applied and removed by any user, at any time. Contact your Concordance Desktop administrator or supervisor if you have concerns regarding the permanence of applied tags. |
|
When bulk tagging, do not drag and drop (move) tags from one folder to another, as it can produce duplicate tags, as opposed to just moving the tags. |
To Apply a Tag to Multiple Documents Simultaneously
1.Open the Tags task pane.
2.Run the appropriate search to limit the documents you have to review.
3.Open the Table view to view the search results.
4.In the Table view, select all the documents you want to apply tags.
5.In the Tags task pane, do one of the following:
•Click the tag's check box, right-click the tag, and then select Tag all documents in query.
•In the Table view, drag the documents selected to the tag in the Tags panel.
•Double-click the tag's name.
When you double-click a tag Concordance Desktop can either apply the tag or open the tagging options menu. The double-clicking option is set on the Browsing panel in the Preferences dialog box. Double-clicking a tag to apply the tag is the default setting.
A red check mark appears in the tag's check box, and the tag is now added to each of the selected documents.
To Apply a Tag to All Documents and Attachments in a Query Simultaneously
1.Open the Tags task pane.
2.Run the appropriate search to limit the documents you have to review.
3.Open the Table view to view the search results.
4.In the Tags panel, right-click the tag, and then select Tag Query & Attachments.
|
If no attachments are found for a document, the selected tag is applied to all the documents in the current query. |
5.When prompted, confirm the number of documents to tag.
i.A red check mark appears in the tag's check box, and the tag is now added to each of the selected documents and associated attachments.
To Remove a Tag from Multiple Documents Simultaneously
1.Open the Tags task pane.
2.Run the appropriate search to limit the documents you want to remove a tag.
3.Open the Table view to view the search results.
4.In the Table view, select all the documents you want to remove tags.
5.In the Tags task pane, click the tag's check box, right-click the tag, and then select Untag all documents in query.
i.The tag's check box is now empty and the tag is removed from each of the selected documents.
Creating a Query from Tags
If you need to identify which documents have a particular tag applied to them, you can easily do so by creating a query from a tag.
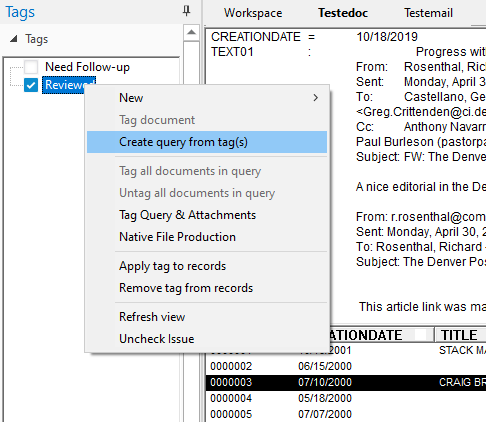
To Create a Query from Tags
1.Open the Tags task pane.
2.In the Tags task pane, select the tags you want to query.
i.You can select multiple tags by pressing the SHIFT or CTRL key while selecting multiple tags.
3.Right-click the selected tags and select Create query from tag(s).
i.All documents that are tagged with the selected tags display in Table view.