During the discovery process, marking up record detail is the phase when deeper content investigation and case record preparation begins.
The Markup toolbar includes a variety of tools you can use to mark up (annotate) a document or image during review. Applying markups includes redacting information and adding notes. You can also apply color markings to highlight or underline text and add a circle or box to emphasize a block or region of key content. All of these elements can easily be edited, moved, or resized.
There is no limit to the number of markups you can add to a document.
Markups for the current document/record are displayed in the history tab of the Document information pane. The markup history displays markup type, author, date, and time. Markup history is also saved in the .cib file. See, Viewing document information.
|
The current state for the markups on a document are stored in an XML formatted (.xrl) file in the same directory as the corresponding media file. DO NOT edit this file. Doing so may corrupt all your markups and redactions, as well as, possibly cause Concordance Desktop Viewer to crash. |
|
Due to changes within Brava, our third party vendor, if you are currently working on a review with Concordance Desktop Viewer version 1.08 or earlier, it is recommended that you complete the review and produce the files before migrating to Concordance Desktop. For more information, contact Concordance Desktop Technical Support. |
To Add Text
1.On the Markup toolbar, click the Text tool ![]() .
.
2.Using the Text tool, select the area where you want to add the text.
3.In the Text dialog box, type the text you want to add.
4.On the Markup properties toolbar, specify any of the following:
•To change the color, click the Color button ![]() , and then select a color from the color picker.
, and then select a color from the color picker.
•To change the font, in the Font list, select a font.
•To change the font size, in the Font size list, select a font size.
5.To change the background color of the text box, click the Text Background button (T), and then select one of the following:
•Transparent sets the background as transparent and all text is visible.
•Match Display Background sets the background color to match the color of the current document background.
•Select Background Color opens the color picker dialog box, and sets the background to the color selected. The outline color of the text box is set to be the same as the current font color.
6.Set the font style, do any of the following:
•To underline the text, click the Underline button.
•To italicize the text, click the Italics button.
•To make the text bold, click the Bold button.
7.Navigate to another document to save the markup.
To Add a Note
1.On the Markup toolbar, click the Note tool.
2.Using the Note tool, click in the area of the document where you want to place the note.
3.In the Changemarks dialog box, do the following:
•In the top field, type a title for the note.
•In the bottom field, type the text you want to include in the note.
4.When finished, click OK.
5.To change the note color, on the Markup properties toolbar, click the Color button ![]() , and select a new color from the color picker.
, and select a new color from the color picker.
6.Navigate to another document to save the markup.
|
You cannot use Rich Text Formatting (RTF) in notes, including copying RTF content from another application and then pasting into a note. Doing so may corrupt all the markups and redactions, as well as, possibly cause Concordance Desktop Viewer to crash. If this happens, you need to contact Customer Support. |
|
After applying a note, you can move the pointer over the note to display the first 40 characters of the contents of the note. To view the contents of the note (maximum of 520 characters), double-click the note you want the view to open the Markup History Details dialog box. |
To Add Lines
1.On the Markup toolbar, click one of the following:
•To draw a straight line, click the Line tool ![]() .
.
•To draw a jointed line, click the arrow next to the Line tool, and then click the Polyline tool ![]() .
.
•To place an X over an area on the document, click the arrow next to the Line tool, and then click the Crossout tool ![]() .
.
•To draw an arrow, click the arrow next to the Line tool, and then click the Arrow Line tool ![]() .
.
2.Draw on the document:
•To draw a line, crossout, or arrow, drag the tool across the document where you want the markup to appear.
•To draw a polyline, click to create the starting point, move the tool, and then click to create each segment.
•To draw a line, polyline, or arrow that is horizontal or vertical, press Shift while you draw.
3.To change the line properties, on the Markup properties toolbar, do any of the following:
•To change the color, click the Color button ![]() , and then select a color from the color picker.
, and then select a color from the color picker.
•To change the line width, select the value from the drop-down list.
•To change the line style, select the style from the drop-down list.
4.Navigate to another document to save the markup.
To Add Shapes
1.On the Markup toolbar, click one of the following:
•To draw a rectangle or square, click the Rectangle tool ![]() .
.
•To draw an ellipse or circle, click the arrow next to the Rectangle tool, and then click the Ellipse tool ![]() .
.
2.Draw in the document:
•To draw a rectangle or ellipse, drag the tool across the document where you want the markup to appear.
•To draw a square or circle, press Shift while you draw.
3.To change the shape properties, on the Markup properties toolbar, do any of the following:
•To change the color, click the Color button ![]() , and then select a color from the color picker.
, and then select a color from the color picker.
•To change the shape style, select the style from the shape style list.
4.Navigate to another document to save the markup.
To Add Text Edit Markups
When a document contains selectable text, the Strikeout, Underline, and Highlight tools become available.
1.On the Markup toolbar, click one of the following:
•To draw a strikeout, click the Strikeout tool ![]() .
.
•To draw an underline, click the arrow next to the Strikeout tool, and then click the Underline tool ![]() .
.
•To draw a highlight, click the arrow next to the Strikeout tool, and then click the Highlight tool ![]() .
.
2.Draw in the document:
•To draw a strikeout, drag the tool across the text where you want the strikeout to appear.
•To draw an underline, drag the tool across the text where you want the underline to appear .
•To draw a highlight, drag the tool across the text where you want the highlight to appear.
3.To change the text edit color, on the Markup properties toolbar, click the Color button ![]() , and then select a color from the color picker.
, and then select a color from the color picker.
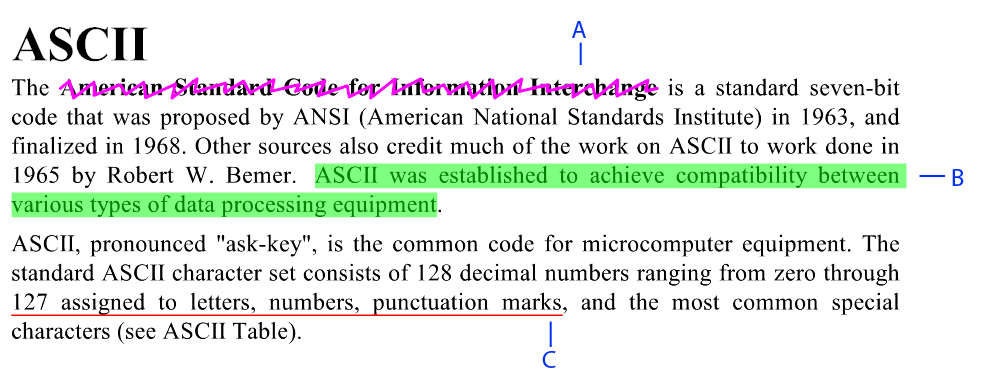
A) Strikeout B) Highlight C) Underline
4.Navigate to another document to save the markup.