Production is the generation of a subset of document TIFF or PDF files, some of which have been redacted. Concordance Native Viewer production parameter settings can be saved and used each time you create a production. See Production Parameter Sets for more information.
Before starting a production run, you need to run a query to locate all the documents for the production.
Production Numbers
During a production, you may choose to create production numbers and write the numbers back to the database. If Create Production Numbers is set to Yes, Concordance saves the new production numbers to the new or appended .cib file and writes the beginning and ending production numbers for each document back to the Concordance database in the fields you specify. The additional parameters underneath Create Production Numbers determine the generated production numbers.
Take an example of a production with three documents (A - 1 page, B - 4 pages, C - 2 pages). If you set Prefix to ABC, Starting Number to 0001, and Add a Numeric Suffix to Yes results in this output:
•Document A: Beginning Production Number = ABC0001.0001, Ending Production Number = ABC0001.0001
•Document B: Beginning Production Number = ABC0002.0001, Ending Production Number = ABC0002.0004
•Document C: Beginning Production Number = ABC0003.0001, Ending Production Number = ABC0003.0002
Using the same example details above, but setting Add a Numeric Suffix to No, would result in this output:
•Document A: Beginning Production Number = ABC0001, Ending Production Number = ABC0001
•Document B: Beginning Production Number = ABC0002, Ending Production Number = ABC0005
•Document C: Beginning Production Number = ABC0006, Ending Production Number = ABC0007
Running a Production
1.If you have not done so already, run a search query to locate the documents you want to produce.
2.Create a directory folder to store the production files.
3.In Concordance, from the Tools menu, select Production, then click Production. The Concordance Production dialog displays.
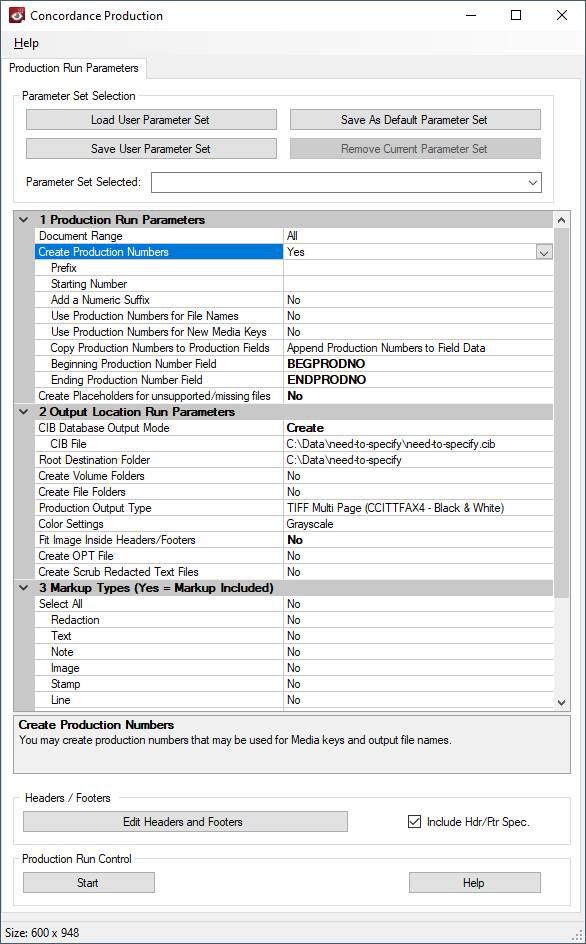
4.In the Production Run Parameters section:
•Document Range should be set to All to include all the documents in the current query, or Range to specify the Selected Range of documents from the current query to include.
•Select Yes for Create Production Numbers.
oFor Prefix, type the prefix you want to precede the production number. The Prefix can be any combination of letters, numbers, or punctuation characters that are valid for folder or file names.
oThe Starting Number should be set to the number you want to use to start numbering the production files. Zero fill your Starting Number to define the desired number width. This can hold a maximum of 10 digits.
oSelect Yes for Add a Numeric Suffix if you want to add an incremental numeric value to a production number for each page in a document. The pages within a document will be produced beginning with a suffix of .0001 and incremented accordingly. If more than 9999 pages exist in the document, the suffix values will roll over to .10000 and so on. This numbering may cause sorting issues for other applications used to view documents/images.
oSet Use Production Numbers for File Names to Yes if you want to replace the current file name with the generated production number.
oSet Use Production Numbers for New Media Keys to Yes if you want to replace the current media key with the generated production number in the CIB File you specify.
|
When producing single-page .tiff formatted files, the Use Production Numbers for File Names and Use Production Numbers for New Media Keys options must be set to Yes. |
oCopy Production Numbers to Production Fields should be set to either Append Production Numbers to Field Data or Overwrite Field Data with Production Numbers.
oFor Beginning Production Number Field, select the field you want to use to store the beginning production number.
oFor Ending Production Number Field, select the field you want to use to store the ending production number.
|
As a best practice, when you write the production beginning and ending numbers back to Concordance, select an empty field to ensure that the numbers do not append a field with existing data. If the production number appends to an existing field, the numbers may truncate if the content exceeds the field length. |
•Set Create Placeholders for unsupported/missing files to Yes if you want an Image not available placeholder image to appear for unsupported or missing files. The placeholder can be customized with an image of your choosing by replacing the default file in the installation Program Data folder.
5.In the Output Location Run Parameters section:
•For CIB Database Output Mode, select Append to add the documents to an existing CIB database or Create to create a new CIB database.
•Click in the CIB File field, then click the ellipses. Navigate to and select the existing CIB file (for Append), or enter a new File name (for Create) and click Open.
•Click in the Root Destination Folder, then click the ellipses. Navigate to and select the root folder to use for the output production files and click OK. The Root Destination Folder should not exceed 250 characters.
•Select Yes for Create Volume Folders if you want volume folders for the production files. Then set the following options:
oPrefix specifies what should precede the volume number. The Prefix can be any combination of letters, numbers or punctuation characters that are valid for folder and file names.
oStarting Number specifies the initial number for the volume folders.
oMaximum Volume Size specifies the maximum size for a volume folder.
|
The contents of the volume directories can be copied to external media for distribution. Make sure you know the capacity of that external media before setting the Maximum Volume Size. This ensures that the entire contents of the volume can be copied without running out of space. After a volume fills to the maximum size, a new volume folder is created and this process will continue sequentially. An individual produced file will not be split across volumes. |
•Create File Folders allows you to specify details for organizing the production files with volume folders. If desired, select Yes and then set the following options:
oPrefix specifies what should precede the file folder. The Prefix can be any combination of letters, numbers, or punctuation.
oStarting Number specifies the initial number for the file folders. Zero fill the Starting Number to determine the desired number width.
oMaximum Record Count specifies the maximum number of records to include in each folder.
oSelect Yes for Use first file name in folder as folder name.
•Select the Production Output Type that is appropriate for your needs. This specifies the output type and image compression for your produced files.
|
LZW compression produces a small file size image, which cannot be used with Concordance Image. |
•Color Settings can be set to Color to produce files with original colors or Grayscale.
•Set Fit Image Inside Headers/Footers to Yes to reduce the size of the produced document or image to accommodate the space needed for the specified headers and footers.
•Select Yes for Create OPT File to generate an .opt file for the production files. In Output path for OPT File, click the ellipses, then navigate to and enter a name for the .opt file.
|
It is recommended that you select Yes for Create OPT File if you selected Yes for Add a Numeric Suffix. This will ensure the produced documents/images can be loaded properly into viewer applications. |
•Create Scrub Redacted Text Files
6.In the Markup Types section:
•Select one or more markups to include individually by setting their value to Yes.
•Turn on all markups by setting Select All to Yes.
|
Due to how markups are rendered during production, please note that crossout, strikeout, highlight and underline markups are treated as one markup together. For example, if a crossout and highlight markup are both applied to a document, if you select Yes for Crossout in the production parameters, both the crossout and the highlight markup are produced. |
7.Define any header, footer, or watermark settings you need. A header or footer is a string of text assigned to a specific location within a document. The text can be static text or updated values such as date, time, and page number. Headers and footers can appear at the top or bottom of a document and also can be placed in the right and left margins. Each header/footer location may contain 10 lines of text. A watermark is a semi-transparent string of text that appears behind the existing document content. A watermark appears across each produced file from bottom left to top right and has a transparency setting of 20%. To set header, footer, and watermark parameters:
•Select the Include Hdr/Ftr Spec. check box to include a header, footer, or watermark in the output files.
•Click Edit Headers and Footers. The Edit Headers and Footers dialog displays.
•Open an individual Header/Footer or Watermark folder by expanding the item in the list.
•In the expanded list select a <blank> field. Enter the text you want displayed in that area. To include a macro, type the percent sign (%) and the available macro list displays allowing you to select one. See Macros for the list of available macros.
•Click Font to edit the font properties for all the Header/Footer and Watermark text.
•Click OK to save your changes and close the Edit Headers and Footers dialog.
|
If you selected Yes for Create Production Numbers, you need to add the BatesPgNo() macro to at least one header or footer. |
|
Printing and Production headers/footers and watermark settings are separate. Parameters defined for Production are only used for Production. |
8.When you are ready to run your Production, click Start. The Production Control dialog displays.
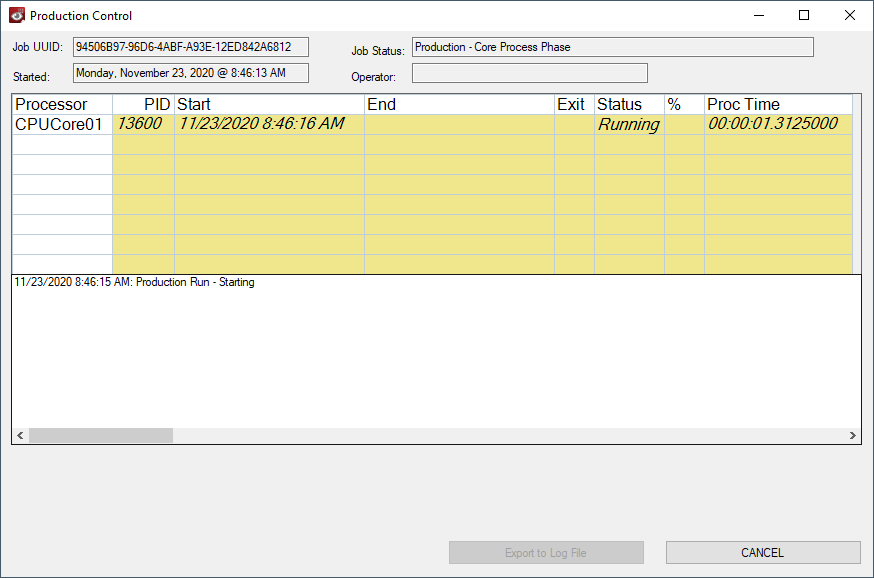
9.The dialog updates to show progress information at the bottom while the production is running. Production Control displays progress as files are converted, distributed to the production volumes and file folders, creation of the CIB and OPT files, and production information written back to the specified fields in Concordance.

10.When the job is complete you can select Export to Log File to save the production job information or click Close to exit the Production Control dialog.