Return to Topic![]()
|
|
Note the following important considerations before you change a field property: •Certain field type conversions may cause a loss of data. For example, changing a text field to date field can cause all invalid date values to be cleared. Similarly, changing a memo field to text will cause truncate fields that have greater than 255 characters. •A unique index cannot be added to an existing field if that field does not contain all unique values. |
|---|
To Manipulate Field Sequence and Visibility
The Field Order section of the Modify Fields dialog box is used to specify the order in which fields will be displayed in the Index display on the main form.
To perform this action |
Do this |
|---|---|
Add a field to the pane. |
•Select Visible for the desired field; the field will be added to the bottom of the list. |
Move a field to a different location. |
•Drag the field from the Field Order pane to the desired location, and then release the mouse button. |
Move multiple fields simultaneously. |
1.Use the CTRL or SHIFT key to select multiple fields. 2.While holding one of these keys, click and drag the fields to the new location and then release the mouse button. The fields will be re-ordered on the Index display after closing the Modify Fields dialog box. |
Hide or show fields. |
Right-click anywhere within the Field Order pane and then select an option: •Hide Selected Fields: Hides any fields selected in the Field Order pane. Use the Ctrl or Shift keys to select multiple fields. •Hide All Fields: Hides all fields that are currently displayed in the Field Order pane. •Show All Fields (User-defined): Leaving currently displayed fields intact, this option displays all user-defined fields in the current LAW case. •Show All Fields: Displays all system and user-defined fields existing in the current case. |
To Deleted a Field
1.In the main application window, on the Index menu, click Modify Fields.
2.Select the field you want from the field list and then click Delete.
The field and all data associated with it are deleted permanently from the database.
|
System fields cannot be deleted. You can tell if a field is a system field if it is displayed in gray in the Modify Fields dialog box. |
|---|
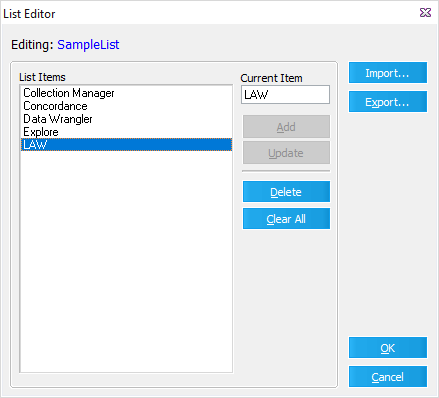
List Fields Items
List Items can only be created for Custom Metadata Fields of the List type. These items become the set of pre-defined text values that can be applied at the document-level to various case records. To create these lists, select the desired field from the Field List pane within the Modify Fields utility, and click on the Edit List button in the Toolbar. This will open the List Editor for the selected field:
|